Make a bitmap to print in a single color
Used in:
- Silkscreen (positive image, right-reading emulsion side up. shoot with emulsion sides touching)
Photo litho (positive image; place right-reading emulsion side up. Shoot emulsion sides touching)
- Platemaker (negative, right-reading emulsion side up; see special instructions at Photopolymer Plate Image Prep (LETTERPRESS))
Double click screenshots to enlarge them.
Table of Contents
1/ Choose your Image
You can either:
- Pick a digital image from your own collection or the internet
- make an image or digital collage in Photoshop
Make sure your image is big enough
- To do this, open your final image (that is fully edited, collaged, etc) in Photoshop.
Press
File > Open
Once your image is open, press
Image > Image Size
- Make sure that your image
- is as big as you want it to be in real life, or bigger (i.e. 8 x 11 inches)
- is at least 140dpi in resolution

2/ Save a copy of your image
Making a bitmap is a destructive process. This means that if you save the changes you make, you won't be able to get back your original
From the top file bar, press
File > Save AS
- Save a new image and name it something like "IMG01_Copy"
3/ Make your image black & white
- From the top file bar, press
Layer > New Adjustment Layer > Black & White
- Set the "Mode" to normal and opacity 100%.

- Set the "Mode" to normal and opacity 100%.
- A box with some color sliders will come up. You can play around with these until your image looks good to you. Essentially, you are choosing how light and how dark Photoshop sees certain colors.
When you are happy with your colors, go to the top file menu and press
Layer > Merge Visible
4/ Make your image grayscale
- This is different than making your image black + white. You are now telling the computer to only see black whites, and greys.
From the top file menu, press
Image > Mode > Grayscale
If it asks to "Discard Layers," press "Flatten"

Printing Silkscreen?
If you are printing Silkscreen and using the AccuRip software in the Silkscreen room, you can skip to step 6.
5/ Make your image a bitmap
About bitmapping and line work
If there are no greys in your image (i.e. pure black and pure white), you do not need to bitmap your image.
There are several ways to make your image a bitmap. Note that the way they appear on your screen is different than how they will appear printed out. Zoom in to see details of the dot pattern.
A: Halftone
Halftone has the classic newspaper/comic book style dots.
To halftone your image:
From the top file menu, press
Image > Mode > bitmap
- Your output can be the same as your original resolution. You can also increase it to 300 pixels/inch to get very round dots. (Note: you can only increase your resolution with HALFTONE and nothing else!)
- For "Method," pick "Halftone Screen"
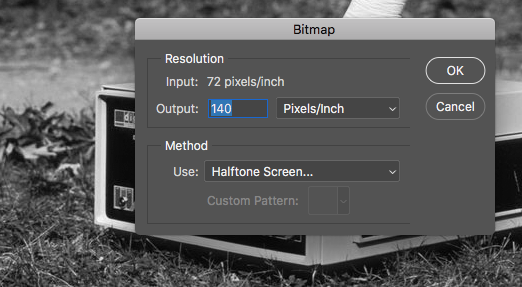
- In the next dialog box, set the frequency yo 32 lines/inch. You can play with the angle and the shape. If you don't like it, just press CMD + Z (CTRL + Z on PC) to undo.

B: Diffusion Dither
Diffusion dither randomly pixelates your image and can often (but not always) give you a clearer, more "true" photo.
From the top file menu, press
Image > Mode > bitmap

- In the box that pops up, keep your resolution the same, or downsize to 75% of your screen mesh count for silkscreen. (I.e. 200 mesh x 0.75 = 150dpi)
- Press OK and you are done.
6/ Save & Upload your image
- Press
File > Save As - Name your file and save as Photoshop (PSD) on the Format menu.
- To print: Ask your teacher where they want you to save your final file. If unsure, save on your USB drive, or to the Short-Term Storage Box Folder.
- Personal Backup: Files will automatically delete from the school computer when you are logged out. If you are on a shared computer, make sure to save a backup for yourself by: emailing to yourself, uploading to a cloud service, putting on a personal USB.
7/ What next?
Depending on what your next step is, the following may be helpful:
- AccuRip
- Epson SC-T3200 (printer in silkscreen)
- Epson 9880 (printer in office)
- Epson 3880 (platemaker/pictorico only)
- UTPrint (if you are printing masters for Riso)