Page History
...
1. In Final Cut Pro export a quicktime reference movie

2. Use >Current Settings and make sure that “Make Movie Self-Contained is unchecked

3. Open Compressor Software
...

5. Select the DVD encoding settings to apply. Go to the Settings Tab>Apple>DVD>DVD:Best Quality 90 minutes. Drag the two files from this folder to the “Batch Window” to apply the encoding settings.

6. Select the MPEG-2 clip to change the properties of the encode in the “Property Inspector”
7. The Inspector window will show the settings for the MPEG 2 that is going to be encoded. If you don’t see the inspector window go to >Window >Show Inspector

8. Set the MPEG 2 encoding settings: Click on the Video Format tab and that should show the native information about the file.
...
9. 
10. Now click on the Quality Tab.

11. Mode should be set to Two pass VBR Best. Change the Average Bit Rate to 6.5 and the Maximum Bit Rate to 7.7. Change Motion Estimation to Best.
...
13. Then click on the GOP tab and change the GOP Structure to IP and the GOP size to 6

14. Choose the Destination for the mpeg2 file to be saved. Right click “Source” in the “Batch Window” and set the Destination to Source (where it defaults) or other and then save it to another folder if needed.

15. Click “Submit” and then “Submit” again at this menu.

16. The file will start to encode to an MPEG 2 that we will use in DVD Studio Pro. To check the status of the encode launch the “Batch Monitor”
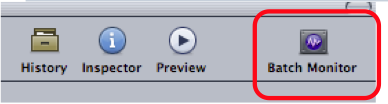
17. Click on “This Computer” to show the processes of the encode
...
19. Go To DVD Studio Pro > Preferences

20. Go to the Encoding tab and change the Aspect Ratio to 16:9 HD OR 4:3 SD for non wide screen DVDs
...
23. Motion Estimation should be set to Best

24. Make a new project
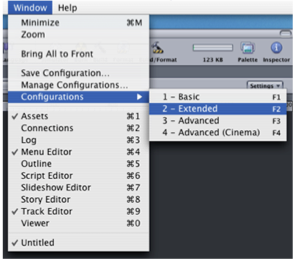
25. Go to Window>Configuration>Extended to change DVD Studio interface
26. Import the MPEG 2 made in Compressor, Quicktime reference file or Quicktime movie into the Assets window

27. Drag the MPEG 2 and the AC3 file or QuickTime from the ASSETS tab to the Track timeline. Audio should match video exactly.

28. Click on the Outline tab (1) next to the Assets tab then click on the UNTITLED_DISC (2)

29. Then click on the Disc Properties Menu then click on First Play>Menu 1 > Track 1 >Chapter1

30. Click on the Outline tab next to the Assets tab then click on the Track 1 or Track 2 or the # of the track necessary to set the aspect ratio. The aspect ratio needs to be set for all the tracks in the DVD project so they play correctly and don’t look stretched out.

31. When “Track” is selected the “Tracks Property Inspector” will open and then change the Display Mode to 4:3 for standard definition source material. Change to 16:9 Letterbox for High Definition source material.
...
36. Click “Choose” to chose the “Current Source” for the DVD

37. Navigate to the location that the DVD VIDEO_TS AND AUDIO_TS folders are stored and click “Choose”

38. Then click “Burn” to start the DVD burning process
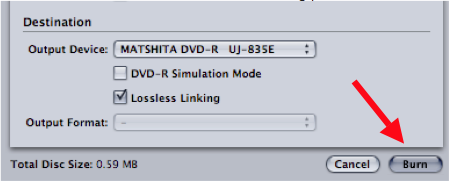
39. Put a blank DVD into the burner to burn the DVD material
...
Overview
Content Tools