Page History
...
Open up the file called “template.psd” this can be downloaded from here: |
|
Change your view to 100% to see a larger image making typing easier. Click on the % entry at the lower left of the photoshop viewer window |
|
Click on the “Horizontal Type Tool and select the layer of text to edit/change. |
|
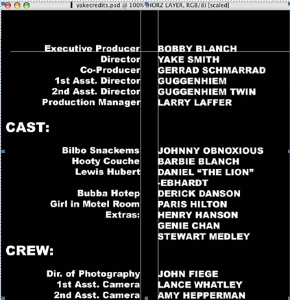
Click on Layer 1 in the “Photoshop Layers Window” to activate the “Left Column” of text in the “template.psd” file. Modify the credits as needed by selecting the text and typing over it. Make sure to keep template structure so alignments of text on the corresponding credits don’t get misaligned |
|
When credits are typed and aligned turn off the reference guides in the “Photoshop Layers Window” by unchecking the “eye” icons of the reference guides. If these guide lines are not turned off they will be visible in the final credits. |
|
Go to the Top Tool Bar and select View Fit On Screen. |
|
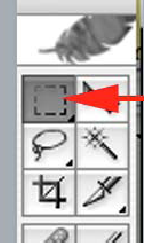
Now you are ready to crop your image to cut away the unused portion of your credits. Use the Marquee Tool in the Tool menu to select all of your text by click and dragging making a frame around the credit text. |
|
Choose >Image >Crop in the Top Tool Bar. |
|
And now for the big save. Choose File Save As in the Top Tool Bar. Change format to TIFF and choose an appropriate place to save your image. |
|
Use these options |
|
Congratulations. Your credits will look something like this. |
|


...
Overview
Content Tools