...
The Avid Trim Tool can be a fairly daunting editing tool to the uninitiated. However, as you learn the tool, you'll find that it is incredibly powerful. If you'd like to watch a Lynda.com video, sign onto your UT Lynda Portal and navigate to this Trimming tutorial.
This document contains the following sections:
Simple Trimming | Staying in Sync | Fixing Sync | Advanced Trim - Slip and Slide |
|---|
Trimming simple, single cuts. This will get you started | Tips to keep you in sync while using the trim tool. | Tips to fix sync problems using the trim tool. | Trimming multiple cuts at the same time -- not for the faint at heart
|
|
|
|---|
Trim mode is used to do fine editing between shots in your sequence.
1. Select which tracks you want to trim by clicking on the track selector(s), making them blue.
2. Place the position indicator (blue line) near the edit point you want to work on. |  Image Modified Image Modified
|
3. Hit the trim mode button. - The purple bars will appear on each side of the edit. (notice they do not appear on V1 in diagram 1 because that track was not selected)
- Your composer window should now look like diagram 3.
- The left window represents the last frame of shot A and the right window represents the first frame of shot B.
|  Image Modified Image Modified
|
4. Choose whether you want to trim the incoming shot (the truck), the outgoing shot (the woman) or both at once (diagram 3). - To trim one side, the truck shot for instance, you would click on the left side of the Composer window. The mouse will turn into a "single-side trim" icon and the double purple bars will become single purple bars in your timeline.
- To trim both sides you would click in the middle of the windows. When you move the mouse to the middle you will notice a double sided trim icon appears.5. Trim the shot by clicking on either the single arrow for trimming one frame or the double arrow for trimming 10 frames (diagram 3)
- Trimming is done in terms of direction not + or -. If you want to add frames to the tail of the truck shot, you would move in the right direction, using the right arrow. If you wanted to add frames the to the head of the woman shot you would move in the left direction and use the left arrow.
- Try adding much more than you need and then cutting it down rather than trying to guess how many frames you need and trying to hit it on the nose (this can wear your eye and sense of rhythm out).
- You can also drag the purple bars on your timeline and do the trim by eye.
|  Image Modified Image Modified
|
6. Preview the trim by hitting the "Play loop" button in the bottom right of diagram 3.
7. Click the trim mode button again to exit trim-mode or click anywhere in the timeline. |
|
|
Staying in SyncWhen you start working with multiple audio tracks, it's very easy to accidentally put audio tracks out of sync. |
|
|
The best way to avoid this is by being vigilant that every time you make a trim that you make it to every Video and audio track.
All tracks that are selected and will be trimmed simultaneously, but were there anything on V2, it would be moved out of sync. - To select a side for trimming, you can also hold down "shift" and click to the left or right of the cut point on your timeline.
|  Image Modified Image Modified
|
Another way to stay in sync easily is by using the "Add edit" tool.
This is especially helpful if you have a long project where there might not be anything on track V2 until the last hour of your program.
1. Put the Blue line at the edit point by "apple-clicking" near it.
2. Select all tracks
3. Click on the "Add-edit" tool, edits will be made on every track selected.4. Click on the trim tool and proceed trimming. All tracks will be trimmed. |  Image Modified Image Modified
|
Another way to help you stay in sync is using the sync-lock function.To use this you must click to the left of the track activating the sync lock.
Synch lock won't work unless you click both an audio and a video track. It needs to lock to something.
You can see that with the sync locks on, A2 went out of sync but Avid will not allow you to put A1 out of sync. |  Image Modified Image Modified
|
Fixing SyncOnce sync is broken, it's not hard to fix. Avid keeps track of the number of frames each clip is out of sync. |
|
|
1. Look at your timeline. Usually, you can visually tell what has happened. In this case, it's clear that the 2nd Audio track has been shifted over to the left.
2. Look for the number of frames the shot is out of sync
3. Select only the track out of sync
4. Click into trim mode.
5. Add the number of frames Avid tells you (158 in this case) You can do this by clicking on the purple box and typing in the frame numbers or by clicking on the purple bar in the timeline and dragging it 158 frames forward. |  Image Modified Image Modified
|
Advanced Trim - Slip and SlideSlip and slide are short cuts to trims you can do in multiple steps using basic trimming.
Slipping and sliding can be helpful when you need to trim while keeping the same total running time. (e.g. commercials, music videos) |
|
|
Slip ModeSlipping involves changing the start frame and end frame of the middle clip (Scene 87 Part 2 - the old man) while keeping the other shots unchanged. |
|
|
1. Enter slip mode by lasso-ing from right to left around the clip you want to slip. Your composer window will show four frames. - To lasso, you must place the mouse outside the timeline and drag.
- If you lasso left to right you will enter segment mode.
- Alternately, you can enter slip mode by clicking the trim mode button and right click, then select SLIP MODE
|  Image Modified Image Modified
|
2. Use the left and right trim arrows in the trim window to make your trim. - The right trim arrow will add frames to the end of the clip while taking away frames from the beginning of the clip.
- The left trim arrow will take away frames from the end of the clip and add frames to the beginning of the clip.
- 1st and Third clip (handsome man, handsome man in flames) are unchanged. Total duration of sequence is unchanged.
|
|
|
3. Preview the trim by pressing the "Play loop" button in the trim window. (The triangle with a line through it, located in the bottom right of the Composer window)
4. Exit trim mode by clicking on the trim mode button. |
|
|
Slip ModeSliding involves changing the position of the surrounding shots. In this example, changing the end frame of Scene 87 part 4 (the handsome man), and changing the start frame of blow up part 2 (the handsome man in flames). The middle shot (the old man) remains unchanged. |
|
|
1. Enter slide mode by clicking the trim mode button and right click, then select SLIDE MODE - The right trim arrow will add frames to the end of the first clip while taking away frames from the beginning of the third clip.
- The left trim arrow will take away frames from the end of the first clip and add frames to the beginning of the third clip.
- Middle clip is unchanged. Total duration of sequence is unchanged.
| 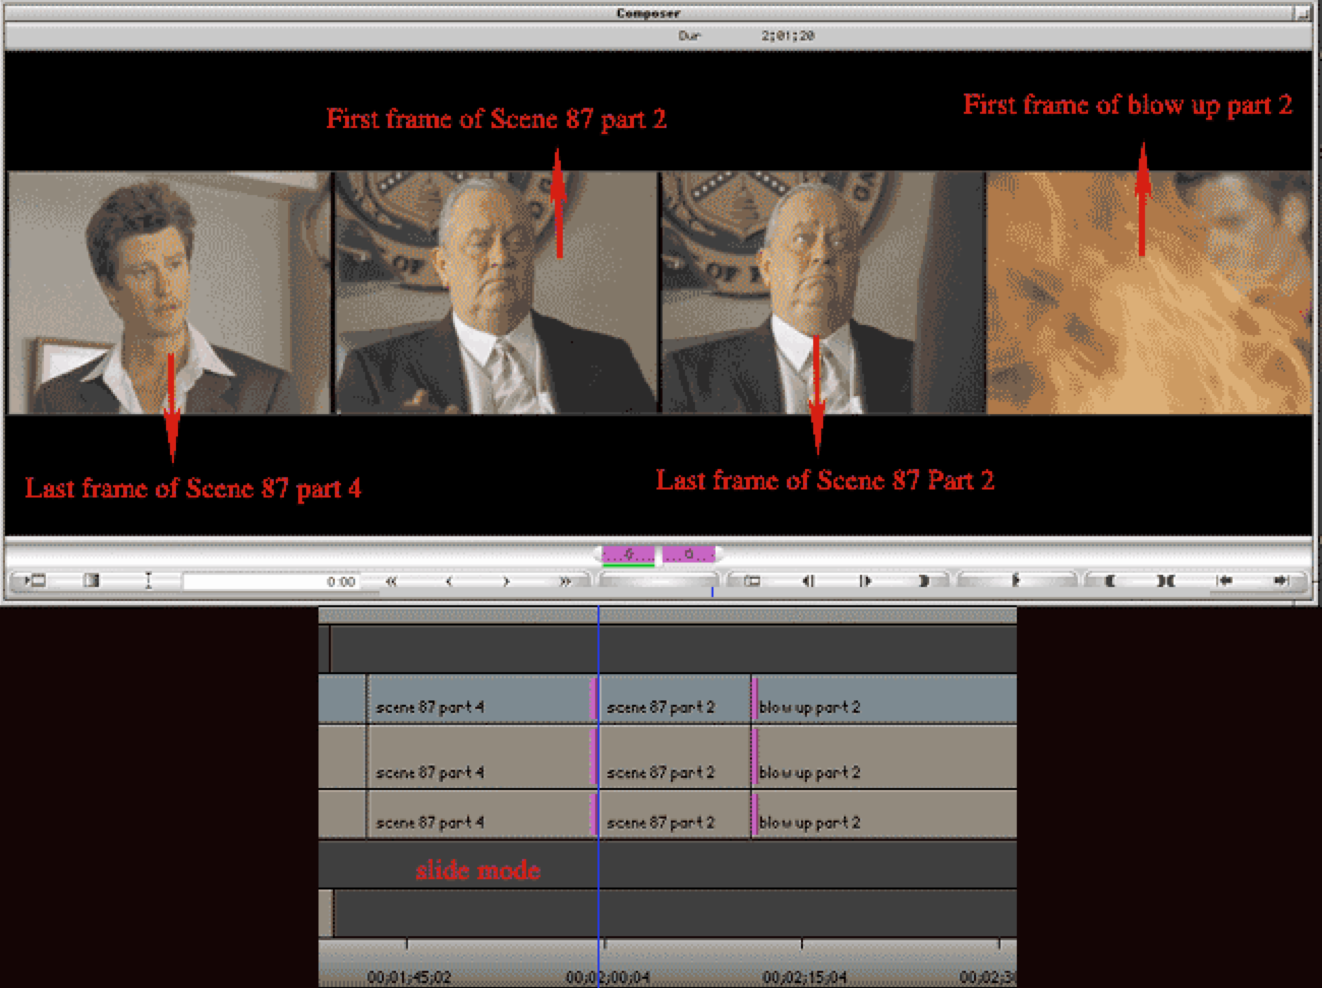 Image Modified Image Modified
|
3. Preview the trim by pressing the "Play loop" button in the trim window. (The triangle with a line through it, located in the bottom right of the Composer window).
4. Exit trim mode by clicking on the trim mode button. |