Versions Compared

Key

  • This line was added.
  • This line was removed.
  • Formatting was changed.
Panel
borderColor#333f48
bgColor#333f48

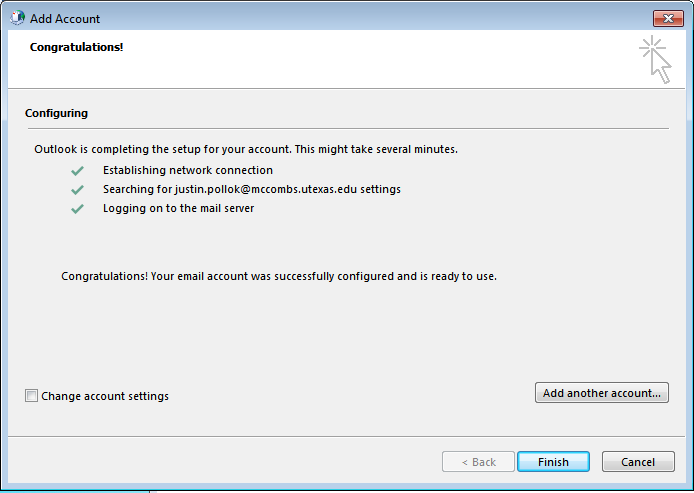
SET UP NEW OUTLOOK PROFILE - WINDOWS 7/10

Panel
borderColor#00a1f1
bgColor#00a1f1
titleColorwhite
borderStylesolid
Center

Panel
borderColor#005f86
bgColor#005f86

SET UP NEW OUTLOOK PROFILE

Warning
Info
iconfalse

Note: If you run into ANY issues with Outlook, Post-Migration: Please (take a deep breath) and re-start your computer, and then try creating a New Profile again.

Note: You may be prompted multiple times to re-enter your credentials (even if select Remember my credentials).

Info
iconfalse

Reminder:

  • You are NOT simply adding a new email account to an existing Profile - This will not work for the Migration.

    You

    MUST create a NEW PROFILE to which your email account (firstname.lastname@mccombs.utexas.edu OR firstname.lastname@mba19.mccombs.utexas.edu) will either be automatically configured or you will have to manually add it.

  • You are NOT simply adding a new email account to an existing Profile - This will not work for the Migration.
Info
iconfalse
Expand
titleBefore You Start
Expand
titleDo NOT Delete Your Old Profile
Info
iconfalse

We adamantly RECOMMEND that you do NOT delete your old Profile.

Expand
titleBe Connected to Campus Network
Info
iconfalse

We recommend this process to be followed while connected to the campus network (wired, wireless, or VPN).

Expand
titleBe Patient
Info

Please note: It may take a few minutes for the client to retrieve your mail from the servers after your account has been set up through the Email Client.

Info
iconfalse
Expand
titleCreate New Profile - Outlook
Info
iconfalse
  1. Exit out of Outlook completely.
  2. Click Windows Start button and type in "Control Panel" in the Search Bar (at the 'magnifying glass icon').
  3. Click on Control Panel in the Start Menu search results to open it.
  4. In the top right corner of the Control Panel window, you will see a search bar ('magnifying glass icon'). Type in "Mail".
  5. When your search results display in the window, click on on Mail (32-bit).
  6. A small 'Mail Setup' window will open. Click on Show Profiles and another 'Mail' window will open.


  7. You should see at least one profile in the list if you already have email setup in Outlook - for most of you the default profile is named 'Outlook'
  8. Click on Add. A small dialogue box will open: Type the letters "EID" (as the new Profile Name). Click OK
  9. Another window will open for adding the e-mail account.
  10. If you are logging into the computer with your EID, your information should auto populate. If it does not, type in your McCombs email address (firstname.lastname@mccombs.utexas.edu OR firstname.lastname@mba19.mccombs.utexas.edu) in the provided blank and nothing else in the other blanks including password.
    • If you are still logging into your computer with your McCombs account, please follow the provided steps in previous email communication regarding EID migration or contact the SWAT Desk at techsupport@mccombs.utexas.edu to schedule a time if you need assistance.
  11. Click Next and it will begin to search for your account. This process could take a few minutes while it's searching for your email settings.
  12. A small log-in window will appear with your McCombs email address pre-filled as the username. Enter your EID password for the password. Select the 'Remember my credentials' check box and the click OK
    • Some people may not see the log-in window and instead the account will setup successfully on its own (the setup tries to use the credentials you logged into the computer with which should be your EID and EID password).
  13. Another dialogue box may open asking to 'Allow this website to configure @mccombs.utexas.edu server settings'. Check 'Don't ask me about this website again' (if it's an option). Click ALLOW.


  14. You should see three green check marks if it successfully configured the account. Click FINISH.


  15. Under 'When starting Microsoft Outlook, use this profile', select 'Always use this profile'. Drop down the menu options and select the EID profile you just created. Click Apply and OK


  16. Open Outlook and it will begin the process to setup the new mailbox. This may take a few minutes.
    • If this process goes over 10 minutes, close the small Outlook launch window (top right X). Reopen Outlook again.


  17. Outlook should fully open and start syncing your mailbox with the Exchange server. This will take some time and can take up to a couple of hours for large, complex mailboxes. 
    • Outlook will need to remain open to continue this sync process. If near the end of the day, keep Outlook open and don't log off, sleep or shut down, just lock your workstation (Windows key + L). If you do close Outlook, it will resume syncing on next launch.
    • If you aren't seeing all of your e-mail, click here and follow the steps to adjust how much email is cached to the computer (instead of Outlook needing network access and to be told to retrieve older email). By default, Cached Exchange Mode is turned on and set to 12 months. If you would like all email cached locally (uses more hard drive space), change the slider to ALL. 
  18. Congratulations! You have configured your new mail account. Please let it fully sync (status at the bottom of Outlook) and make sure your mailbox looks correct. Check calendar and contacts as well. Follow the steps provided on the Wiki for rules and additional mailboxes.
  19. If "All folders are up to date" displays at the bottom of Outlook and you are missing email or other items, please verify your desired Cached Exchange Mode settings in Step 17. Send a test email to yourself to verify send/receive functionality. If you are still having issues, please contact Tech Support or 232-6616 for further assistance.

Expand
titleRe-configure Locally Stored Items
Warning

NOTE: These items are stored locally on your computer. They will be automatically linked to your new Profile, but you will have to set the default for them (ex: If you go to configure your signature - The current one will be there, but the setting of when to use it will require an action on your part)

Info
iconfalse
Warning

NOTE: The following items are stored locally on your computer but require you to import them into your profile. (*Inbox Rules only if they were exported and saved as a file)

.pst files are by default stored in the following location(s) - depending on what version of Outlook you are using:

  • drive:\Users\user\Documents\Outlook Files\archive.pst
  • drive:\Users\user\AppData\Local\Microsoft\Outlook\archive.pst
Info
iconfalse
Expand
titleHow To - Miscellaneous
Info
iconfalse

For configuring most things that you don't see listed on this page.

Expand
titleKnown Issues
Expand
titleRunDLL32 Windows Host Process Error
Info
iconfalse
  1. Exit out of Outlook completely.
  2. Open Microsoft Word (open either a blank document or any word document on your computer)
  3. Go to FIle > Options > Advanced
  4. Scroll down to "display"
  5. Check the box Disable Hardware Graphics Acceleration
  6. Exit Microsoft Word.
  7. Try creating yournew Profile again.

FAQ

SUPPORT

HOME

Panel
borderColorwhite
Section
Column
width100%
Center
Center
Info
iconfalse

ANSWERS TO YOUR QUESTIONS

Center
Round Rectangle
titlebgcolor#ffd600
bgcolor#ffd600
Center

Panel
borderColorwhite
Section
Column
width100%
Center
Center
Info
iconfalse

TECHNICAL SUPPORT

Center
Round Rectangle
titlebgcolor#f8971f
bgcolor#f8971f
Center

Panel
borderColorwhite
Section
Column
width100%
Center
Center
Info
iconfalse

RETURN TO HOME PAGE

Center
Round Rectangle
titlebgcolor#00bf8f
bgcolor#00bf8f
Center

Panel
borderColor#333f48
bgColor#333f48