TeamViewer installation for PC when remotely connecting to a work computer from home.
Step-by-step guide
- Download and Installation
- Download executable available in Texas Undergraduate Studies Canvas Page (for UGS Staff) or download from TeamViewer website.
https://www.teamviewer.com/en-us/
- Start installation executable, click on Run.

- On the next window, make sure that under ‘How do you want to proceed?’ ‘Default Installation’ is enabled. Under ‘How do you want to use TeamViewer?’ select ‘Personal/Non-commercial use’. Click on Accept - finish. TeamViewer will start installing.

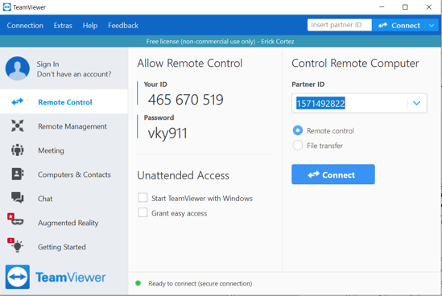
- The TeamViewer client should open automatically.
- Download executable available in Texas Undergraduate Studies Canvas Page (for UGS Staff) or download from TeamViewer website.
FOR WORK COMPUTER ONLY. Change sleep mode settings. (Windows 10)
Info title Note TeamViewer requires the computer that will be accessed remotely to be active. Therefore, it is necessary to deactivate sleep mode on the work computer that will be remotely connected from your personal/home computer.
Go to settings and access the ‘System’ menu.

Inside System, navigate into the “Power and Sleep” settings.

Under ‘Sleep’ make sure that both “On battery power, PC goes to sleep after” and “On battery power, PC goes to sleep after” are set to never.

Close the Settings window.
Related articles
| Content by Label | ||||||||||||||||||
|---|---|---|---|---|---|---|---|---|---|---|---|---|---|---|---|---|---|---|
|
...