Page History
In these few shorts steps you will be able to edit clips from a Quicktime movie and save them as a separate files.
NOTE: This process requires the upgrade to the Pro version ($30) of the Quicktime Player. College Mac labs are outfitted with QT Pro but individuals can also purchase the upgrade here -----> http://www.apple.com/quicktime/extending/
Launch Quicktime Pro.Click File/Open File...Navigate to the file you want to edit | |
Set your IN and OUT pointsUse the Keyboard shortcuts to set the IN and OUT points. | |


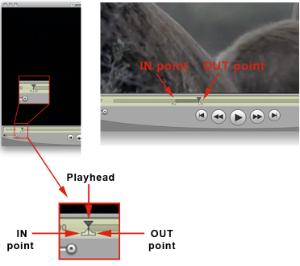
Frame by Frame accurate editingYou can move the playhead frame by frame to get a very accurate | |
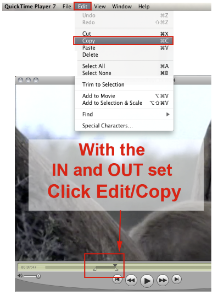
Copy the clip SectionNow that you have your IN and OUT points set you need to copy the new clip section | |
Open a new Quicktime PlayerClick File/New player - this will open a new untitled Quicktime player | |
Paste the clip sectionClick Edit/Paste - this will paste the new clip section into the new player. | |
New clipNow the new clip appears in the new "untitled" player | |
Export your clipClick File/Export for Web | |


This will export the movie clip along with instructions and HTML code to embed this video into a webpage if you choose to do so. The movie
clip will be labeled with the extension of .m4v. You can now upload this .m4v file to Blackboard, Webspace, your own web server, or play it from a computer.
Note: If the you have problems with the .m4v file you can rename the file using the .mp4 extension. The .mp4 is extension more web compatible.
Download this tutorial in a PDF
Overview
Content Tools