Page History
Make sure the Thunderbolt cable is plugged into the Blackmagic Design Intensity Pro as shown here. |
| ||||||
Check that the Thunderbolt cable
|
| ||||||
Go to the |
| ||||||
Go to the Blackmagic Design setting |
| ||||||
Click on Blackmagic Design Intensity Extreme settings button |
| ||||||
Set the following settings in this frame grab |
| ||||||
Open ProTools by clicking on the Applications folder and choosing Pro Tools |   | ||||||
Create a blank session, name it and pick a place to save it Choose Type - Session (local)
Choose a .wav file type Sample rate 48 Bit Depth 24 I/O last used
Click on Location to navigate to where you want to save the project |
| ||||||
Save to tempstorage or your storage drive
Choose Open |
| ||||||
| Then choose Create |  | ||||||
Choose the menu labeled: Track>New... or press Command Shift N |
| ||||||
Create: 1 new: Mono, Audio Track in: Samples |
| ||||||
Click on the "Edit Window View Selector" dropdown in the Edit window. If you're in the mix window, press Command = to toggle to the Edit window. |  | ||||||
Choose I/O |
| ||||||
| I/O will now have a check mark next to it. |  | ||||||
| You can now see the I/O column on your track in the Edit Window. | 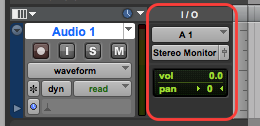 | ||||||
| Click and hold the input drop down. |  | ||||||
| Choose A1 from the input drop down. |  | ||||||
| Click and hold the output drop down. |  | ||||||
Choose Stereo Monitor (Stereo) --> Stereo Monitor. This allows you to hear that track's output through this system's speakers. If you opened a previous session and need to hear other tracks playback through this system, then make sure their outputs are set like this as well. |
| ||||||
| Your I/O section should look like this. | | ||||||
Use these buttons to select a source to listen to: If you want to hear ProTools, then the button labeled ProTools needs to be pushed in and the red light illuminated. If you want to hear Avid, then the button labeled Avid needs to be pushed in and illuminated. You can leave them both pressed and illuminated. |  | ||||||
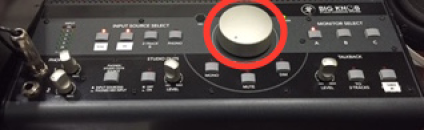
Use this knob for Control Room Speaker Volume. Adjusting this knob will not affect the record level in Pro Tools. This knob only adjusts how loud the playback in the control room is. |
| ||||||
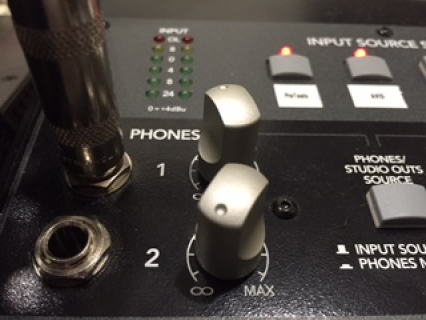
Use the top knob (Phones 1) to control the sound booth headphones volume. |
| ||||||
If the booth is not receiving audio then this button may be in the wrong position. Make sure it is in the "INPUT SOURCE(S)" position or UP. |  | ||||||
Push this button to select either CR (Control Room) or push again to toggle to HP. |
| ||||||
Next, Import the video into the project |
| ||||||
Navigate to the video file that you want to view in the ProTools session |
| ||||||
Choose to import at Session Start
You do not have to choose "Import audio from file" |
| ||||||
Connect Mic and Headset in the Sound Booth for Audio talent |
| ||||||
To eliminate headphone latency while recording, you can turn on from the Options menu |
| ||||||
| The track you want to record to should be "record enabled" | 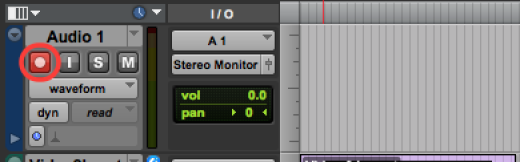 | ||||||
If levels are going into red then turn down P1 on HD OMNI hardware. If levels are low in just the green, turn up P1 on the HD OMNI hardware. (see animated GIFs below) Push the knob like a button to select between adjusting P1 or P2. |  | ||||||
| Once "record enabled," you should be able to see levels coming into ProTools on the input meter. |  | ||||||
| If your input meter looks like this, you need to turn up the microphone pre amplifier P1 on the HD OMNI hardware. |  | ||||||
| If your input meter looks like this, you need to turn down the microphone pre amplifier P1 on the HD OMNI hardware. |   | ||||||
This is just right (Goldilocks).
|  | ||||||
Click and drag to select a portion you want to record. Click REC then click PLAY to start recording. |  | ||||||
Push and hold this button to talk back to talent in booth |
| ||||||
This is where the talkback Mic is located |
| ||||||
If you did not start your project on your external drive, then you will need to SAVE it to your drive when you're finished with your session. To consolidate your files when you are finished recording you need to save them on to your hard drive. Go to >File>Save Session Copy In |  | ||||||
| The next menu will come up and choose the "Session Format" allowing you to choose the current version running or a previous version of the software. Make sure that "Copy Audio Files & Session Plug-In Settings Folder" and "Copy Root Plug-In Settings Folder" boxes are checked. Notice what is not checked and leave them unchecked. |  | ||||||
| Choose where you want to save the session copy and audio files Also title the new session file in the "Save As" box |  |


Overview
Content Tools