Page History
How to use the Mixtool and Keyframes in Avid
by Steve Collins
Originally Published Fri, May 23, 2003 Modified Thu, May 29, 2003
| Anchor | ||||
|---|---|---|---|---|
|
| Anchor | ||||
|---|---|---|---|---|
|
The Audio Mix tool can be used to do volume adjustments of shots in your sequence. If you need to do detailed volume changes within shots, you should use audio keyframing.
1. To open the audio mix tool.
Avid Menu >Tools > Audio Mix
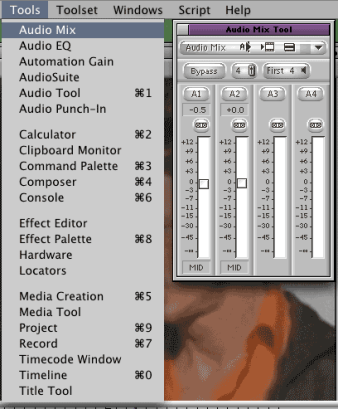
2. Select shot to be adjusted by placing the position indicator (blue line) in the shot.
3. Only monitored tracks appear in the Audio Mix tool. If a track does not appear, check the sequence to make sure the track is monitored

4. Move the volume slider for the track you want to adjust (e.g. A2 for 2nd audio track)
- to adjust multiple tracks simultaneously, you can "gang" them together by selecting the gang buttons The "ganged" sliders will move as one.
- You can also change volume by typing a number into the text box above the gang buttons.

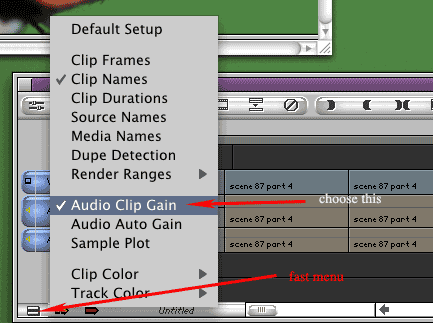
5. To be able to see the volume change on the timeline, you have to choose "Audio Clip Gain" from the fast menu in the timeline.
| Anchor | ||||
|---|---|---|---|---|
|
- You can make a volume change to the whole track, by choosing set Level On Track Global from the fast menu (see third diagram) Make sure that the track is selected in the Audio Mix tool.
- You can make a volume change to part of the sequence by putting an in-point and an out-point around the section you want to change and then choosing "Set Level In-Out" from the fast menu (this will only appear in the fast menu, if you have an in and out on your sequence)

| Anchor | ||||
|---|---|---|---|---|
|
Audio Keyframing (also called volume rubberbanding) is used to do precise volume changes within a shot in your sequence. For example, lowering the volume of a door slam in the middle of the track.
1. Choose "Audio Auto Gain" from the fast menu beneath your timeline.

2. (optional) Enlarge your Audio track by putting the mouse between the track selectors and dragging the size larger.
3. Put the position indicator (blue line) on the area you want to change.
4. Hit the "n" key on the key board. (Or Choose the pink triangle icon from the fast menu in your composer window.) You will see a black triangle appear on your time line. Make sure to select the tracks you want a key frame on, using the blue track selectors.
5. By moving at least a frame away from that triangle and hitting the "n" key again, you can have one key frame as an anchor and then another key frame to change the volume with.
6. Place the mouse on your second keyframe and drag up or down. The volume slopes in a straight line from one key frame to the next. (make sure to be out of segment mode when selecting the keyframes)
- To move key frames left to right, hold down Option before you click on the key frame and drag left or right.
- To delete a keyframe, click on the keyframe and hit delete.


Send Comments, Suggestions, or Changes to David Cox
Overview
Content Tools