Page History
...
Step 1 - Create an Account / Login
Sign up for an Account or log in here - https://utexas.box.com/login |
|


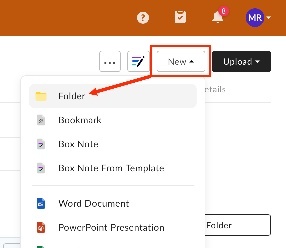
Step 2 - Create a folder
To create a folder, |
click |
|
|

|
like to share the contents of the directory with, or
simply select Keep private for now.
Click ```Okay```.
Enter the |
Folder name and click Create. |
|

|

| Info | ||
|---|---|---|
| ||
Folders are not required to upload files and the drag/drop feature is available in your home Box folder, just like with any directory However, sharing large projects is much simpler via Directory sharing than sharing individual files. |
Step 3 - Upload a file
To upload a file |

click the Upload button and choose File. You can also upload a folder. |
|
| You can also drag and drop files to upload. |
|


Step 4 - Share the file
Once the file upload has completed |
Click on the Share link to both enable sharing and generate a UTBox specific link to access the folder.

From this window you are offered two options:
Shared Link:
Simply copy and paste the link into your email, messenger app, etc. to offer other UTBox Users access to your file.
When finished, simply click the ![]() at the top-right of the window. Do not click
at the top-right of the window. Do not click ![]() unless also sending an email using the next option.
unless also sending an email using the next option.
Email Shared Link
From the second option, you can enter names or email addresses to those who you want to share the file with.
Clicking on the box to add email addresses also creates a little area for personalized messages, so recipients of the email know why they are being invited.
Note - The dropdown menu gives Users the options to share file contents with everyone who has the link, only those Users with active EID's at the University of Texas or only for Users who already have access to the directory the file has been uploaded to.
highlight the file you want to share and click the share button. |
|
Box will auto-generate a link that can be shared. You can click the COPY button to copy the link so it can be pasted on a website or in an email. You can even email the link directly from Box by clicking on the email icon. For custom link settings continue to the step below |
|
| To set custom link settings click on the LINK SETTINGS button |
|
In the Shared Link Settings window you can do the following: • Set the link to expire • Require a password to access the file • Create a custom link • Allow the file to be downloaded To create a custom link check the box next to Publish content broadly with a custom non-private URL Enter a custom link. The link can not contain any special characters. Only a dash ( - ) is allowed between the words in the link. See this example: this-is-my-custom-link Click Save, then the Copy button to copy the link so it can be pasted on a website or in an email. |
|


To learn more about Box watch the video below
...
Overview
Content Tools