| Right Click on your sequence and choose select it for exporting a self contained quicktime |
|
| Right Click and choose Export Media |
|
Choose Match Sequence Settings Choose Entire Sequence Choose where to save the file and choose Export |
|
On The Export Settings choose >Match Sequence Settings >Click on the Output Name |
|
| Choose the destination for the file Save it to your storage drive etc. . . |
|
Click on Export When that is finished you are going to re import that file back into Premiere |
|
| Import the file you just exported back into your project |
|
| Import the 4K or 2K .mov you just exported |
|
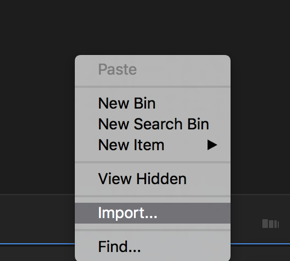
Import the 5.1 Interleaved File into your Premiere Project |
|
Select the file and import |
|
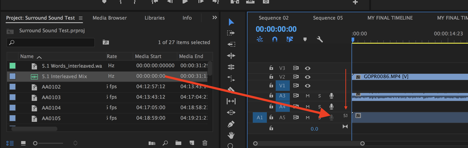
Next need to check the sync in your final timeline. |
|
Load the copy of the timeline by double clicking it to load in the program monitor |
|
Test your surround interleaved mix with the timeline you just loaded by dragging it into your picture locked timeline and check for sync. |
|
| Solo the track with the small 5.1 on it that is your mix. Adjust by slipping the mix in the timeline if needed. You should not have to do anything if you didn't change your timeline after you exported for the mix. If you did have to slip it to get it in sync note that number of frames you slipped the mix. Once the mix is in sync with the video go on to the next step. |
|
Click on the New Item and choose Sequence |
|
Choose Sequence |
|
Choose HD 1080 DNX HQ 1080 23.976 DON'T HIT OK YET!! |
|


CLICK ON THE TRACKS TAB NEXT Click on the Tracks Tab and then delete the audio tracks Put a check box on the tracks 2-4 Click on the "-" minus button to delete the tracks This will leave just one audio track |
|
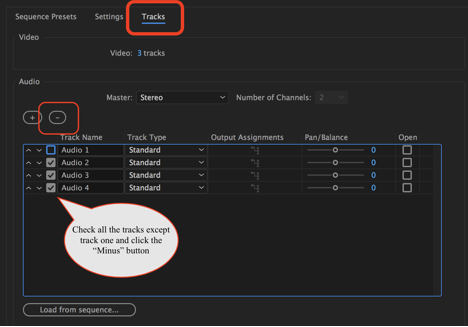
DONT' HIT OKAY YET
Set Video to 1 track |
|
Change the Track Type of the one audio track left to 5.1 |
|
Title the sequence and click OK |
|
Drag the imported 5.1 Sound file to the timeline so the beginning is at the beginning of the timeline |
|
Make a video only edit on to your timeline on top of the 5.1 audio and make sure they line up |
|
| Export the QuickTime |
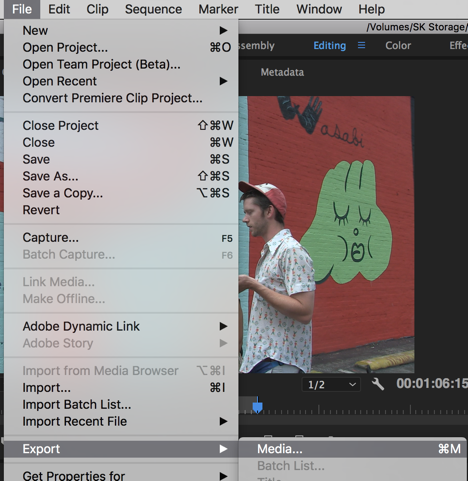
Click on the Sequence to export and choose >File>Export>Media or click "Command M" |
|
Choose the following: Format – QuickTime Click on Output Name and choose a destination for the exported file Choose to export Video and Audio Click on the Video Tab and choose – Apple ProRes 422 as the Video Codec On Windows systems chose the AVID DNxHD codec 175 23.98 Basic Video Settings choose 1920 x 1080 Frame Rate - 23.976 Field Order – Progressive Aspect – Square Pixels |


DONT' CLICK EXPORT YET
| |
Click on Audio tab and choose |
|
Sample Rate 48 |
|
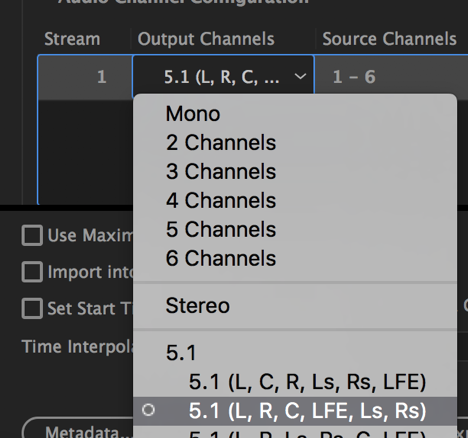
| Audio Channel Configuration |
Choose Export |
|
You may find other ways to do this on the internet. Ways that may seem legit, from legit organizations, like this one: |


Overview
Content Tools