While the Dymo Rhino 6000 and the 3M PL300 label printers are technically the same product featuring different logos, the quality of the tech support on their respective websites varies wildly. Below are some tips on working with these printers while connected to a Windows computer.
Installing Software for Rhino6000 and 3m PL300 Label Printers
- Download Rhino Connect software and Windows printer drivers for your particular version of Windows. As of 11/2015, these installers were available at this URL: http://www.dymo.com/en-US/dymo-user-guides
- Note that it is recommended (but not required) that you connect the printer to a power supply when used via USB.
- If you are using a Rhino-branded printer, everything should install as expected. It is recommended that you install the printer driver prior to connecting the USB cable to the printer.
If, however, you are using a 3m PL300 printer, you will not have much luck finding software downloads for the printer. Additionally, if you simply connect the printer, Windows will see the device but not be able to find an appropriate driver. You can, however, force Windows to use the driver for the Rhino printer instead. Remember, these are the same printers, just branded differently and reporting as different products to Windows. Here are the steps to install a Rhino6000 driver with a 3m PL300 printer:
Download the driver for the Rhino 6000 printer. Run the installer. Once the installer has completed, you will be instructed to connect the printer using the USB cable.
Connect the 3m Pl300 printer to your computer using a USB cable. Windows will prompt you that the correct driver cannot be found. Disregard this notice.
Click Start > Devices & Printers and note that a new device "3M PL300" is listed under unspecified devices.
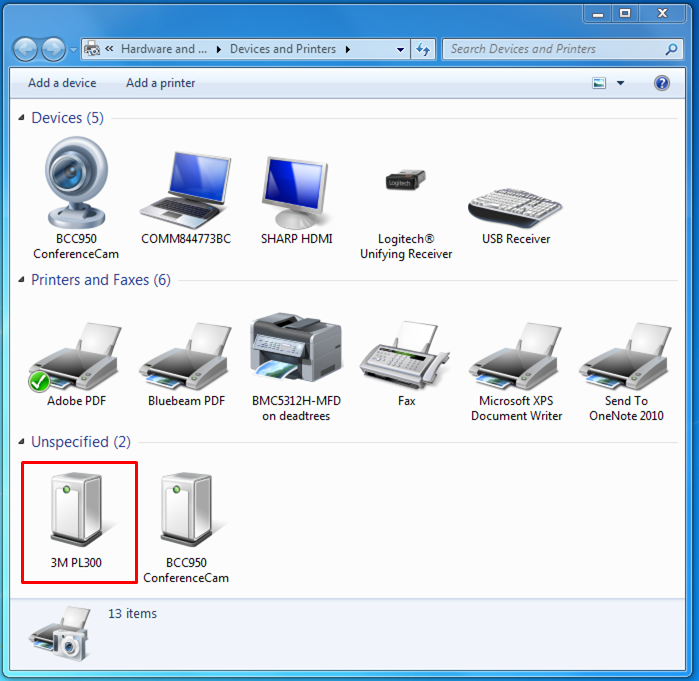
Right-click on this device and choose properties.

Click on the Hardware tab, make sure Dymo3M PL300 "Other device" is selected and click properties.

Click "Change settings" and authenticate with admin credentials

Select the driver tab and click "update driver"

Click "Browse my computer for driver software"

Select "let me pick from a list of device drivers on my computer" and click Next

Select ?Printers and then click Next
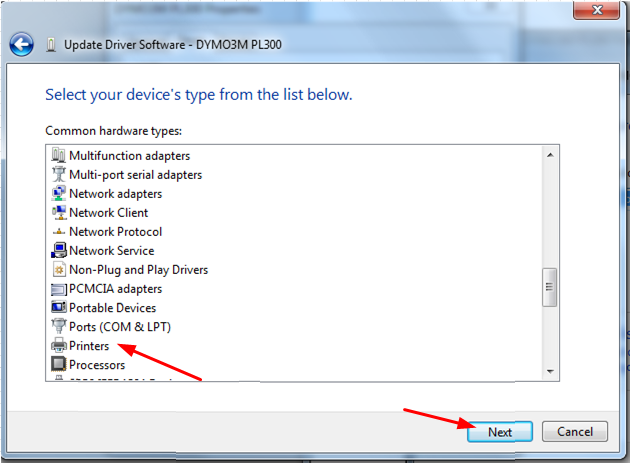
Select Manufacturer "Rhino" and model "Rhino 6000" and click next.

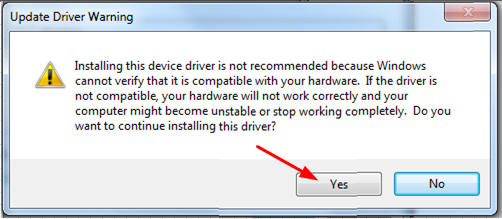
Windows will warn you that this may not be the correct driver. Click Yes to continue installing the driver.
Once installed, you will see a new printer on your computer named "Rhino 6000". Remember that a Rhino 6000 and a 3M PL600 are the same thing.

Install the Rhino connect software and print away!
Creating multi-line cable wrap labels using Rhino-Connect software with a 3M PL300 or Rhino 6000 Cable Labler
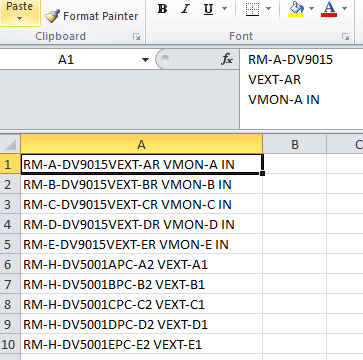
Using Rhino-Connect software to make cable labels is great if you have only 1 column of data. However, we often label our cables with multiple lines of text which we type into 2 or 3 columns. By default, when you import data from an external data source (such as an Excel list of cables), the Rhino-Connect software maps each and every cell and line to a new cable label. This means that a single cable label which should have 3 lines of text ends up printing as 3 separate cable labels.
Here's an example of our source data. We want each line of the Excel sheet to be a cable label... like this: |
|
When you import multi-column external data into Rhino-Connect, the software maps each and every cell to a new label. Certainly not what we want! |
|
The solution to this is to combine your 3 cells in excel into 1 cell which includes a carriage return symbol (which starts a new line within a label). |
|
Fill this formula down the entire column to populate all the rows (highlight the cells in D and then press CTRL-D). |
|
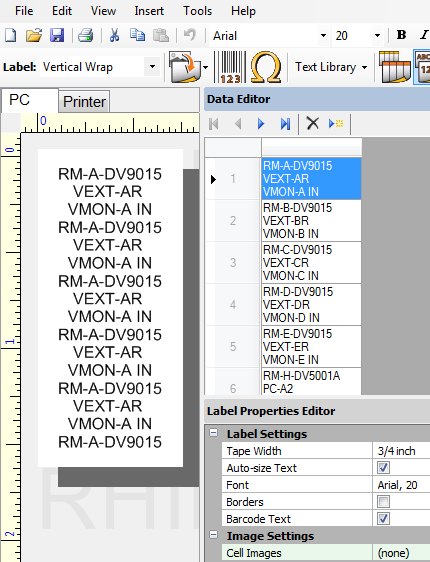
Remember that you must close the file in Excel before you import it into Rhino Connect. When you import the file, you will have perfectly formatted multi-line cable wrap labels. |
|


Rhino Label Part Numbers
Old Rhino 6000/5200 Labelers
Rhino Vinyl Label 1” – White Tape, Black Text - 1805430
Rhino Vinyl Label ¾”– White Tape, Black Text - 18445
Rhino Vinyl Label ½”– White Tape, Black Text - 18444
Rhino Vinyl Label 3/8” – White Tape, Black Text - 18443
Rhino Vinyl Label 1” – Black Tape, White Text - 1805432
Rhino Vinyl Label ¾”– Black Tape, White Text - 1805436
Rhino Vinyl Label ½”– Black Tape, White Text - 1805435
Rhino Vinyl Label 3/8” – Black Tape, White Text - 1805437
New Dymo XTL Labelers
Dymo XTL All-Purpose Vinyl Label 2” – White Tape, Black Text - 1868755
Dymo XTL All-Purpose Vinyl Label 1” – White Tape, Black Text - 1868753
Dymo XTL All-Purpose Vinyl Label ¾”– White Tape, Black Text - 1868752
Dymo XTL All-Purpose Vinyl Label ½”– White Tape, Black Text - 1868751
Dymo XTL All-Purpose Vinyl Label 2” – Black Tape, White Text - 1868800
Dymo XTL All-Purpose Vinyl Label 1” – Black Tape, White Text - 1868798
Dymo XTL All-Purpose Vinyl Label ¾”– Black Tape, White Text - 1868797
Dymo XTL All-Purpose Vinyl Label ½”– Black Tape, White Text - 1868796
Reviewed 11/1/18 - Cox
Overview
Content Tools