You will need the Dell Laptop with the Calman Software installed and the Klien Colorimeter and the Murido signal generator | This is stored in a case in the back of the helpdesk in CMA 3.104 |
Turn on Monitor so it warms up |
|
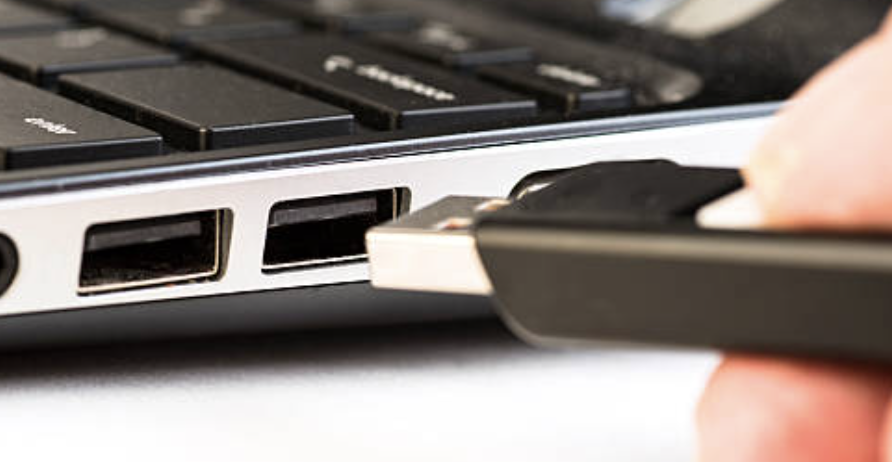
Connect Murideo signal generator via USB to laptop. Make sure the Murideo drivers are installed |
|
Plug in the HDMI out of the Murideo Signal Generator output to the TV you want to calibrate MAKE SURE IN USE HDMI 1 WHERE THE BLACKMAGIC I/O IS PLUGGEDSet the LG TV HDMI input to the input from the Murideo HDMI INPUT 1 |
|
| Press the red ON button on the Murideo |
|
| Now you should see the images from the Murideo on the TV |
|
Murideo Signal Generator connected via USB - Use USB to Serial Port 4 on Laptop for the Murido Signal Generator |
|
| Murideo set Color Space to YC4444 - 16-235 |  |
| Set the Timing Resolution to 3840 x 2160 59.94 |
|
| On the Klien Camera remove the lens cap |
|
and put on the Lens Hood on the Klien camera |
|
Put the Klien on a tripod |
|
| Another example of the camera pressed up against the monitor |
|
| Connect the Klein Colorimeter via USB into the computer |
|
Log into laptop | with UN comm - xxxxx and password |
Open Calman software on the laptop using the desktop shortcut
|
|
Enter in the details and click Start Session (Sony TriMaster ex:) Display Model is PVMX-550 Choose Start Session |
|
Hit Next Here |
|
Hardware should auto connect as shown here Klein Meter |
|
| Murideo Generator |
|
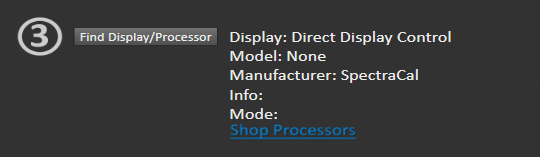
Direct Display Control SpectraCal |
|
Meter Positioning should be good so Click Next |
|
| On the LG Remote click the Gear Icon and then use the down arrow to get to General Settings |
|
| Choose OLED Care |
|
| Choose Device Self Care |
|
| Choose Energy Saving |
|
Turn Energy Saver OFF This will brighten up the screen quite a bit |
|
LG Remote click the Gear Icon and then use the down arrow to get to Picture Settings Set the TV to Picture Mode isf Expert (Dark Room) |  |
| Turn off the lights in the room put in the CC environment Also put something on the computer monitor "Resolve" |
|
| Skip the Pre-Calibration Settings Click Next |
|
Do the Pre - Calibration View and Read Series to get an idea how the Monitor Looks Click on Goal Posts to start the Pre - Calibration View ISF Dark is pretty close Click Next |
|
Mode Settings put the LG in BT.1886On the LG Remote LG Remote > Gear Icon > All Settings > Advanced Settings >Brightness>Gamma > Leave at BT.1886 |
|
In Gamma BT.1886 it is the closest to the Gamma Target Line Press Read Series or "Goal Post" Then Press Next | PICTURE here |
White Point and Color Space |
|
| LG Remote > Star > All Settings > Advanced Settings > Color > White Balance |
|
To set the White Point Select the White selector block |
|
Then Click on the "Infinity button" and while it is running toggle through all the color temp settings that the TV has |  |
Press and hold the Color Temp slider but Warm 50 is the best = default the dot is right in the white box |  |
Now we need to set the right Color Space |
|
LG Remote > Star > All Settings > Advanced Settings > Color . Color Gamut and leave it at Auto |
|
Clarity All off and TruMotion is off Real Cinema Off |
|
LG Remote > Star > All Settings > Advanced Settings > Brightness > Auto Dynamic is off and >Peak brightness off and >Video Range Not Auto - Do limited >Motion Eye Care Off | FG here |
LG Remote > Star > All Settings > Advanced Settings > Color > Color Gamut = Auto Fine Tune Color Adjustment make sure it is also off | FG Here |
LG Remote > Star > All Settings > Advanced Settings > Clarity > All off | FG Here |
| Once Everything is off click Next |
|
Adjust LuminanceClick on Read Continuous lower left corner |  |
LG Remote > Star > All Settings > Advanced Settings > Brightness and adjust the Contrast setting | 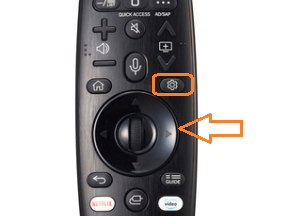 |
Here are the specs 40 to 50 for a Dim Room our suites
|
|
Note 4.112 Suite K contrast is set to 100 for a Dim Room Had a Peak White Luminance set to 43.2 fl | FG Here |
| Click Next |
|
Next click on the Dynamic Range Click on Brightness button and set so that the |
|
This is the result of the Read |
|
Not Bad but can adjust Press Brightness button |
|
Press Black Level not Brightness set black level to 58LG Remote > Star > All Settings > Advanced Settings > Brightness > Black Level You want to barely see 16 and 17 but should not see any squares below 16 those should be invisible. We set Black Level to 58-60 on the LG Monitors |
|
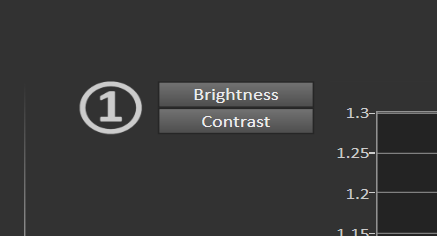
| Press Contrast Menu in Calman Software - |
|
to put up the White Pludge you want to see up to 254 and don't want to see any pink tones or noise? LG Remote > Star > All Settings > Advanced Settings > Brightness > Use Adjust Contrast on the LG to adjust this 82 seemed the best |
|
| Once Brightness and Contrast are set Click Next |
|
Gamma Settings controlLG Remote > Star > All Settings > Advanced Settings > Color > Color Gamut = Auto Auto looks the best so just leave on Auto |
|
| Click Next |
|
| Color Decoder - Skip this Step the LG's and Sonys don't have this |
|
| Click on Next |
|
| Resolution/Bit-Accuracy |
|
| You can click on the test patterns here |
|
Pull up ISF Geometry to check for OverScan Check for the white lines at the edges to make sure you are seeing everything - Not a crucial step so it's Optional LG Remote > Star > All Settings > Advanced Settings >. Aspect Ratio 16:9 Turn on JUST SCAN |
|
| Click Next! | |
Greyscale Two Point Adjust | |
Select 80 Percent WhiteClick on the 80 percent button |  |
| Click on the Continuous read button |
|
You will go to your White Balance settings to find your RGB Gain and Bias LG Remote > Star > All Settings > Advanced Settings > Color >White Balance RGB balance RED = +2 Blue = -3 You want to adjust the Red Green and Blue controls until you get all 3 RGB colors to match exactly this is close but not exact This is what we ended up with |
|
| Then we clicked on 30 % |
|
Click on the Continuous read button |
|
Repeat the same process for the 30 percent chip LG Remote > Star > All Settings > Advanced Settings > Color >White Balance RGB balance RED = +2 Blue = -3 You want to adjust the Red Green and Blue controls until you get all 3 RGB colors to match exactly this is close but not exact This is what we ended up with Toggle back and forth with the 80 and 30 toggle till you get the Bias's and Gains to be absolutely flat Picture here |
|
| Finally after you are finished do a Goal Post "Read Series" to get the final reading to make sure all's good. |
|
| Final reading delta E should be below 1 | FG or two point here |
| click Next |
|
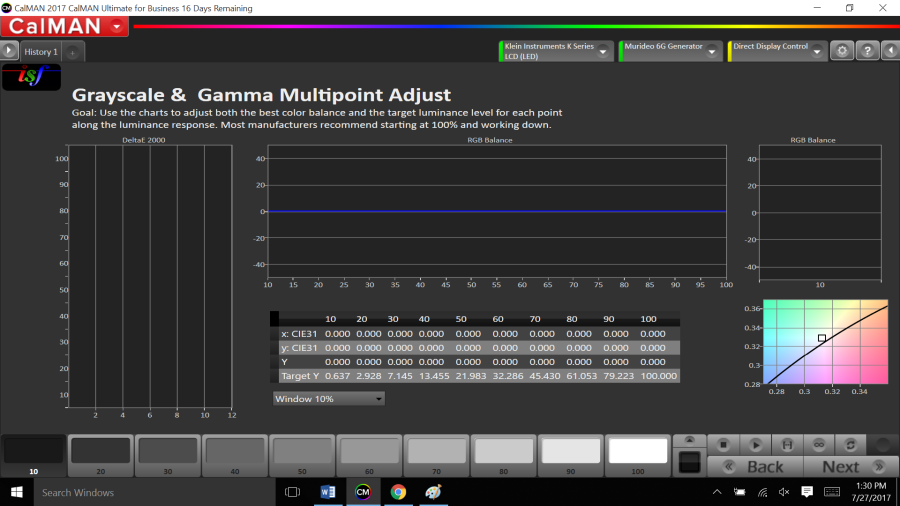
Grayscale and Gamma Multipoint Adjust |
|
LG Remote > Star > All Settings > Advanced Settings > Color > White Balance > Method > Change to 10 Points |
|
| Click on Read Series "Goal Post" |
|
LG Remote > Star > All Settings > Advanced Settings > Color > White Balance > Signal Level % and this is where we'll change the signal level of the TV from 10 to 100 percent to match the chip on the calman software Go through and set RGB levels on each signal level to get the flat line on the RGB Balance Charts This is what it should look like after you set all the levels 10-100 Make Sure you Leave the LG at 100 Percent Level |
|
| Then click Next |
|
| Color Management System CMS Adjust |
|
| Click the Goal Post to get a read and see where the balls fall in the boxes |
|
LG Remote > Star > All Settings > Advanced Settings > Color > Fine Tuning and choose Select Color RED To Adjust the RED press the RED Chip Put on Continuous Read on the Calman Adjust Saturation and Tint till you get RED in the box |
|
| If you click on the color of the box as we have clicked on Green then you will get the close up of the offset of the color green dot is out of the box. |
|
| Then click Next once you have all the colors in the boxes |
|
Here we'll do the same workflow setting the video levels to 20 to 100 percent Then adjust the fine tuning saturation till the boxes line up as well as possible Selecting every color |
|
| Click the Goal Post to get a read and see where the balls fall in the boxes |
|
|


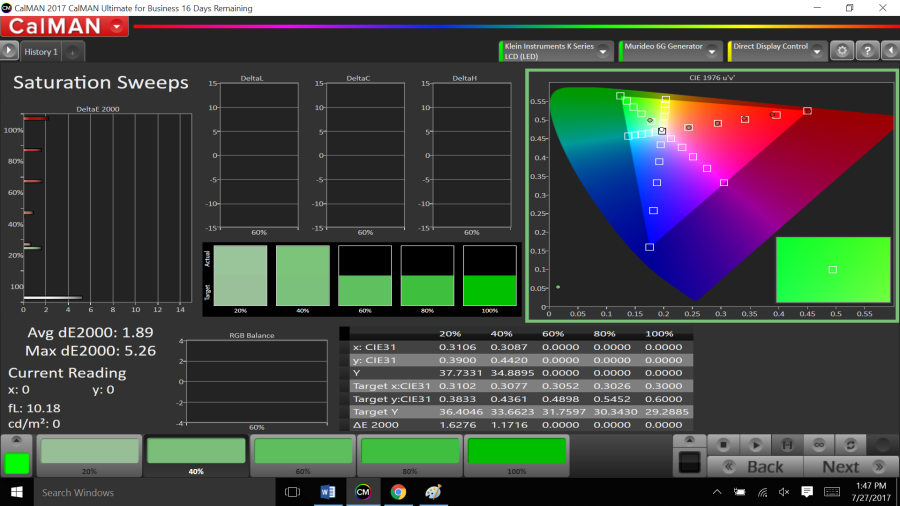

This shows on the scale how far we are off
Saturation Sweeps to show where the saturation falls
Pick a color in the lower left corner to choose white.

Re check the White Levels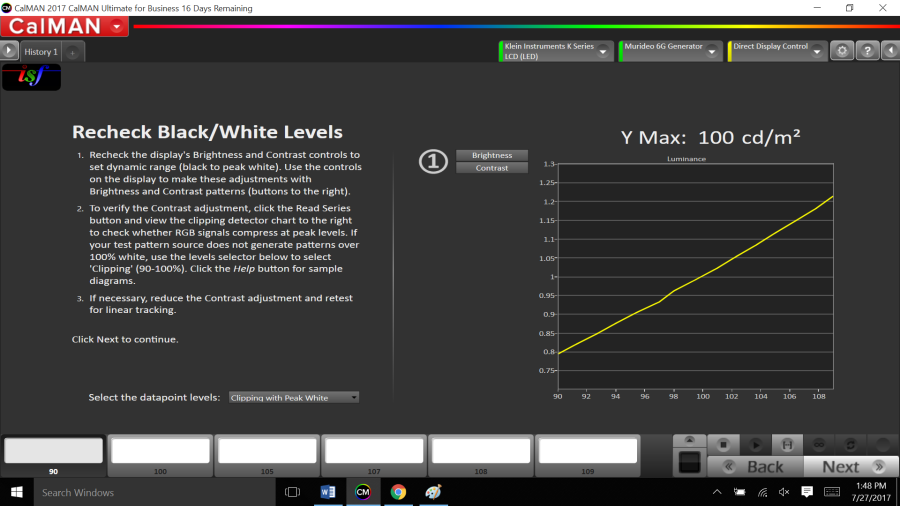
You will get the Black Pluge Slide back up and the White Pluge slide back up set these again and set these by eye
Should
Press Brightness and will get the controls to adjust for the Black PLUGE test pattern – You want to barely see 16 and 17 but should not see any squares below 16 those should be invisible
Press Contrast button to put up the White Pludge you want to see up to 254 and don't want to see any pink tones or noise? 
Now go to the Sony OLED and lets compare
Go to ETOF and set it to 2.4
ColorChecker Analysis
.4 not visible .6 is visable then you should try to fix it.
Overview
Content Tools