RESTART THE COMPUTER BEFORE YOU START THIS WORKFLOW - IF YOU DON'T THE AUDIO WILL
APPEAR TO HAVE DIGITAL NOISE - EVEN THOUGH IT DOESN'T
Set the Rodecaster to Multichannel audio >Home >Settings >Advanced >Audio >Multitrack >USB On | |
Setup Computer input and output >Apple>System Preferences |
|
Click on Sound |
|
Click on Output |
|
Input choose |
|
Open ProTools |
|
Click OK Here |
|
| |
| |
Open ProTools again |
|
When ProTools opens click "Cancel" on the Quick Start Dialog. We do not want to open a session yet. |
|
For Recording |
|
RODEcaster Multichannel |
|
Open ProTools>File> |
|
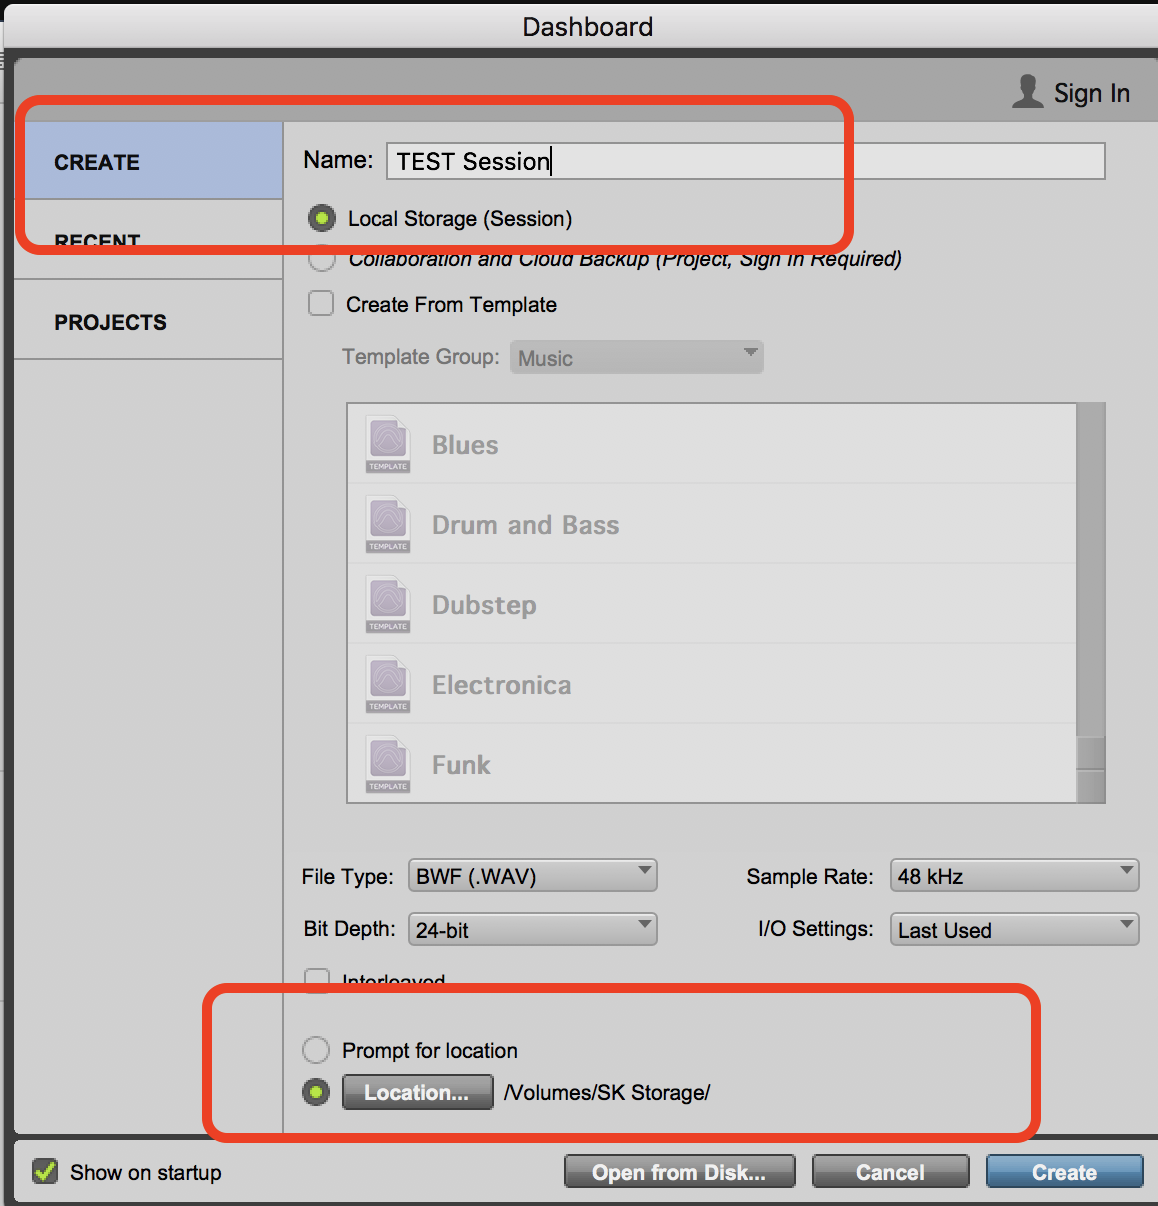
Create a session Name it Choose 24 Bit 48 kHz Choose a location to save the file and then select Create |
|
Now go to Input and Output setup |
|
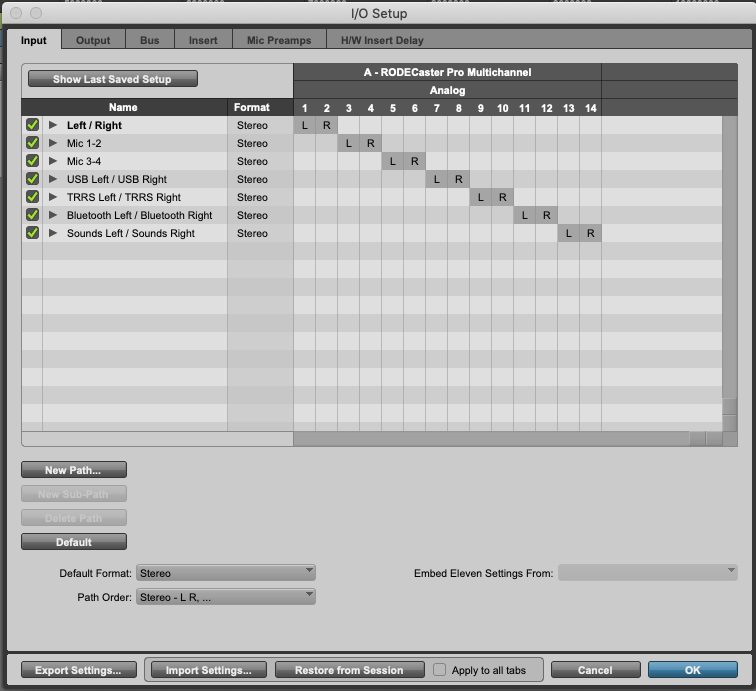
Click on the Input tab all the channels of the RODECaster are available as inputs Mics 1 and 2 Mics 3 and 4 USB Left and Right TRRS Left and Right Bluetooth Left and Right Sounds Left and Right (sound effects loaded on the RODECaster) |
|
Click on Output Tab and you will have nothing |
|
Click Aux I/O |
|
Click OK here |
|
Choose RODECaster Pro Stereo as the Output >Click OK |
|
RODECaster Pro Stereo is selected >Click OK |
|
Turn up the USB input on the Rodecaster |
|
Track>New Track |
|
Create 1-4 mono tracks for how many voices you are recording Our example we are recording 2 people |
|
On every track |
|
Or Go to > View>Edit Window Views> I/O > |  |
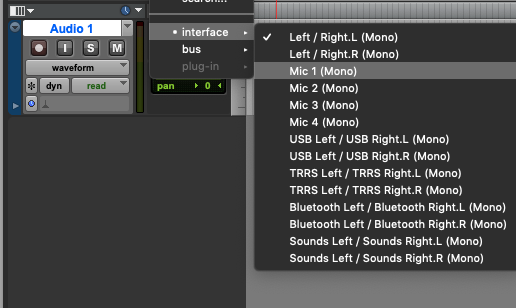
Next choose the input for each track you want to record Example here choose Mic 1 to record Mic 1 |
|
| Set the input of that track to >Mic 2 |
|
Next we need to make sure the microphones are set correctly on the RODECaster Pro Select the Microphone channel selector softkey for the mic you want to use EX: #2 |
|
| Then Choose Microphone |
|
Make sure it is set to RODE Broadcaster |
|
| Click the Back button to get to the previous menu |
|
| Click On Level |
|
Make sure that Phantom Power is on and the Level is set to 18 or higher. this is how you will adjust input level in ProTools when you record press the plus and minus buttons to adjust levels |
|
Make sure that the ceiling volume is turned down on the RODECaster to prevent feedback |
|
the Microphone faders on the RODECaster don't adjust recording input level This is how you hear in the headphones!!When you slide them up the headphone volume increasesnot the recording input level! |
|
You also adjust headphone volume with these knobs |
|
Bring in your Video if you'd like to record audio to a video QuickTime >File >Import >Video |
|
Choose Session Start (most common) |
|
Choose the Audio Files folder - Open |
|
On your session tracks any track you want to hear while recording route the output to the RODECaster Stereo |
|
Recording in ProTools Click on the RED record button "record enabled" on every track you want to record |
|
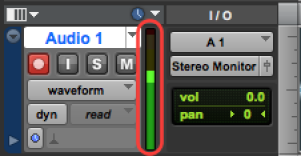
Check Levels in ProTools Should see input levels in ProTools I/O view. Set inputs so the levels are in the green to yellow areas. |
|
Make sure that Phantom Power is on and the Level is set to a good level in protools this is how you will adjust the input levels I was getting a level 39 before it looked good in ProTools |
|
Record as needed using normal ProTools recording procedure by hitting play on the transport window while the record button is enabled. |
|
To play what you have recorded change your Output on the recorded track to >RODECaster Pro Stereo 1-2 |
|
NOTE: MAKE SURE YOU CHANGE IT BACK TO NO OUTPUT WHEN YOU AREDONE MONITORING and go back to recording OR YOU WILL HAVEAN ECHO IN YOUR HEADSET |
|
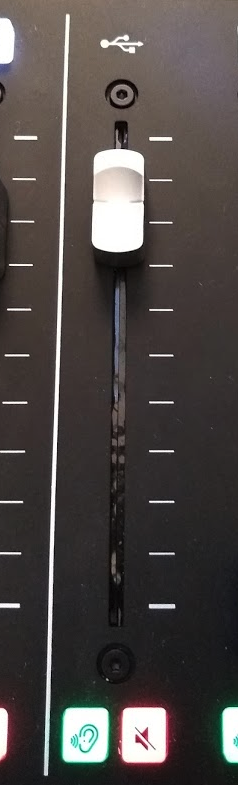
MUST TURN DOWN THE SLIDERS ON THE MICS IN ORDER TO GET AUDIO ON THE CEILING MICS then Turn up the USB slider to hear ProTools Playback turn up ceiling speakers to hear playback in the room
picture here |
On RODECaster board turn up the USB icon Slider |
When finished >Quit Pro Tools |
|
Save |
|
>Locate your ProTools session and there will be your audio files that you can use |
|


Overview
Content Tools