What is Stache?
Stache is UT's browser-based password manager where you can store passwords or other pieces of confidential, sensitive, or private information.
Who has access to Stache?
UT faculty, staff, and students with an active EID.
Why should I use Stache?
You can share entries with others at UT such as colleagues or research lab members. This allows your group to have a central location to store such information that is both secure and convenient.
You should NEVER share personal passwords such as your EID password or other personal account information!!
Log In
1. In a web browser, go to https://stache.utexas.edu/
2. Click Log in now
3. Sign in using your EID and EID password then authenticate with Duo
4. You are now signed in to Stache and viewing your home page. You'll see the entries you have created and entries others have shared with you
a. If someone sent you a link to a specific Stache entry, click the link again to open the entry
Create a New Entry
1. Sign in to Stache
2. From your Stache homepage, click + Add a new entry in the top right corner
3. Enter your desired entry name and click Create
The entry opens to show three sections on the left, Purpose, Secret, and Note. While the sections are labeled, they are suggestions. On the right-hand side of the window you'll see entry permissions and other settings.
4. Click the section to show the contents. Click within the section again to start typing and add information. IMPORTANT: click Save. If you do not click save, your changes will be lost when you exit the browser window.
a. The Generator button opens a password/passphrase generator.
Share Entries with Others
1. Sign in to Stache and open the entry you want to share.
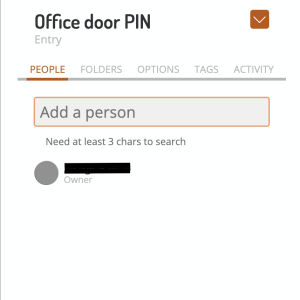
On the right side, beneath the entry title, with the People tab selected, you'll see a list of current permissions.
2. In the Add a person text box, begin typing the person you want to add by EID or name. A list of search results will populate, select the desired person.
3. The default permission is Reader. Select the change you'd like to make. IMPORTANT: click Save. If you do not click save, your changes will be lost when you exit the browser window.
Permission Types
All permission types allow the person to view the contents of the Purpose, Secret, and Note sections and who has what permissions on the entry.
Reader: They cannot make any changes to the contents or permissions.
Writer: They can make any changes to the contents but cannot make changes to permissions.
Owner: They can make any changes to the contents and permissions.


