Overview
breseq is a tool developed by the Barrick lab (of which your instructor is a member) intended for analyzing genome re-sequencing data for bacteria. It is primarily used to analyze laboratory evolution experiments with microbes. In these experiments, there is usually a high-quality reference genome for the ancestral strain, and one is interested in exhaustively finding all of the mutations that occurred during the evolution experiment. Then one might want to construct a phylogenetic tree of individuals samples from a single population or determine whether the same gene is mutated in many independent evolution experiments in an environment.
Learning objectives:
- Quick introduction to a self contained/automated pipeline to identify mutations.
- Explain the types of mutations found in a complete manner before using methods better suited for higher order organisms.
- Examine the same data used in the Mapping, and SNV tutorials as breseq output.
Input data / expectations:
- Haploid reference genome
- Relatively small (<20 Mb) reference genome
- Average genomic coverage > 30-fold
- Less than ~1,000 mutations expected
- Detects SNVs and SVs from split read alignment of reads (does not use paired-end distance information)
- Produces annotated HTML output
This does mean that breseq is not suited for diploids, and other very large genomes. GATK is a similar pipeline that has many more additional options that is suited for diploids and large genomes. You can learn a great deal more about breseq by reading the Online Documentation.
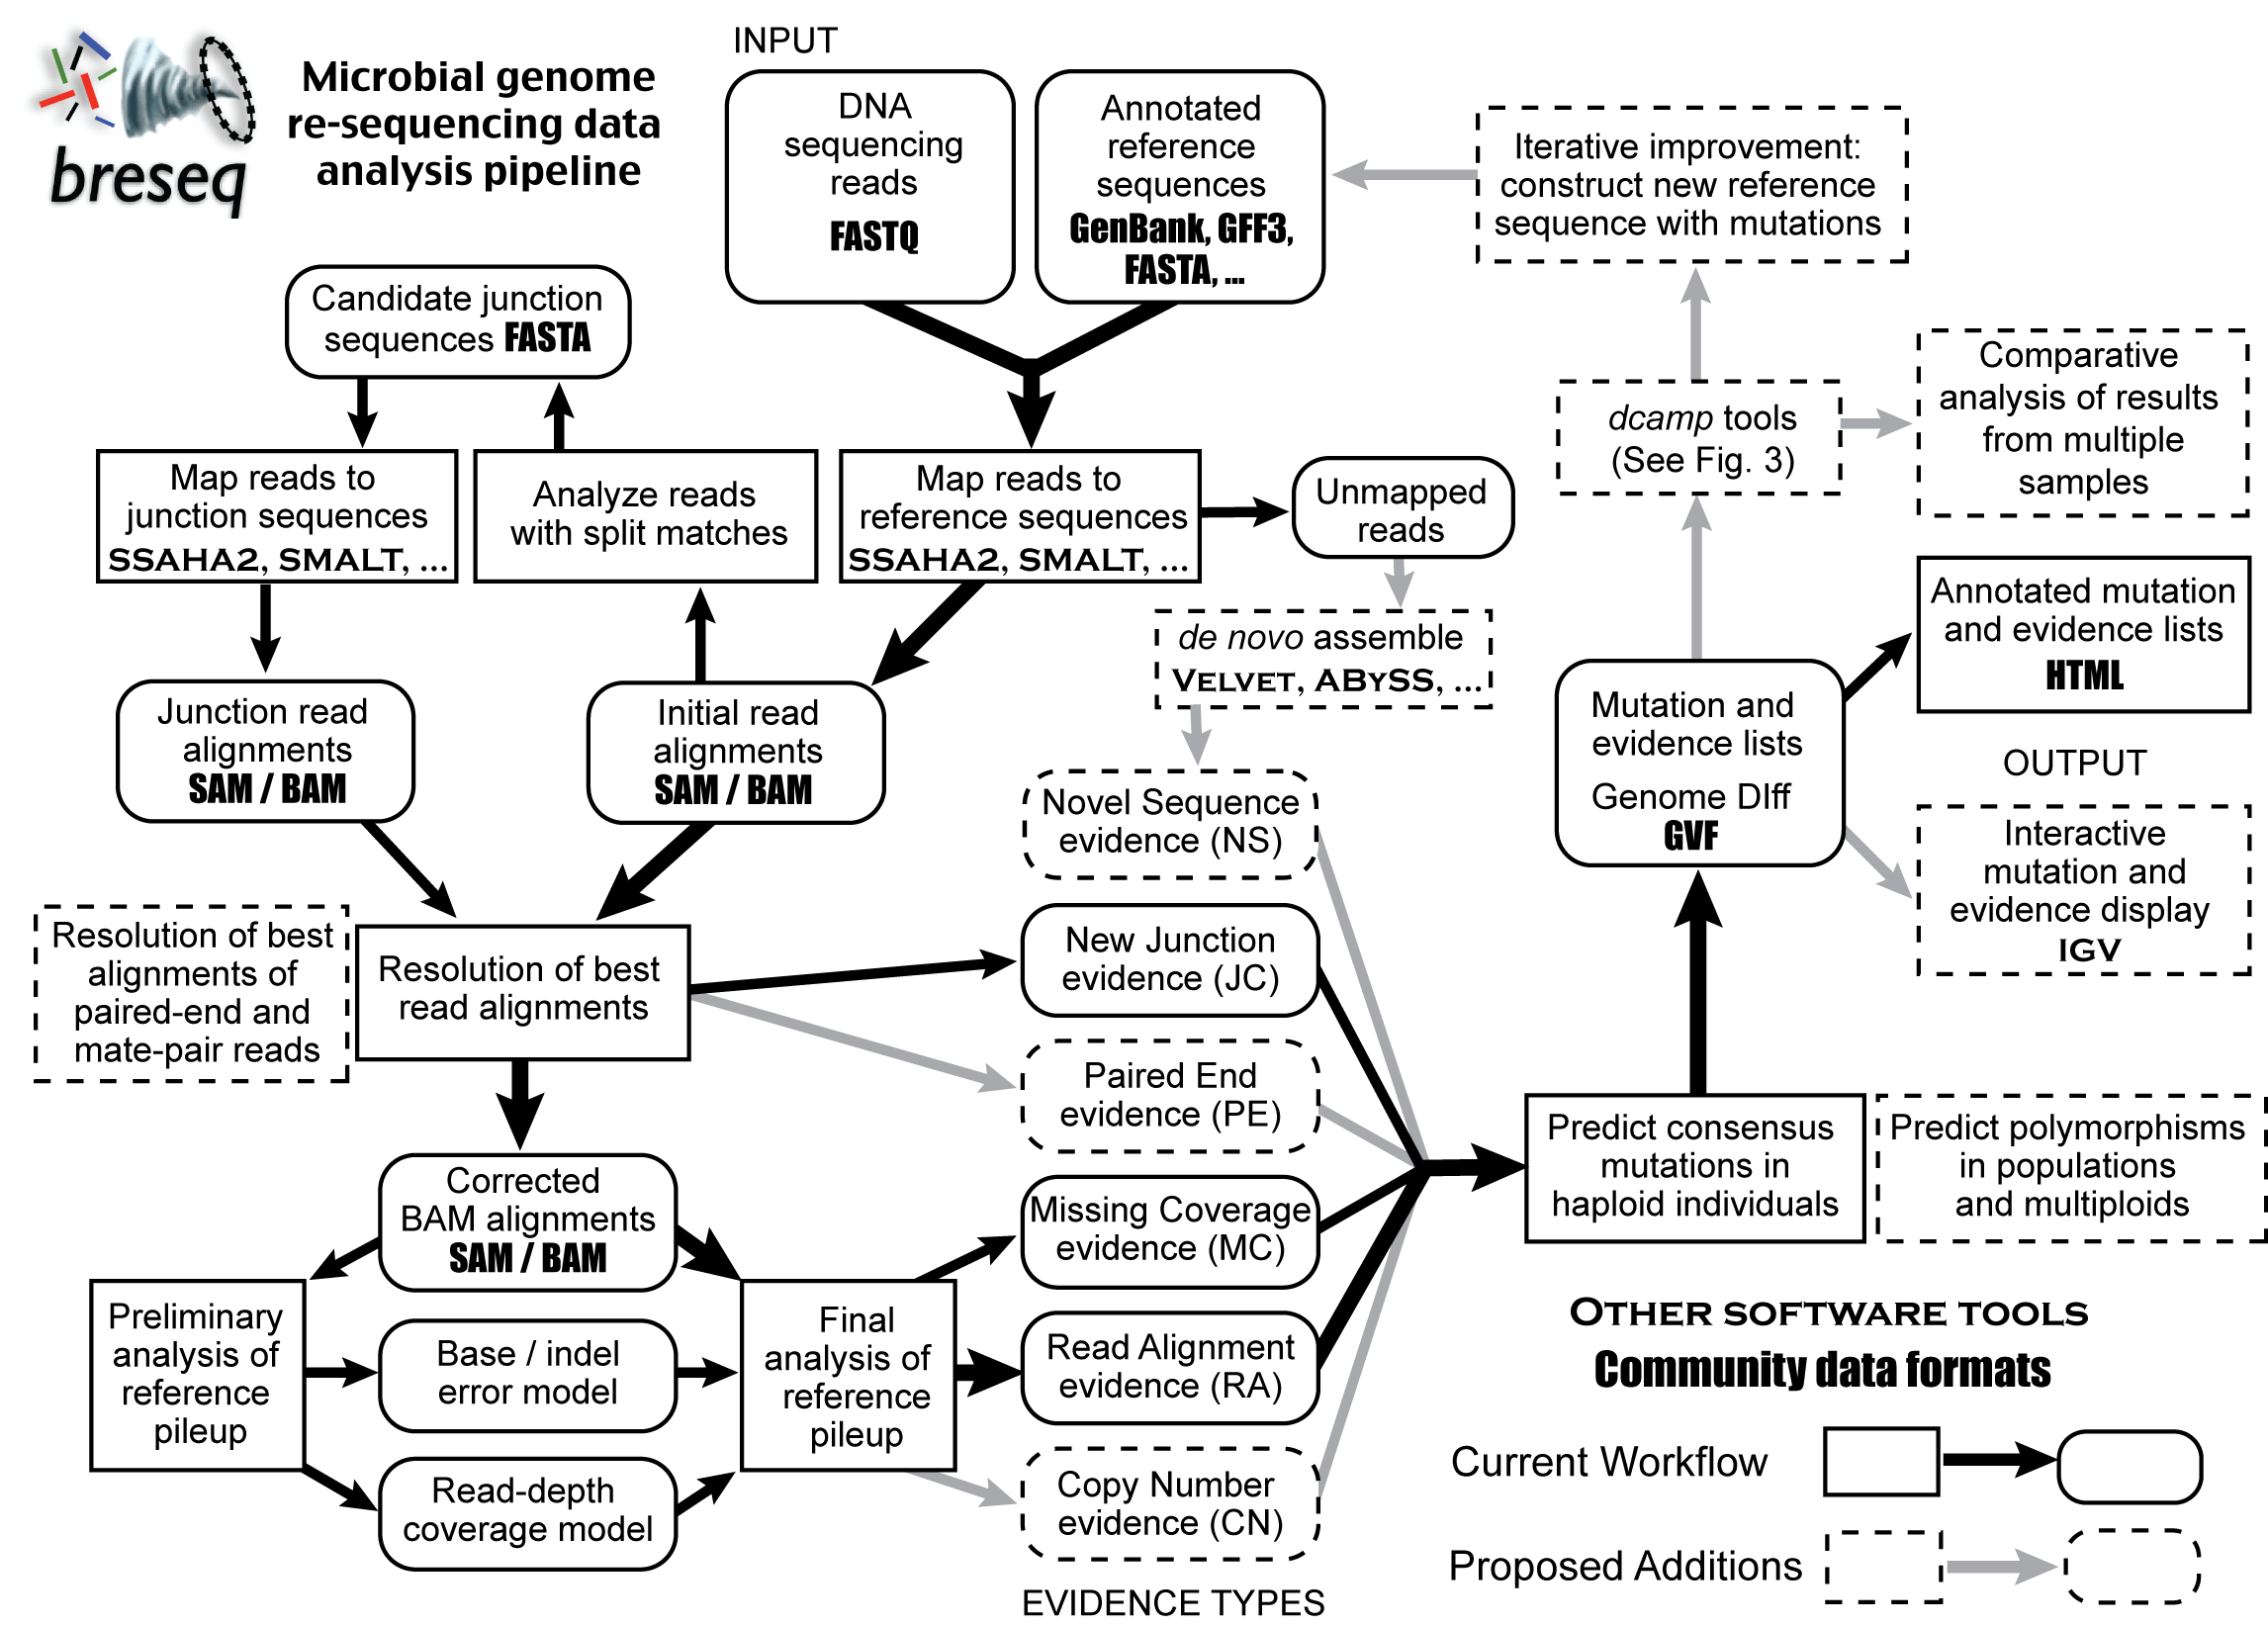
Here is a rough outline of the workflow in breseq with proposed additions.
breseq access
In order to run breseq, we need to install it. If you think this sounds like a great opportunity to use conda you are right! Using https://anaconda.org/ you find 2 different results for breseq. 1 is in the bioconda channel that we have worked with multiple times and has been downloaded >32,000 times. The other is from a contributor with limited track record, nothing has been updated in more than 4.5 years, and has only been accessed 6 times. Like with apps on your phone the answer to "which is the correct one" should be rather obvious.
As breseq is a "all in 1 tool" that works to map, call variants, sift signal from noise, and provide basic visualization, you may think that breseq is the only program you would use for the analysis of appropriate samples. Do not forget that read qc and read processing actually take place before running breseq. Therefor a full environment might contain (such as the one I use in my own analysis): fastqc, fastp, and breseq. Nicely, all 3 programs are in the bioconda channel. Using what you have already learned so far, you should know how to create a new environment with these 3 programs. Unfortunately there is currently an issue wherein installing breseq does not grab one program that is needed to draw some of the graphs it can normally produce. One way of fixing this is to include "libjpeg-turbo".
conda create --name GVA-breseq -c bioconda fastqc fastp breseq libjpeg-turbo -c conda-forge
conda activate GVA-breseq
Because we are including multiple different packages, the installation will take a few extra minutes to complete. If you just include breseq and libjpeg-turbo the installation will be faster. This is one of the reasons that having 1 environment with all programs installed in it is not always the best idea.
breseq should now run using the breseq command. breseq without any options will show you what the command expectations are while adding .
A consolidated explanation of help files and my experience with them
Bacteriophage lambda data set
First, we'll run breseq on a small data set to be sure that it is installed correctly, and to get a taste for what the output looks like. This sample is a mixed population of bacteriophage lambda that was co-evolved in lab with its E. coli hosts.
Data
The data files for this tutorial is located in following location:
$BI/ngs_course/lambda_mixed_pop/data/
Copy the contents of this directory to a new directory called GVA_breseq_lambda_mixed_pop in your scratch directory.
Possible errors on idev nodes
As mentioned yesterday, you can not copy from the BioITeam (because it is on corral-repl) while on an idev node. Logout of your idev session, copy the files, and be sure to start a new idev session as breseq should not be run on the headnode.
File Name | Description | Sample |
|---|---|---|
| Single-end Illumina 36-bp reads | Evolved lambda bacteriophage mixed population genome sequencing |
| Reference Genome | Bacteriophage lambda |
Running breseq
Because this data set is relatively small (roughly 100x coverage of a 48,000 bp genome), a breseq run will take < 5 minutes, but it is computationally intense enough that it should not be run on the head node.
Remember to make sure you are on an idev done
For reasons discussed numerous times throughout the course already, please be sure you are on an idev done. Remember the hostname command and showq -u can be used to check if you are on one of the login nodes or one of the compute nodes. If you need more information or help re-launching a new idev node, please see this tutorial.
conda activate GVA-breseq
cd $SCRATCH/GVA_breseq_lambda_mixed_pop
breseq -j 68 -r lambda.gbk lambda_mixed_population.fastq
While breseq is running lets look at what the different parts of the command are actually doing:
| part | puprose |
|---|---|
| -j 68 | use 68 processors (recall we saw this was best in the rough testing using of bowtie2 |
| -r lambda.gbk | Use the lambda.gbk file as the reference to identify specific mutations |
| lambda_mixed_population.fastq | breseq assumes any argument not preceded by a - option to be an input fastq file to be used for mapping |
The absolute minimal command that breseq can do anything with is a reference file and a fastq file. We've added the -j option to use more processors to speed things up a bit. When you executed the command without any options you saw more options and if you use breseq --help you will see more still. This will finish very quickly (~3 minutes) with a final line of "+++ SUCCESSFULLY COMPLETED". If you instead see something different as the last line before getting your prompt back, get my attention.
Evaluating output
breseq produced a lot of directories beginning 01_sequence_conversion, 02_reference_alignment, ... Each of these contains intermediate files that are used to 'pickup where it left off' if the run doesn't complete successfully. These can be deleted when the run completes, or explored if you are interested in the inner guts of what is going on. More importantly, breseq will also produce two directories called: data and output which contain 1. files used to create .html output files and 2. actual .html output files respectively. The most interesting files are the .html files which can't be viewed directly on stampede2. Therefore we first need to copy the output directory back to your desktop computer. Use scp to transfer the contents of the output directory back to your local computer.
Remember this tutorial is available if you need help transferring files.
cd $SCRATCH/GVA_breseq_lambda_mixed_pop
tar -czvf output.tar.gz output  # the czvf options in order mean Create, Zip, Verbose, Force
pwd # helpful for the Remote (Right) terminal window
# scp command first ...
tar -xvzf output.tar.gz  # the new "x" option at the front means eXtract
Navigate to the output directory in the finder and open the a file called index.html. This will open the results in a web browser window that you can click through different mutations by using clicking the 2 letter codes or symbols on the left hand side of each row. The summary statistics link at the top of the page provides useful information about the percent of reads mapping (71.4%) to the genome as well as a link overall coverage of the genome where you can see a line graph showing how many reads mapped to each location across the entire genome (125.3 on average though varies between more than 200 and less than 50 depending on the location). The coverage summary graph is an awesome way to look for super large scale events in this case you can see the ~6kb deletion in the middle of the genome. The Mutation Predictions page is where most of the analysis time is spent in determining which mutations are important (or more rarely inaccurate).
Click around through the different mutations and examine their evidence to see what kinds of mutations you can identify. If you cant understand what type of mutation each line represents, or how the images should help you understand what the mutation is, please dont hesitate to interact over zoom.
Bacteriophage lambda data set repeated
Did you notice the name of the fastq file we used? lambda_mixed_population.fastq. As the name of the file implies, this file is actually from a mixed population of phage though we did not include any information about that fact in the breseq command we used. Further as you clicked around on some of the RA evidences you may have noticed that some of the mutations which listed reads as having aligned to the reference genome as well. This is similar to our initial SNV tutorial where the variant calls were made in a consensus diploid mode which forced the program to decide between variants being at ~50% and 100%, breseq only works on haploid organisms and thus assumed that any variants that were present must have been present at 100%.
Since we know it was a mixed population we can actually rerun the same fastq files against the same reference and add a flag for polymorphism mode (-p) and see what the difference in results is when we tell breseq that variants may exist at any frequency. As this command takes a little over 5 minutes to complete, you may want to go back and look more at the consensus results you just transferred back, or forward and see what comes next.
Data, and running breseq
mkdir $SCRATCH/GVA_breseq_lambda_mixed_pop_polymode
cp $SCRATCH/GVA_breseq_lambda_mixed_pop/lambda* $SCRATCH/GVA_breseq_lambda_mixed_pop_polymode
cd $SCRATCH/GVA_breseq_lambda_mixed_pop_polymode
breseq -j 68 -p -r lambda.gbk lambda_mixed_population.fastq
This time, the run should take ~5 minutes, and again finish with a last line of "+++ SUCCESSFULLY COMPLETED".
Evaluating output
Again you will need to transfer files back to your local computer to visualize the differences. The same exact compression command will work as the folder name is the same. In doing so you need to be careful where you transfer that file on your local computer such that you don't overwrite the previously transferred files. Maybe add a _polymode to the directory you are transferring to as we did in our command above. Again help with SCP can be found here.
tar -czvf output.tar.gz output  # the czvf options in order mean Create, Zip, Verbose, Force
pwd # helpful for the Remote (Right) terminal window
# scp command first ...
tar -xvzf output.tar.gz  # the new "x" option at the front means eXtract
When you look at the summary statistic page, you will see none of the output has changed until you get quite far down the page and find that this time it was run in full polymorphism mode. When you look at the mutation predictions page, you now see more total mutations (with most of the new mutations being at frequencies less than 20%), a new column listing the frequency each mutation was listed at (with variants at less than 100% showing up in green), and if you look closely some mutations that were previously listed in white and at 100% are now listed as less than 100% (ie 82.0%). Hopefully from the discussions we've been having to this point it makes sense that mutations that are real but at low frequency would be mistaken for 0% rather than 100% when those are the only 2 choices. Again feel free to get my attention if you have any questions about the output, such as wondering why there are so many mutations at 100% even in a mixed population sample.
E. coli data from Mapping, SNV tutorials:
As a reminder, the read files we were working with in the bowtie2 and SNV tutorials were originally downloaded from the NCBI Sequence Read Archive or via the corresponding European Nucleotide Archive record. They are Illumina Genome Analyzer sequencing of a paired-end library from a (haploid) E. coli clone that was isolated from a population of bacteria that had evolved for 20,000 generations in the laboratory as part of a long-term evolution experiment (Barrick et al, 2009). The reference genome is the ancestor of this E. coli population (strain REL606), so we expect the read sample to have differences from this reference that correspond to mutations that arose during the evolution experiment. If that description sounds like what breseq was made for ... breseq was literally developed at least in part to analyze this data.
data
Like we did earlier we'll start by downloading our reads and reference into a new folder on scratch. As the analysis in the rest of this tutorial will focus on the job queue system rather than analyzing interactively in an idev session, you should logout of any idev session you may be in now.
The breseq_commands file
As already noted, the run will take ~2.5 hours to complete. Making this a great opportunity to use the job queue system rather than interactively on an idev session. As we will discuss on Friday, the job queue system is the common way you will use TACC to analyze your own data. For now we will be ignoring the theory and practice of how to use the system and instead focus on getting our analysis into the queue system so it can run overnight before tomorrow's class. As you will be reminded it is recommended that you start Thursday's class with evaluating this job submission in case you choose to make use of it during Thursday's class.
breseq -j 68 -r NC_012967.1.gbk SRR030257_1.fastq SRR030257_2.fastq.gz
Because we are going to use the job queue system, rather than entering the above command into the terminal prompt, instead copy paste the command into a new file named "breseq_commands" using nano. Recall from the introduction tutorial:
nano breseq_commands
After you paste the breseq command into the editor, you can save the file using the control options listed at the bottom of the editor. Specifically, you'll want:
- ctl-o - to save (aka write) the file
- ctl-x - exit nano
Be sure that cat breseq_commands gives the following output exactly:
breseq -j 68 -r NC_012967.1.gbk SRR030257_1.fastq SRR030257_2.fastq.gz
The .slurm file
The job queue system takes 2 things:
- A commands file (like the one we just created)
- A slurm file with instructions of how the commands file is to be run
I've gone ahead and provided you a generic slurm file in the gva course portion of the BioITream. Copy it to your current directory.
As the file provided is generic you will need to make a few changes to the file. Note that most of these lines have additional text to the right of the line. This commented text is present to help remind you what goes on each line, leaving it alone will not hurt anything, removing it may make it more difficult for you to remember what the purpose of the line is
| Line number | As is | To be |
|---|---|---|
| 16 | #SBATCH -J jobName | #SBATCH -J D3Breseq |
| 21 | #SBATCH -t 12:00:00 | #SBATCH -t 4:00:00 |
| 22 | ##SBATCH --mail-user=ADD | #SBATCH --mail-user=<YourEmailAddress> |
| 23 | ##SBATCH --mail-type=all | #SBATCH --mail-type=all |
| 29 | export LAUNCHER_JOB_FILE=commands | export LAUNCHER_JOB_FILE=breseq_commands |
The changes to lines 22 and 23 are optional but will give you an idea of what types of email you could expect from TACC if you choose to use these options. Just be sure to pay attention to these 2 lines starting with a single # symbol after editing them.
Again use ctl-o and ctl-x to save the file and exit.
Submitting the job
Now that we have the 2 things that the job queue system needs (commands file and slurm file to control the computer), all that is left is to submit the job using the sbatch command. It is important to make sure you have the correct conda environment active before subbing the job so that information gets forwarded to the compute node by the queue manager.
conda activate GVA-breseq
sbatch GVA2022.launcher.slurm
Your output should be similar to this:
-----------------------------------------------------------------
          Welcome to the Stampede2 Supercomputer
-----------------------------------------------------------------

No reservation for this job
--> Verifying valid submit host (login4)...OK
--> Verifying valid jobname...OK
--> Enforcing max jobs per user...OK
--> Verifying availability of your home dir (/home1/0004/train402)...OK
--> Verifying availability of your work2 dir (/work2/0004/train402/stampede2)...OK
--> Verifying availability of your scratch dir (/scratch/0004/train402)...OK
--> Verifying valid ssh keys...OK
--> Verifying access to desired queue (normal)...OK
--> Verifying job request is within current queue limits...OK
--> Checking available allocation (UT-2015-05-18)...OK
--> Verifying that quota for filesystem /home1/0004/train402 is at 29.45% allocated...OK
--> Verifying that quota for filesystem /work2/0004/train402/stampede2 is at  0.01% allocated...OK
Submitted batch job 7909016
Checking your submitted job
The showq command can be used to check the status of any jobs you have submitted. Executing the command without any options will show you the status of all jobs currently on stampede2 (which can be interesting at least once to get a sense of the volume of work that TACC deals with). More useful is to provide the '-u' option so that you only see jobs that are related to your userid.
Initially your job will be listed in the "WAITING JOBS------------------------" section, though depending on how busy stampede2 is when you submit your job, it may move directly to the "ACTIVE JOBS--------------------" section. Once the breseq command finishes running, the job will move down into a 3rd section labeled something similar to "COMPLETING JOBS--------------------".
- If you do not see your job listed just after you tried to submit it, it is likely that there was some kind of error with your submission. Get my attention for help troubleshooting what is going on.
- If it has been some time since your job submission (and especially if you saw it listed in the active job section), the job may have completed. Check for the expected breseq output using the
lscommand. If you entered your email address, you may have some emails providing additional information about this job.- You will likely want to start Thursday's class by performing these checks as if you are having difficulties interacting with the job queue system it may cause problems during Thursday's class depending on what tutorials you decide to do.
Recall that the the first part of Wednesday's class is devoted to data visualization, and comparing these results to the IGV tutorial results
Rather than waiting a few hours for the breseq analysis to finish, you can copy the expected results of the analysis to your local computer and evaluate them now. Alternatively, you can wait until your analysis is complete and finish this tutorial then.
For those wishing to do the comparison now:
scp <user>@stampede2.tacc.utexas.edu:/corral-repl/utexas/BioITeam/ngs_course/lambda_mixed_pop/breseq_SRR030257_run_output_folder.tar.gz .
The scp tutorial is available if you need additional assistance copying these files back to your computer.
evaluating output
Here are the comments from the IGV tutorial evaluating the data:
In addition to highlighting the power of the statistical testing going on under the hood of breseq to separate the signal from the noise the concise html output to visualize the mutations, hopefully you also see how you can answer the same questions even easier with breseq.
Additional tutorials dealing with breseq
Error correction
Additional information on analyzing the output
- Deatherage, D.E., Barrick, J.E.. (2014) Identification of mutations in laboratory-evolved microbes from next-generation sequencing data using breseq. Methods Mol. Biol. 1151:165-188. «PubMed»
This tutorial was substantially reformatted from the most recent version found here. Our thanks to the previous instructors.