Excerpt Taken from FCP Manual
4/13/07
• Calibrating Your Broadcast Monitor
• Monitors are calibrated using SMPTE standard color bars.
Brightness and contrast are adjusted by eye, using the color bars onscreen. Adjusting chroma and phase involves using the “blue only” button found on professional video monitors. This calibration should be done to all monitors in use, whether they’re in the field or in the editing room.
• To calibrate your monitor:
• Connect a color bars or test pattern generator to the monitor
you’re using.
• Alternatively, you can one of the built-in color bars generators in
Final Cut Pro. Avoid using still image graphics of color bars.
• Turn on the monitor and wait at least ten minutes for the monitor
to reach a stable operating temperature.
• Select the appropriate input on the video monitor so that the
color bars are visible on the screen.
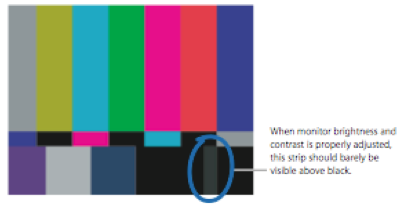
• Near the bottom right corner of the color bars are three black
bars of varying ntensities. Each one corresponds to a different brightness value, measured in IRE. (IRE originally stood for Institute of Radio Engineers, which has since merged into the modern IEEE organization; the measurement is a video-specific unit of voltage.) These are the PLUGE (Picture Lineup Generation Equipment) bars, and they allow you to adjust the brightness and contrast of a video monitor by helping you establish what absolute black should be.
• Turn the chroma level on the monitor all the way down.
• This is a temporary adjustment which allows you to make more
accurate luma adjustments. The chroma control may also be
labeled color or saturation.
• Adjust the brightness control of your monitor to the point where
you can no longer distinguish between the two PLUGE bars on
the left and the adjacent black square.
• At this point, the brightest of the bars (11.5 IRE) should just
barely be visible, while the two PLUGE bars on the left (5 IRE and 7.5 IRE) appear to be the same level of black.
• Now, turn the contrast all the way up so that this bar becomes bright, and then turn it back down.
• The point where this bar is barely visible is the correct contrast setting for your monitor. (The example shown below is
exaggerated to demonstrate.)
• When adjusting the contrast, also watch the white square in the lower left. If the contrast is too high, the white square appears to “spill” into the surrounding squares.
• Adjust the contrast until the luma of the white square no longer “spills” into surrounding squares.
• Once you are finished adjusting luma settings, turn up the chroma control to the middle (detent) position.
• Note: Some knobs stop subtly at a default position. This is known as the detent position of the knob.
• Press the “blue only” button on the front of your monitor.
• Note: This button is usually only available on professional
monitors.
• When monitor brightness and contrast is properly adjusted, this
strip should barely be visible above black.
• Notice how all of the differently colored bars turn into alternating light and dark ones.
• If your monitor is correctly calibrated, all the gray bars will be evenly gray and all the black bars evenly black.
• If the two outer gray bars don’t match, adjust the chroma control of the monitor until they do. Then adjust the phase control to even out the inner bars.

• Note: NTSC and PAL video have brightness and contrast levels that are very different from those of RGB computer displays. Broadcast video viewed on a computer monitor often looks dull and dark, whereas the same video viewed on a broadcast monitor will be bright and clear. For this reason, the color bars above are shown for reference only and not to reflect what you should be seeing.
• When the phase (similar to hue) of the monitor is correctly adjusted, you should see alternating bars of gray and black, as shown.
Overview
Content Tools