So here is the unprocessed image. The author of this page, who does a lot of the lab's photography, like to shoot dark. It's easier to make dark images lighter than to make a light image darker. Once pixels go 'hot', or white, there is no way to get their natural color back. To get the image the color it needs to be, we'll use a tool called 'curves'. 
- If you hit Ctrl+Alt+M, the curves interface will pop up. Make sure the preset is set to Custom. Press the white eye dropper icon, and then click in the white color box. The scale bar will get VERY white and the colors on the color bar will look a little hyperactive, but don't worry- look at the specimen.
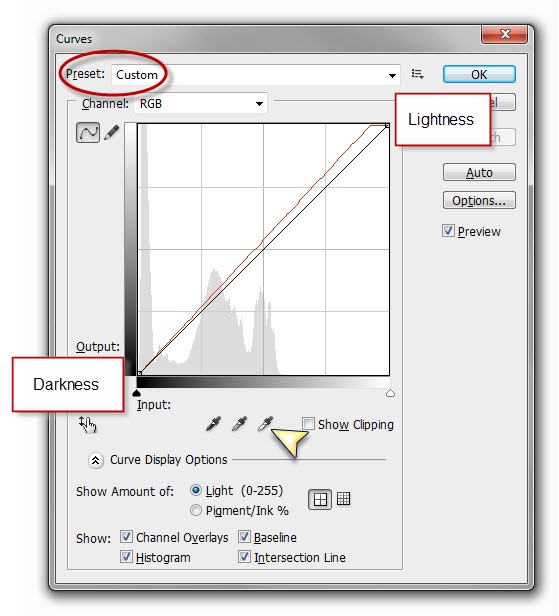
If if looks to be TOO bright, use the small boxes in the corner marked Darkness and Lightness to adjust the balance until you are satisfied. Hit OK.

Once we've got the color right, we finally get to put those hotkeys to use.
- Hit Crtl and the + key a few times and center in on the scale bar to enlarge the image. Then, hit the A key to activate the measure tool. Draw a measurement line across any straight line in the image- I use the scale bar. In the image below, the measure line has been drawn over in red to make it easier to see. It will be white when you use the tool.

- Now hit F1. A dialogue box will pop up telling you how much the image will rotate, just hit OK and move on.
- Hit the Crtl and the - (minus) key until you have about 15-20 mm of the scale bar in the screen.
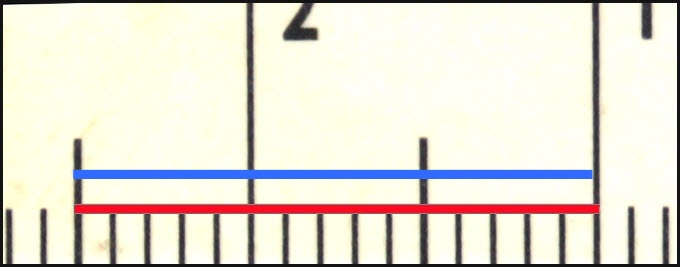
- Hit the S key to use the line tool. Draw a line from the outside edge of one of the mm lines to the outside edge of a mm line further down the scale bar. I usually shoot for 15 mm, because that is the default of the Scale Image script. If you hold down the shift key while drawing a line, it keeps the line straight.
- In the photo below, the blue line is correct- it goes from the leading edge of a hatch mark to the leading edge of the last hatch mark. the red line starts at the leading edge but ends at the trailing edge of a mark- this may look like a super small error, but due to the nature of the script, these sorts of mistakes compound and can end up throwing the final scale bar off by a couple of millimeters. Yes, this is a big deal- researchers rely on precision in measurements, so we don't want to introduce any inaccuracies!
- So now that we have our accurate line, we can hit the F2 key to bring up the scale image dialogue box. The default is 15 mm (the field occludes the second 'm'. I promise you we are not scaling to meters!!!)

- Enter the length of your line if it is not the default, and hit OK.
- Bring the image back down to normal size (Ctrl - - -). If you need to use the lasso tool, or the quick selection tool to isolate the specimen. If the background looks a flat enough color, don't sweat it.
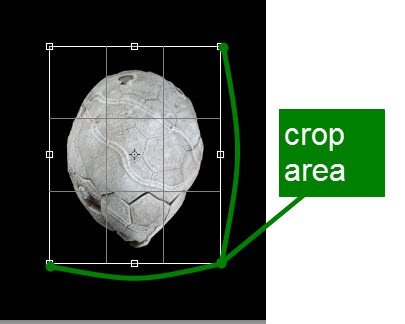
- Hit the D key to use the crop tool. How you crop the image is up to you- some folks leave a lot of space around the image, some will crop with hardly any blank space at all. Use the crop tool do draw a 'box' around the specimen and hit enter. The areas not in the grid are discarded.
- Once you've cropped the image, hit the F3 hotkey. This launches the final script, the draw scale script. The end result is a scale bar at the bottom of the image as well as the ability to use the measure tool within the Photoshop interface to take accurate real life measurements off the image.It is worthwhile to check the scale against the specimen from time to time- at the time of this writing, there is one computer in the lab where the scripts are broken and give wildly inaccurate scales! Ironically enough, this computer is the Photography computer.
 The final product looks very nice and professional.
- Save this image by using the Save As dialogue and putting it into the Scaled folder. It is VITAL that we save an unedited version of every image. These are stored on an external drive on the photography computer. Do not EVER save over the original image. It's a vital point of reference for us.