Subform View:
The Field Number is the kingpin to this line of concatenated data. If you don't already have a field number, you should run a separate query to see if there is already an established field number for the Collecting Info you are working with.Once you know the Field number, just type it into the field and either tab out or click the down arrow to view the selections. Choose the entry you are looking for, and you're done!
If you have the collector name and collected date, you can use that info to format a field number and see if it's in the database. and choose from the drop down results. The "-0001" at the end of the results line lets us know there is a single entry for that name/date combo.
Just remember, Locality, Geographic location, Geolocate, Geologic time and lithostrat are all tied to a field number. You must make a new field number if one of these things change.
If the Collecting Information is brand new, you'll have to add the information. To create a new entry, click the ![]() on the at the end of the Collecting Info line to launch the subform.
on the at the end of the Collecting Info line to launch the subform.
 Or, you can start typing the last field number you can remember and hitting tab, the drop-down will let you know where in the number sequence you are. You can also just type 'NPL-00' and tab out if you don't know what number to start with. Notice the last entry, and just add one. Voila! A new Field Number.
(Eventually, this will be 'NPL-0', but hopefully that's a while off!) Select 'Add' to make a new Collecting Info record. Once yo do this, you'll lauch the CI form. Open the next section to see how to proceed.
Chapters in this section
Subforms in the CO form:
- Collection Object Attributes
- Determinations
- Collection Object Citations
- Inventory and Preparations
- Conservation and Specimen Prep
things to know:
Creating new field numbers
Form View:
Whichever way you get here, the form is the same and has the same rules. This form has 3 sub-forms nested inside it.
When accessed through the CO form it's a subform with 3 subforms nested into it. Xzibit would be so proud.

The top part of the locality form is a combination of the Locality subform, and some generalized information. These are separated because there are cases where a locality name will be the same, the other information will be different. Instead of creating a new locality each time a collector heads out to that site, or uses a different collecting method, we just tie the unchanging Locality to the more flexible Collecting Information form. We'll dissect the form the order they appear in the above version of the form.
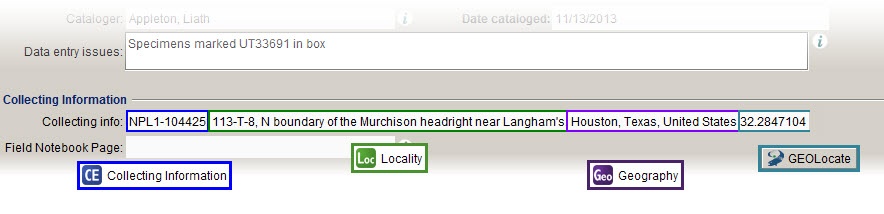
Locality:
First, you'll want to see if the locality is already in the database. Running a quick query on the Locality table, looking for locality names from the County and State will help, especially if you add a noun (ie, 'Caleb's Quarry, Ibex area, courthouse) in the locality name query field. Or, you can use the wildcard *, plus a search term (then hit the drop down arrow) and see what comes up. Just be aware, this method only finds the search term as the first word of the locality name no matter where you put the wildcard icon.
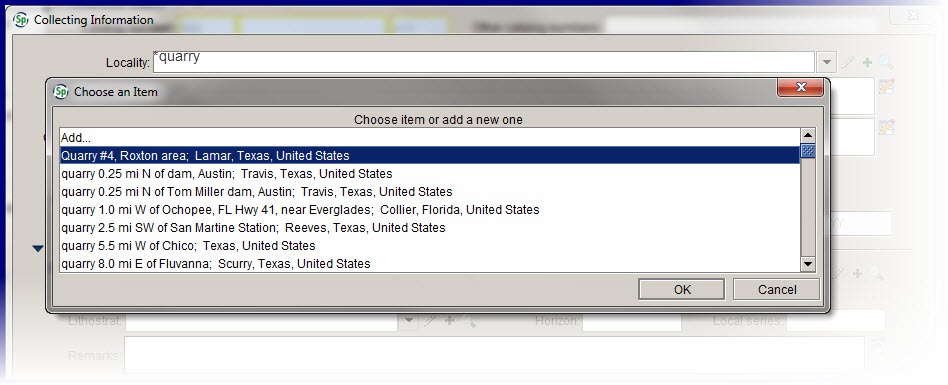
If you need to add a locality, here's a thorough breakdown of the locality form (accessed by clicking the green + button, or selecting the 'Add...' option from the search results)
While just a single line in the Collecting Info form, this is actually a form on to its self, with many subforms inside it. You can access the Locality form via the Collecting Information, or from the Data tab of the Specify. For a refresher on navigating the task bar, click here.
![]()
Geography is a lookup table. It searches the Geography tree based on one of 4 categories: Continent, Country, State and County. Remember, Trees in Specify are a method of holding data in a series of nested nodes from coarse to fine granularity. Therefore, when you use the geography lookup field, you have to type the finest 'slice' you have. In most cases, this is the County Name. Sometimes, it's just the State. When the data gets as coarse as Country or Continent, we still record it- some data is better than none, and you never throw away data!

Outside of the US, this system does not translate quite as neatly, but if you remember to use the finest division of data you have, most of the time you'll be fine.

Degrees of Latitude and Longitude are divided into degrees °, minutes ', and seconds ". The default we use is Seconds can show precision up to 7 decimal places. Only use the numbers that are there- adding 0's at the end of a shorter entry implies that there is a really high level of precision. The default is set to decimal degrees, but the drop down menu lets you select which format you wish to use. You will only be filling out lat/long info if it is provided to you. The other way of getting coordinates is Georeferencing, which is a separate animal and required more in depth training than will be covered here.
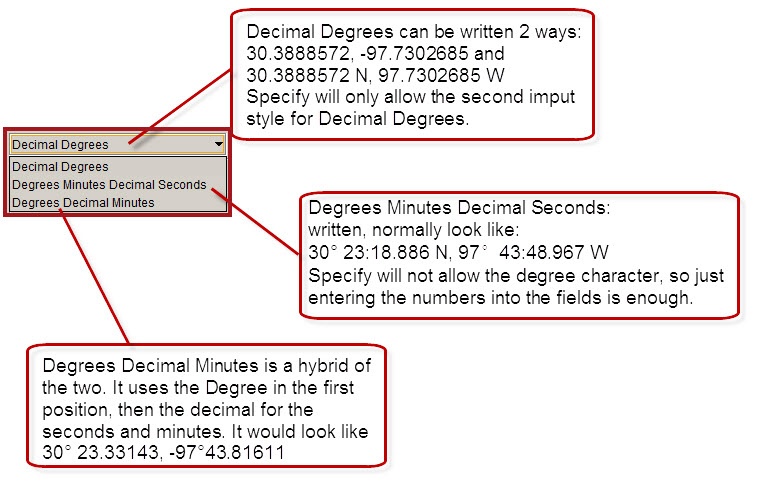
Depending on your selection in step 8, you'll enter the lat/long according to the coordinate setting. None of these options require you to know how keystroke combos to make a degree sign '°' (hold down alt key, type 0176) so just type the numbers.Specify automatically translates them to to decimal degrees.

When you are entering the lat/long that were given to you, most of the time those coordinates will be 'Collector, no source'. This is not to say the collector is guessing- but they could be using GPS, topo maps, found the coordinates on Google Earth...we just don't know for sure. In cases where we DO know, select the actual method.

Each of the methods of determining latitude and longitude will have some margin of error inherent in the method used. Listed below are relevant modifiers.
- Collector, no source- no precision or accuracy margin.
- Dead reckoning- no precision or accuracy margin.
- GPS- will depend on make and model of GPS used. See manufacturer issued owners manual for more information.
- Geolocate- a study in 2004 shows Geolocate to be accurate to 2.11 km in a trial of 100 randomly selected records. See Murphy et al, 2004 for more information.
- GoogleEarth- uses SRTM data, which offers something like 30m vertical accuracy, at 90m horizontal grid spacing.
- Map- USGS map accuracy standards vary according to map scale. Please see the+USGS Map Accuracy Standards+ for relevant data. Be aware that most USGS maps are NAD 1927 datum.
- Terrain Navigator- The match will always be within five tenths of a second
Verbatim Locality:
This is EXACTLY how the locality info is written on the label. Always enter ALL of the verbatim info here. All data not listed in TagSurv's locality name should be placed in brackets. Ex: Shoal Creek, Austin, Travis ???[Travis County, TX, USA 33.000, -100.000, method: geolocate, accuracy: high] All data needs to be moved over!
If you can only read a part of the label, you can add your own information in square brackets [ ]

[illegible] River, Travis Co., TX
unknown locality, Travis County, Texas, USA
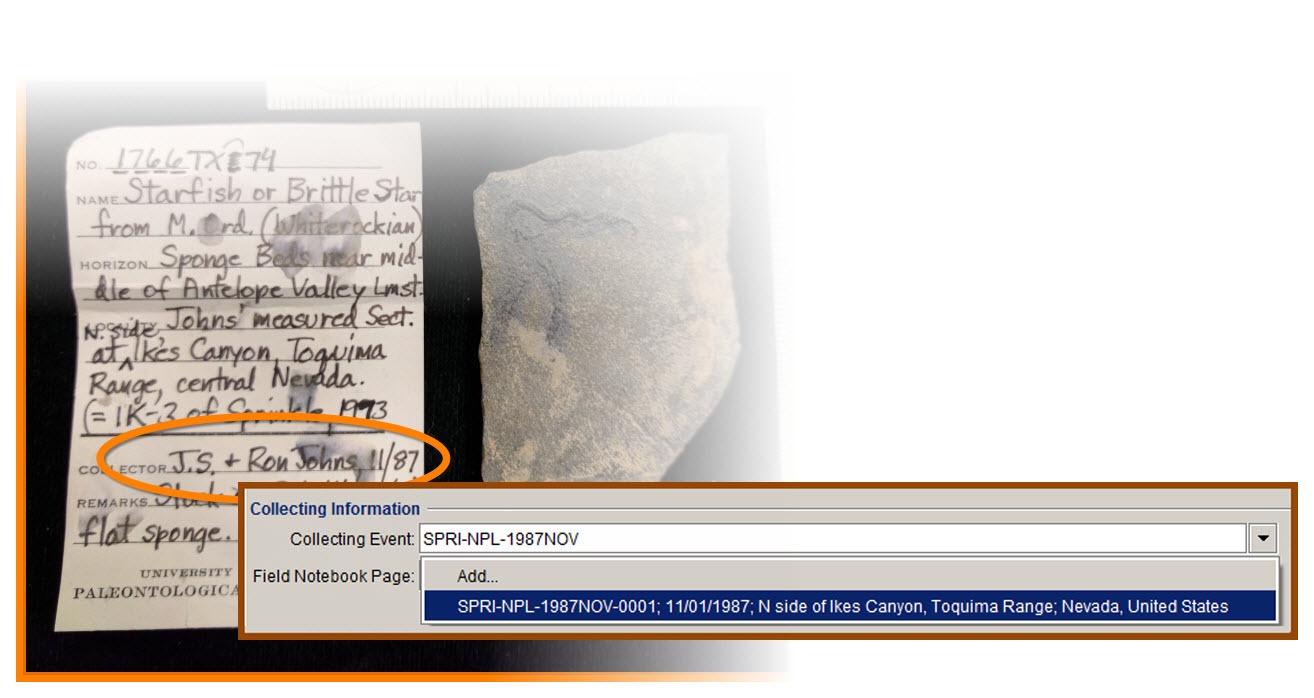
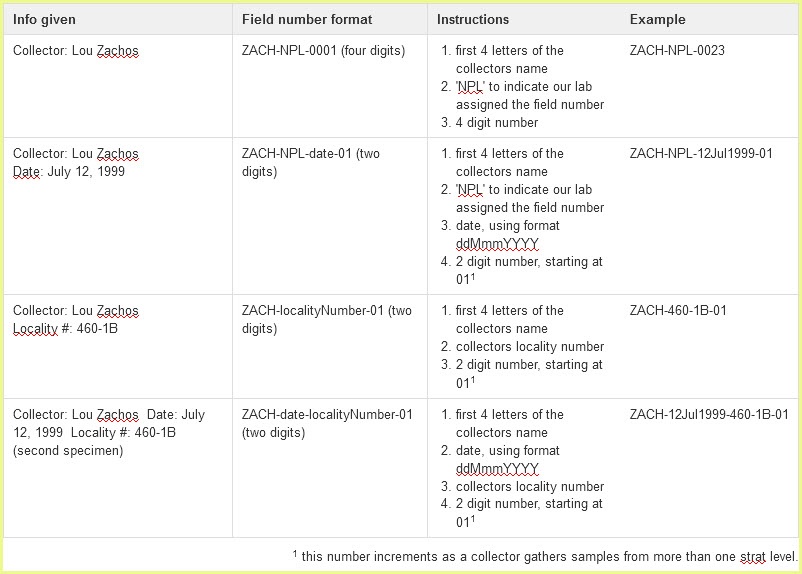
A field number is a number assigned to a 'find' in the field. These will sometimes tie into Field Notebooks, so we can point a scanned notebook page right at all of the things that are tied to that number. Notice, I said 'all of the things'. A field Number can have many collection objects associated with it. The core idea here is that a field number applies to a discrete event- the discovery of the object. If the collector moves over 20 feet, and finds more things they would give them different field numbers because the locality is slightly different. It should also be noted that anytime any of the collecting information changes, the field number should change. What I mean here is that, lets say you find 5 fossils at a single site. You pack up 4 of them, then a friend comes and grabs the last one and plunks it into a baggie. That last object would get a new field number because it has a different collector. It's appropiate to give a derivitive number in this case- say, your field # format is the local nickname (LBH=Limb Bone Hill) + grid number (12) + day (05/22/1998). The field number for the one your friend packed could simply be LBH_12_05/22/1998_b.
If there is no Field Number, follow this chart to find how to create one. Remember, the field number is the foundation to the Collecting Info- Locality, Geography, Collector and Paleo Context all pile on this number.
Verbatim date is where you record exactly how the date was written by the collector, with no concern for formatting. The other date fields are pre-formatted fields, but if you click the drop down you'll find the options available changing the formats.

This section of the Collecting Info is just below the Locality block. Paleo Context is how Specify 'sets the stage' for each Collection Object. Here we have the method of recording the geological time in which the fossil came from, as well as the rock in which the fossil was preserved.

This is how we record what point in the Geological Time scale the item came from. This field links to up the Chrosostrat 'tree' which orders all the nodes in a nested structure.
To fill out this field, just type the name of the smallest unit. In the above example, 'Norian' is all that is entered, then the drop down is clicked. Specify formats the nested nodes from most specific to least.

Please note, when you have 'Lower Cretaceous", the most specific search term would be "Lower". Sometimes, terms will be said to be lower (or upper, mid..) in the data you have but there is no entry for that in the Chrono tree. In these cases, just use the term and put the more specific data in the remarks.
Each of these nodes has a data form with it that you can look at if you want to know more, but under no circumstances is anyone to add or edit nodes.
Lithostrat works in a similar fashion to Chronostrat- type the most specific term (most specific= member, followed by Formation then the very general Litho Group). Oftentimes, the rank 'formation' or 'member' is not part of the Litho name.

Please DO NOT edit or add nodes to this tree. If there is a subdivision to a unit that is not part of the tree (say, if the label said "Upper part of Roxton Limestone Member") this is the sort of thing that belongs in the PC remarks. Only select the exact node you are looking for. If you are working from a label that says Gober Chalk, Roxton Limestone member, DO NOT assume it's part of the Austin Group. Look for a Gober Chalk entry without a group designation. Geological units change names from state to state, and are renamed and reclassified pretty often. Questions or requests for help should be put in the Data Entry Issues on the main CO form.
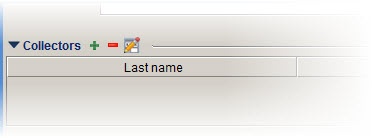
The collectors sub form links up to the all the people listed in the Agent table. To add a collector's name to the form, just hit the green plus sign next to the subform title.
This will launch the Agent search window. Just type the last name of the collector the the field, and hit the drop down arrow (or tab). In the resulting drop down, select the persons name and click 'accept'.
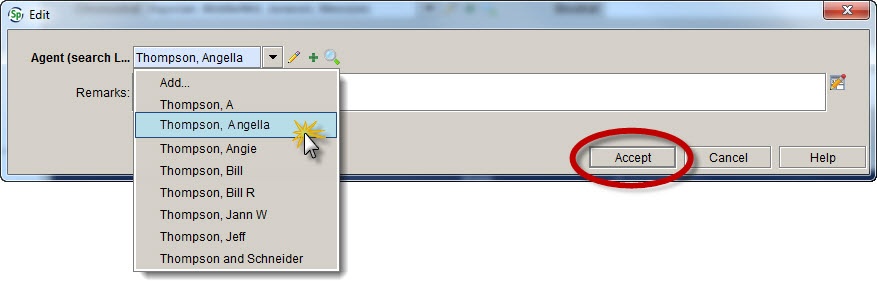
You can add more than one collector simply by repeating this step.

Attachments such as photographs from the field trip, drawings of the strat columns and other pale-context specific drawings or photos go here.
Attaching images is easy, just click the attachment button, change the view to 'grid' then drag all attachments into the window.
