Here's what the Collection Object form looks like as of April 2016. Keep in mind, Specify is a 'living' database, and there are always upgrades and tweaks being made. All efforts will be made to keep this page up to date.
One of the first things to realize about this form, it's bit of a Frankenstein's monster of a database form- parts taken from other tables, strings tied together from a variety of origins and so on. This section is meant to clarify some of this, and give a user enough information that they can understand what into to put where, and why. Because of this expanded focus, we're able to develop of some concepts that the Quick Guide touches on.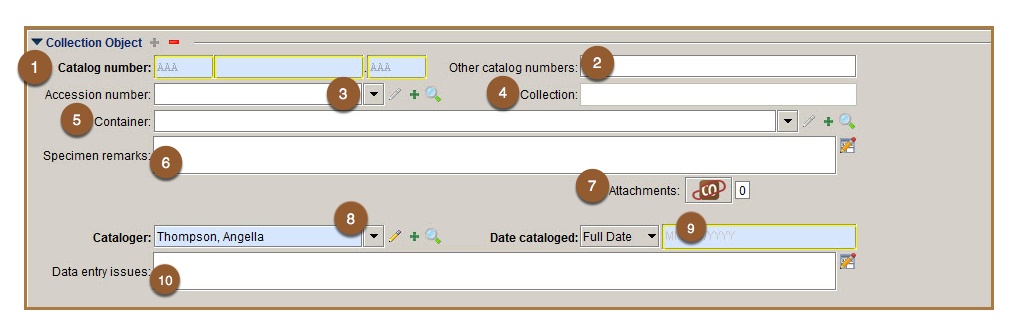
Review the primer on relational databases to see how all these sub-forms relate to other tables and 'tie in' to the Collection Object form.
Chapters in this section
Subforms in the CO form:
See how this box is blue with yellow highlights? That means this is a required field. Specify will not allow you to save this record if it's not filled in correctly (the incorrect part will highlight red)
Basic Format
Catalog numbers at NPL are unique. Specify will not let you save 2 Collection Object records with the same catalog number. The format is pretty simple, and the catalog number field on the data entry form won't let you save an incorrectly formatted number.
Simply put, the catalog format is 3 alphanumeric digits, 8 numeric digits, then 3 alphanumeric digits again.

Over the decades, NPL has acquired a variety of collections. Many of these have their own catalogs, and for the most part, we have been able to keep those original numbers. This is why you see so many collection acronyms. WSA, P, UT, TX, BEG, OMB are just a few examples.
Rarely, historic numbers must be reassigned to make them work with the Specify number format. This seems to happen mostly with TX numbers, which used a format of 4 numbers, TX, then a suffix. Sometimes the suffix would exceed 3 digits, especially in cases where a letter was added to show different specimens on the same slab. Cases like this are the ONLY example where we are reassigning catalog numbers. In the past, many Plummer type specimens were reassigned BEG numbers and this is still causing issues 60 years later.
For information on assigning new numbers, and handling catalog number conflicts head over to the Catalog Number detailed info page.
You will often see other numbers written on either the specimen or label, or both. These numbers need to be entered here, separated by a comma. If you can identify the catalog, put that in there also. This is especially important when a Plummer number has been crossed out and reassigned a BEG number (an act that was very popular in the mid 1900's), also as smaller catalogs get brought under the NPL catalog system, keeping the original catalog acronym and number provides an important record should we ever need to backtrack.
Other catalog numbers can be on a label, on a specimen, even written on scraps of paper in the tray. They all need to be recorded.
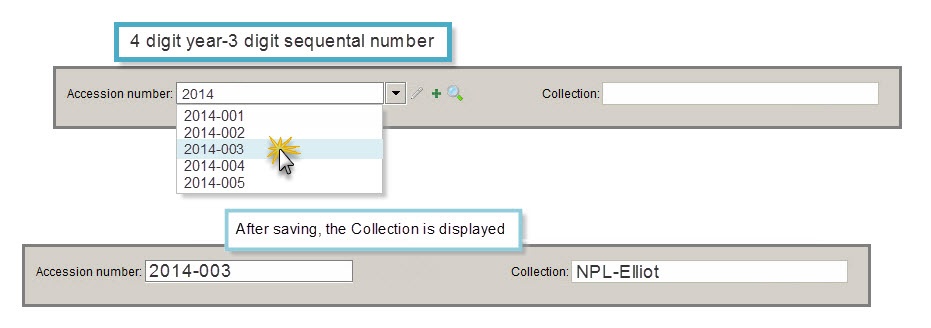
Accession records in Specify help us track important legal and provenance information- the Accession Number is the index number for that record. These numbers are formatted to show the year the material was accessioned, and the order in which it came.The Accession Number field in the Collection Object form lets NPL 'tie' the Accession record to the Collection Object, so it's important to have the correct number in this field.
All collection objects should have an accession number. If you have an Accession Number, you can type the year, then tab and select the correct sequential number. The Collection field is auto completed based on the information tied to the Accession Number, and will not display until the record is saved, closed and reopened. If you have not been given a number, ask. Most of the time, the number will be on shown in the table below. This can be misleading, though, so be on the lookout for other numbers (indicating different, smaller collections within a larger collection), notes on labels naming a different collection and so on.
The Accession number is a lookup field- it has these 3 icons next to the blank field.  Generally, you'll only be using the method described below. These options are for editing or creating accession records, or doing a pre-formatted search form, that is not really set up for how we use this data.
Commonly used Accession Numbers:

When a specimen is preserved in a way that shows evidence of a relationship with another organism, that relationship is recorded in the Containers field.

The Container field is a look-up field. You can either add a new container, or search for an existing one.
Create New:
Launch subform by clicking on the
- Fill out name of container and select a relationship type
- Briefly describe the relationship
- Add specimens to the container
- Save and exit
The Parent/Child relationship is not currently being used.
Add CO record to an existing container:
- Open the Collection Object record.
- Click on the
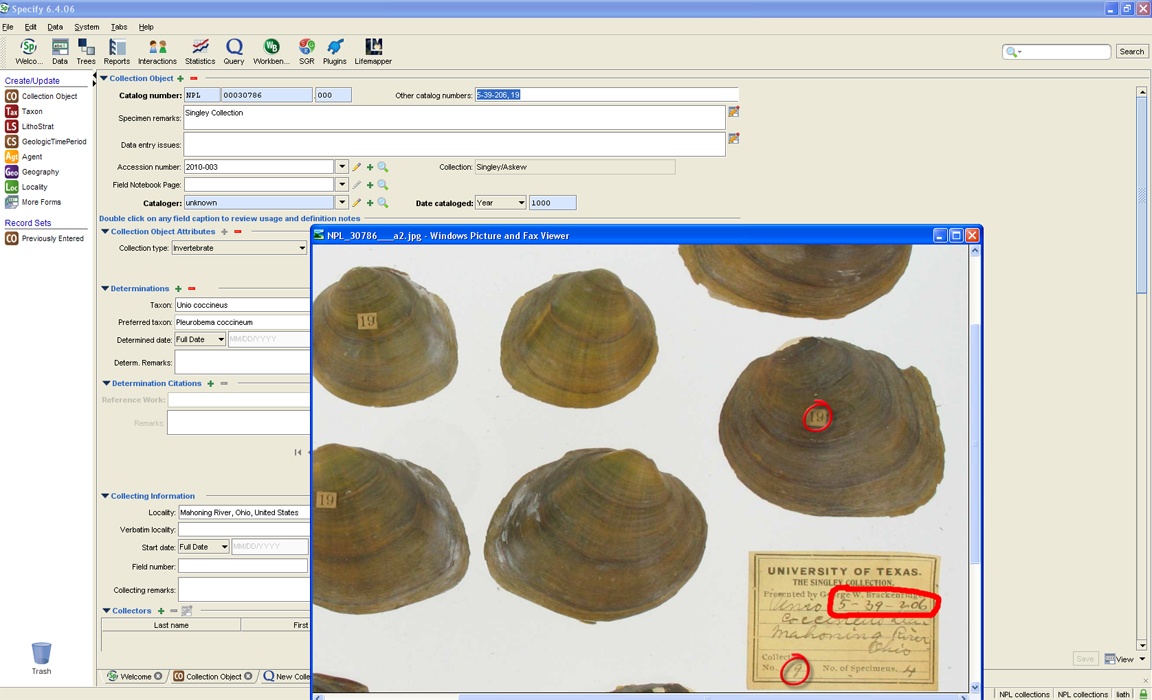
 magnifying glass icon at the far right hand side of the Container field. (see 1st image)
 - The pop up window searches for Containers by name. Wildcards ( * ) can be used to broaden search.
- Select the name of the Container you are looking for, click OK and exit.
This is one of the more confusing aspects of the CO form. See the 'about' page for clarification.
Most of the forms have a remarks field, and we did this so that we could at least categorize the bits of information that have no other set 'home' database field. Notes about the specimen, its history ('given as a gift to Dr Sprinkle at his retirement party') and in some cases, notes about resolved data entry issues below here. Comments about the rock formation it came from, the conditions of the field trip while it was collected and so on...these all belong in remarks field in other tables.

Remarks about the specimen, it's history, or cataloging issues go here.
Before attaching images to the CO field, please be sure you've followed all the steps shown here.
Specimen attachments include photos of the specimen, line drawings, written notes and all sorts of other paraphernalia. For example, Dr Sprinkle has been known to write pages and pages describing interesting specimens. Scans of these notes would be attached here, at the Attachment icon.
With the form in Edit mode, click on the CO Attachment icon.

Be sure to change the mode from Icon to Grid- this allows you to drag and drop images from a folder to the database.
Then, simply drag and drop the images and save the changes.

Always make sure the Web Attachment Server is pointed to the right place!
This is another lookup table, as indicated by the icons. This field uses the last name and searches the Agent table for matches. 'Agent', in this case, is not as fun as it sounds. No CIA or FBI moles work here, as far as I know. In this case, Agent means person, organization, event, or in some cases, a class.
For this field, just type the last name of the cataloger (usually, this will be you) and hit tab.
Now, since you are doing the data entry, enter your last name and hit tab. Find your name you on the drop-down and select it. Remember, this field is asking you WHO put the data into Specify, not who made the original entry in those awesome old catalogs locked away in the curators office. I say this because when we first started using specify, it had been decided to use the name and date of the original catalog entry. Since we had little to no data on the people who did the work and when they did it, those entries were filled out as 'unknown' cataloger with a date of 01/01/1000. So don't worry when you see that, it's an artifact but one we're not really going to worry about.
If the name is not there hit the green plus sign. This will open the agent form. Fill it out to the best of your ability, and hit save. The pencil icon is for editing an existing record. This is rarely needed, but if you see a typo in your name, alert a staff member who will go through the process of fixing it with you. Don't edit a lookup table record on your own- it seems really straightforward, but there's a lot of room for making some pretty huge mistakes here. Changing one lookup table record can, in fact, cascade and cause changes in hundreds- even thousands of records.
This is another required field. The default here is dd/mm/yyyy. You do not have to put in the slashes, simply type the numbers of the date, say 06222016, and as the cursor progresses the slashes are automatically filled in. This is great if you type it all correctly, but not so much if you forget to add a '0' in front of a single digit day or month. Doing that ends up looking like this:
![]()
Now, since you are doing the data entry, enter the date you created the record. We do have original catalogs, and in some cases we even know the who and when those original catalog entries are created. This is not what this field is asking for- this field wants you to record when the specify record was created. I say this because when we first started using specify, it had been decided to use the name and date of the original catalog entry- the books held in the curators office. Since we had little to no data on the people who did the work and when they did it, those entries were filled out as 'unknown' cataloger with a date of 01/01/1000. So don't worry when you see that, it's an artifact but one we're not really going to worry about.
Maybe you've notices that the 'full date' format has a down arrow. That means its a drop down, and this opens a menu that lets you pick different date formats. This may come in handy in other tables, but since you can just check the date on the computer screen, it's safe to assume you won't need month/year or year only date formats for this field.
All formatted dates are done using standard American English. The only time we deviate from this is the Field Number.
Specify is a complex beast of a database. One of the principles of database management is to keep everything in its place, and have a place for everything. Reality, of course, has other ideas.
Once a week or so, one of the data managers at the lab will look at the entries in this field and fix as many of them as they can. Examples of information that should go in this field are: when you have a taxon that is not showing up in the taxon drop down menu, when you can't access a table for some reason (in this case, also let us know what information you needed to add. Knowing the locality form is not accessible is great, but knowing what locality you need added is better).
DO NOT add remarks to this field. Information like 'no storage data' belongs in the Inventory and preps table- we even have a 'missing' entry in the Status drop down. Also inappropriate are remarks about edits that were made to the data, permanent notes recording cataloging errors, other numbers or other such information that would be better served in a remarks field.
Still not sure? Try phrasing it like a request or a question. If you can, and it's a request that can be resolved, it belongs in this field. If not, this information belongs somewhere else.

It's important to remember- this field is where you ask for help, not put permanent information!