
Whitening Agents:
Ammonium Chloride (http://www.sciencelab.com/msds.php?msdsId=9927431)
Magnesium Oxide (http://www.sciencelab.com/msds.php?msdsId=9927216)
Safety Tips:
Whitening should always be done in a fume hood. See safety information MSDS sheets referenced above.
Notes Regarding Whitening (from L. Zachos and Ann Molineux):
- Be sure to not leave the powder on too long because it will absorb moisture from the air. To clean it off, simply get the specimen wet and wipe it off.
- Carefully dust your specimen beforehand. Whitening makes the relief of the specimen stand out, therefore it will make the smallest piece of lint or hair stand out several orders of magnitude. Anyone who looks at the specimen will first notice that piece of lint or hair!
- With practice, whitening becomes a fantastic technique for bringing out the subtle details of your fossils for photography. Your first few specimens may look like they had just lost a paintball match. With enough practice, however, you will become an excellent smoker that’s smooth on the draw. Then, once you see how your photographs turn out, you won’t be able to stop until your loved ones intervene, saying that so much smoking around the kids cannot be good.
- Avoid too much powder. A thick layer will mask many of the finer details that you our are trying to enhance. Uneven coating will provide patchy enhancement.
- Avoid touching the specimen after it is smoked- unless you really want to add your fingerprint into the image!
Whitening equipment and setup for Ammonium Chloride:
1) Prepare camera for imaging
2) Select specimens to be smoked - make sure they are clean
3) Decide if they need to be blackened prior to whitening - blackening is discussed later
4) Transport specimen to fume hood and rest firmly near the front
Whitening Specimens for Photography- Method 1 (Lou Zachos method)-air is automatically continuously pumped over the heated powder
1) Equipment and chemicals
- Propane torch and igniter (or lighter)
- Test tube, clamp and stand
- Aquarium air pump and tubing
- Ammonium chloride (crystalline powder)

2) Procedures
a) Heat test tube to begin to vaporize ammonium chloride, wafting the flame up and down the tube to avoid hot spots

b) Get a firm grasp on specimen. Sometimes it is necessary to use tape to create a “handle” for the specimen.
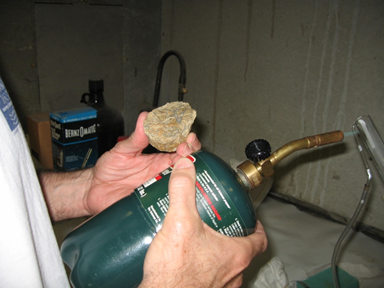
c) Hold specimen in vapor stream, moving constantly to get even coverage

Specimen and equipment can be cleaned with water (ammonium chloride is water soluble).
BE SURE that neither specimen or matrix will react with water.
Whitening Specimens for Photography-Method 2 (The Jim Sprinkle Setup)- air is intermittently pumped by hand over the heated powder
In this setup, the NH4Cl is contained in a glass tube with one portion distended into a bulbous chamber. One end has a one-way hand pump attached such that the pump will push air through the glass tube. The bulbous portion of the tube is loaded with NH4Cl and turned over the heat source to evenly heat it up until the white powder is clearly exiting the tube. The pump is then used to gently dust the specimen. This setup is faster, but requires much more practice to obtain an even coating. When the bulb is hot, lots of—often too much—powder will come out, but will become more manageable as the NH4Cl cools.
1) Equipment and chemicals
- Propane torch and igniter (or lighter)
- Glass tube with bulb for NH4Cl
- Flexible tubing with bulb to pump air over heated powder
- Ammonium chloride (crystalline powder)
2) Procedures
a) Heat the bulb in the gas flame, rotating to avoid hot spots
b) When a stream of smoke being to flow from the bulb gently puff the powder over the surface of the specimen

We do not normally use magnesium oxide for whitening at NPL.
Notes Regarding Magnesium Oxide (from Jean DeMouthe):
- The whitening process with MgO can vary with the setup and depending on who is doing it, the thickness and penetration of the coating vary also.
- The effect of the coating on a particular specimen will depend on the mineralogy, grain size, and porosity of the specimen. And the storage environment needs to be cool & dry, since MgO decomposes in water.
- ALWAYS Wear protection whenever dealing with MgO for any reason; it is strongly alkaline (pH = 10+) and can burn.
- If the specimen has to be cleaned, start with the least disruptive process, which would be a soft brush or air blown with a hand-held puffer (do not use canned air, since that leaves a residue of its own).
- If gentle brushing and blowing do not work, try rubbing with a soft cloth. If the rock is porous, however, this may drive the MgO particles deeper.
- If physical methods don’t work, and the specimen will not be damaged by water, use a gentle, room-temperature stream of clean water. Be aware that MgO + H2O releases heat suddenly, which can cause spattering. Do this only under a hood, and/or with face and hand protection.
- When in doubt, do nothing.
Published resources:
Feldmann, R.M. 1989. Whitening fossils for photographic purposes. In Paleotechniques. Eds Feldmann et al. The Paleontological Society, Special Publication 4: 342-346
Hegna, T.A. 2010. Photography of soft-bodied crustaceans via drying, whitening, and splicing. Journal of Crustacean Biology 30(3): 351-356.
Jago. J.B. 1973. A hazard in the magnesium oxide method of whitening fossils. Journal of Paleontology 47: 591-592.
Kier, P.M., R.E. Grant, E.L. Yochelson. 1965. Whitening fossils. In Handbook of Paleontological Techniques. W.H. Freeman and Company, San Francisco. 453-456
Marsh, R.C. and Marsh, L.F. 1975. New techniques for coating paleontological specimens prior to photography. Journal of Paleontology 49: 565-566
Teichert, C. 1948. A simple device for coating fossils with ammonium chloride. Journal of Paleontology 48: 102-104.