Page History
...
- Load the COPY of the final sequence in the timeline
Delete anything that is before first picture such as slug or extraneous media. First PICTURE IS EXACTLY WHAT IT MEANS THE FIRST IMAGE OR SOUND OF YOUR MOVIE!!!
Double click on the Countdown - ProRes.mov to load it into your source window 
Press the "T" key or mark the entire clip so that the duration = 8 seconds 
Place the timeline indicator at the head of the timeline. Make sure no in or out marks are in the timeline. Make sure all tracks are enabled. 
Edit the countdown into the timeline using the Yellow - splice in tool. 
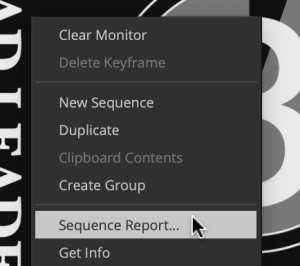
Then right click in the record side of the composer window.
Choose Sequence Report.
Change the Starting TC: to 59:52:00 Click Apply Changes> Then click on "Cancel" to close the window. 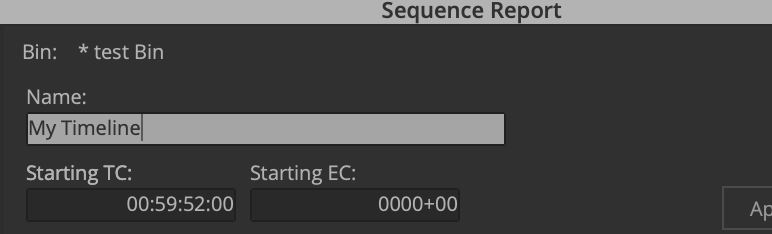
Check the timeline and make sure that the 2 Pop is at 59:58:00 timecode, as shown here.
First Picture should be at the 1:00:00:00 timecode.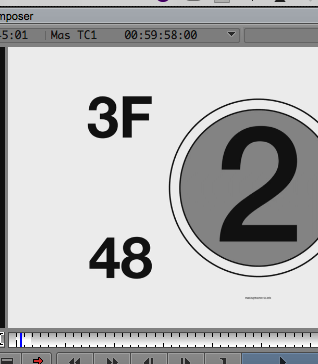
Next go to the end of the timeline and put the "Tail Leader" at the end. Put the blue position indicator at the end of the timeline.
Make sure there are not any In or Out marks in the timeline and all the tracks are selected.

Load the Universal Tail Leader into the Source side window. 
Mark the entire clip by clicking the "T" key or mark an in and an out on the whole clip. Duration should be 8:00 seconds 
Edit the tail leader into the timeline using the RED Overwrite Tool. Save your project in AVID. 

Step Two – Export an .AAF of the audio to import into ProTools
...
Overview
Content Tools