Step One - AVID - Prep the sequence with a Countdown at beginning and End Of Picture tail pop at the end
| Download these two files Countdown and Universal Tail Leader | |
Open your AVID Project and Import the two quicktimes you just downloaded. Go to >File>Input>Import Media |  |
Select the two files Click on Options |  |
| Click on Options again |  |
Image Size Adjustment – choose Image sized for current format Click OK |
|
Choose DNxHR SQ MXF for a 2K or 4K Project |
|
or Choose DNxHD 175 for an HD as the Resolution then select Open |
|


Select your picture locked timeline and duplicate it.
Then make a new bin and copy the timeline into the new bin.
You can do this by holding down alt/option and dragging the timelne over to the new bin.
- Load the COPY of the final sequence in the timeline
Delete anything that is before first picture such as slug or extraneous media. First PICTURE IS EXACTLY WHAT IT MEANS THE FIRST IMAGE OR SOUND OF YOUR MOVIE!!!
Double click on the Countdown - ProRes.mov to load it into your source window 
Press the "T" key or mark the entire clip so that the duration = 8 seconds 
Place the timeline indicator at the head of the timeline. Make sure no in or out marks are in the timeline. Make sure all tracks are enabled. 
Edit the countdown into the timeline using the splice in tool. 
Then right click in the record side of the composer window.
Choose Sequence Report.

Change the timecode to 59:52:00 Click Apply Changes> Then click on "Cancel" to close the window. 
Check the timeline and make sure that the 2 Pop is at 59:58:00 timecode, as shown here.
First Picture should be at the 1:00:00:00 timecode.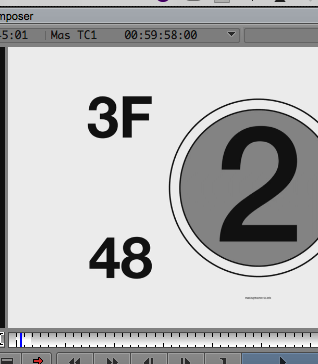
Next go to the end of the timeline and put the "Tail Leader" at the end. Put the blue position indicator at the end of the timeline. Make sure there are not any In or Out marks in the timeline and all the tracks are selected. 
Load the Universal Tail Leader into the Source side window. 
Mark the entire clip by clicking the "T" key or mark an in and an out on the whole clip. Duration should be 8:00 seconds 
Edit the tail leader into the timeline using the RED Overwrite Tool. Save your project in AVID. 
Step Two – Export an .AAF of the audio to import into ProTools
Check the Audio Project settings and make sure they are set to 24 bit >Go to AVID Media Composer > Preferences |
|
Click on the Project >Choose the Audio Project Setting and double click to open |
|
>Choose the Main tab >Choose the Sample Rate 48 KHz >Bit Depth 24 Bit |
|


Open sequence in timeline and select the video and audio tracks to export. Mark an in point at the beginning of the portion of the timeline to export and an out point at the end of the portion of the timeline to export. If the whole timeline is to be exported mark an in point at the beginning and an out at the end.- Example of how timeline should look before exporting.

| Choose File>Output>Export to File |  |
| Click on Export Setting > Options |  |
Choose the following: Make sure that include all Video / Data Tracks in Sequence is not checked Then Click on Save |
|
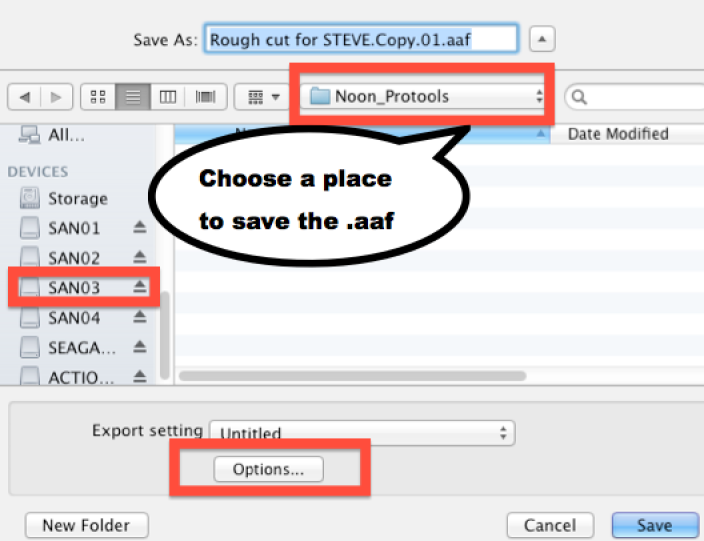
| Click New Folder |  |
Make a Folder on the destination hard drive to hold both the .aaf and the consolidated Audio Files. |
|
Navigate to the hard drive and folder to save the .aaf and the Consolidated Media Click On Save |
|


Step Three - Export the QuickTime "Chase" Movie to use in your ProTools Session
!! If you are working in an Ultra High Definition resolution (ie 2K, UHD, or 4K) you need to first change your project to HD !!
This is necessary because our mixing workstations do not support UHD resolutions very well.
| 1.) Navigate to the Format Tab in the Avid Project Window |
|
2.) From the Preset Drop-down Menu select HD 1080 Then from the Frame Rate Drop-down Menu select 1080p/23.976 (or your the frame rate relevant to your project) |
|


Now that your project is being down-sampled to boring old High Definition...
Open your sequence in the Timeline window and select the video and audio tracks to export. Mark an in point at the beginning of the portion of the timeline to export and an out point at the end of the portion of the timeline to export. If the whole timeline is to be exported mark an in point at the beginning and an out at the end.
Here is an example of how your timeline should look before exporting.
First select your final timeline and choose >RT click the timeline>Choose Output>Export to File |
|
The next window that opens choose Options (Mac) |
|
| (Wndows) |
|
Choose MOV |
|
Uncheck use Marks and Selected tracks to make sure the entire timeline gets exported. But if you don't want certain tracks or only a portion of the timeline you can put in and out points on the timeline and choose Use Marks and Use Selected Tracks |
|
Choose 1920 x 1080 |
|
| Choose H.264 as your codec |
|
| Choose Variable Bit Rate Single Pass to save time on the export |
|
Scroll down the window and you will see the audio settings Make sure Audio is checked and choose Format - PCM Sampling Rate 48 Hz Bits per Sample 24 Choose Stereo Review Compression should be set to H.264 Choose Variable Bit Rate Single Pass for a faster export Click on Save |
|
(Mac) Choose a place to save the file and Name it Then Click Save |
|
(Windows) Choose a place to save the file and Name it Then Click Save |
|
Here is the exported file example |
|


!! DON'T FORGET !!
If you are working in an Ultra High Definition resolution (ie 2K, UHD, or 4K) you need to change your project format back to your original resolution !!
Overview
Content Tools