THE FIRST STEP IS IF YOU ARE USING A MAC THAT IS RUNNING MTN. LION 10.8 THEN YOU WILL HAVE TO CHANGE THE NAMES FOR YOUR RAW MEDIA FILES. |
|
Once an AVCHD folder structure is copied to a computer running Mac OS X v10.8, the subdirectory that contains the media itself will appear with a single QuickTime document (which is in fact a package) inside it. This will most likely be called 'PRIVATE' but may have a different name. |
|
You HAVE TO change the "PRIVATE" to lowercase AVCHD and BDMV to lowercase, |
|
Change "AVCHD" to avchd |
|
To this "avchd" |
|
Same thing for the "BDMV" folder, cha nge that to "Lowercase" |
|
Here is an example of what the file structure should look like for a file that was recorded in a Panasonic HMC 150 camera |
|
Launch Media Composer |
|
The Initial Project Screen will open. Here is where you choose where you create and save new projects. Click on the "Folder" to select where to save your new projects also how to navigate to already existing projects. |
|
Navigate to the hard drive and folder that you want AVID to access and save new projects |
|
You can look at the path where AVID will be accessing projects once you select the folder |
|
Now click on the "New Project" button |
|
The New Project Dialog will come up. Select the project parameters |
|
Select the newly created project and Click OK at the Select Project Screen |
|
When the project opens the next step will be to link to the HMC150 raw files that were backed up in their native file structure. |
|
Navigate to the folder on your hard drive that is located in>Local Disk or hard drive>PRIVATE> |
|


The next screen prompt will ask you to choose the AMA bin configuration. Just use the Default > Bins Based on Current AMA Setting and click OK |
|

Note – If you are not using a UT- Radio TV Film Computer then you might get this problem.

If you do then you need to install the AMA Plug Ins for AVID so that AVID can read the raw media files from the camera. To find where to download the plug ins go to >Marketplace>AMA Plug-Ins |
|

The AVID web site will open and you can then search for the AVCHD AMA Plug-Ins downloads
NOTE YOU MUST QUIT AVID Media Composer TO INSTALL Plug Ins!!
Once you have installed the plug ins – Restart Computer just for safety and then open you AVID project again and retry the Link to AMA Volume
Back in AVID go to >Bin>Choose Columns |
|
Choose the two settings >Video and Video File Format |
|


A new bin will open and populate with the raw data files. They look like AVID clips but there is one difference in the icon that looks like a "Master Clip" with a chain link attached to it.

This is the comparison of the normal Master Clip and an AMA linked file |
|

Next we need to change the AMA linked files to normal AVID Master Clips. All we are doing is transcoding to a .mxf file.
To do this, select all the AMA files in the linked file bin shown above.
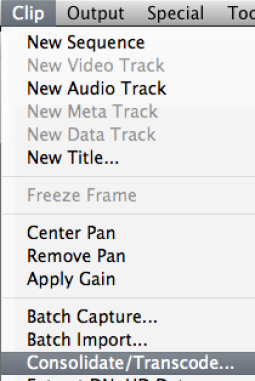
Then Choose >Clip>Consolidate/Transcode |
|
|
|
This dialog box will pop up showing how many clips are being transcoded and how long it will take. |
|


After Transcoding the master clips you want to use will have a .new extension

The next step is to make a new AVID bin and move your "Transcoded" master clips (with the .new extension) to a new bin and close the bin that holds the AMA linked files. Edit with the master clips in your AVID project. They can be used just as any AVID master clip would be used in the AVID project.
Overview
Content Tools