Downloading The Database Server Software
ATTN MIS UNDERGRADUATE STUDENTS: This page provides instructions for downloading the Oracle SREVR component. You only need the Oracle CLIENT component. For Oracle CLIENT instructions please go to https://wikis.utexas.edu/display/MSBTech/Installing+Java+Development+Kit+and+Oracle+SQL+Developer.
The current download URL for all Oracle Database Enterprise products is http://www.oracle.com/technetwork/database/enterprise-edition/downloads/index.html. From this page download Oracle 11g for your operating system. Due to the size of the install files it is downloaded as two compressed file archives. Each archive contains different files that belong in a folder called database. Once downloaded, extract the contents of each into the same directory. For example, don't extract compressed_database_1of2.zip into a folder called "database_1of2" and compressed_database_2of2.zip into a folder called "database_2of2". Instead, extract the contents of each archive into the same folder called "database". When extracting the second archive into the same directory as the first, you may be prompted to merge some directories. Allow the merge. Once completed, you should see a single folder called "database" that contains the following files and folders:

After downloading and extracting the files run the setup program to begin the installation.
Installing The Database Server Software
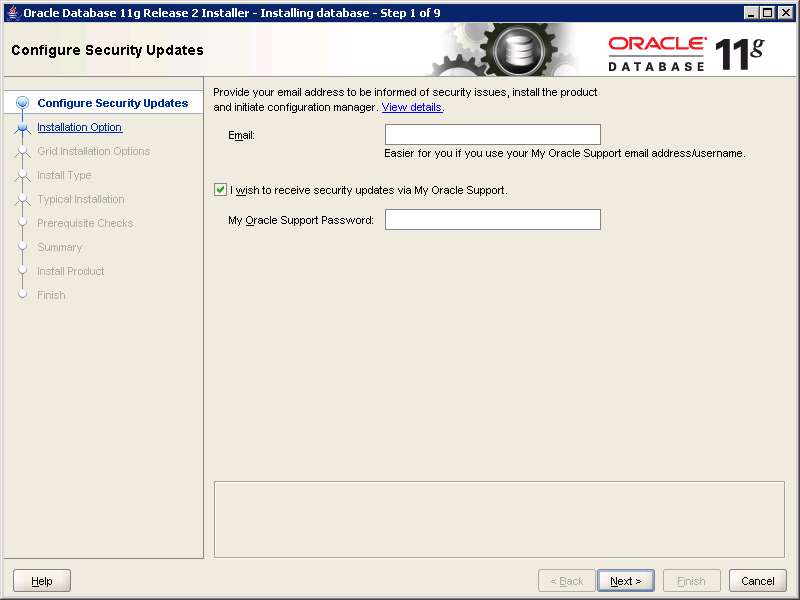
- After launching the setup program the Configure Security Update screen will prompt you to provide your email address in order to receive security update notifications. You may provide your email address to receive these updates or else just leave it blank. Once you decide click Next.
When prompted to select an Installation Option use the default "Create and configure a database", then click Next.

When prompted for the System Class use the default "Desktop Class", then click Next.

At the Typical Install Configuration screen you need to provide a password for the SYSTEM account. You may leave all the other options at their default or change them as you wish. The "Global database name" will default to ORCL or ORCL appended with the Internet domain name of your computer. This name corresponds to the SID which you will later use in the client tool. If you change the name, remember what name you change it to. Click Next to continue.

A few more screens will appear showing you the progress of the installation. If a dialog box prompts you to modify your firewall settings to accommodate the Oracle database software, then you should allow that modification.
- Installatioin is now complete, and you may connect to your local database server.
Installing The Database Client Tool
Oracle SQL Developer is the tool you will use to connect to your database server. If you have not already installed it, please visit https://wikis.utexas.edu/display/MSBTech/Installing+Java+Development+Kit+and+Oracle+SQL+Developer for instructions.
Connecting To Your Local Database Server
After installing Oracle SQL Developer launch the SQLDeveloper application, and select "New" from the "File" menu or else just click the "+" sign on the Connections tab. You will then be prompted to provide the following settings to connect to your local database server.
- Connection Name: This is just a name you can use to save your connection settings. You can set it to anything you want, although we recommned you use the name you gave to your database. In this case we used the default name ORCL. If you click the Save button, the connection settings you enter into this secreen will be saved using this connection name.
- Username and Password: Unless and until you set up another user account within your Oracle database server, you will need to log in as SYSTEM using the password you entered during step 4 above.
- Connection Type: In this case you need to use the deafult "Basic".
- Hostname : Enter "localhost", since you are connecting to a database server on your own computer.
- Port: Enter 1521, the default port for Oracle database server.
- SID: Enter the database name you entered in step 4 above. If you did not chose to rename it, then it will be called ORCL.
Click Save to save these settings so you don't need to re-enter them again.
Click Connect to connect to your database server.

Troubleshooting
If the installation gets about half way through and then complains that a file could not be found, then most likely you did not extract the contents of the second downloaded archive into the same directory as the first. For example, if the second archive contained a directory called "stage" then that directory needs to be extracted to the exact same directory where all the other files from the first archive were extracted. If you receive a message asking you to merge this "stage" directory with an existing directory called "stage", then allow that merge. The error dialog box should give you the option to retry. Once you have merged the contents of the second archive in to your installation directory, then retry. The installation should then resume.