All staff and volunteers at NPL must have an active EID.

For instructions on getting an EID, see the UT EID Self-Service Tools

Much of the work at NPL involves computers. Even tasks that start in the collections or prep room often end in front of a monitor, so its best to get familiar with at least a few of the programs and applications we use. There are many online tutorials that can help, and they are linked on the right hand side of this page.

As part of the NPL orientation packet, you will have created an EID and read and signed our IT policy.

The first time you log into a computer at NPL, you will have to navigate to our share on the server. This is done by clicking on the windows icon in the lower right of the screen, and typing the following into the search field

\\austin\disk\jsg-npl\

From here, you can click on the folder you need to access. It makes things much easier if you create a shortcut for the Document Library, Image Library, and Activity Log. Instructions for creating shortcuts is linked below. Good programs to pin are Specify Database, and Microsoft Word and/or Excel.

There are a few steps you can do to make navigating our file structure easier and faster.

Not all of the folders on the jsg-npl share are accessible to all users. You cannot access other peoples User folder, nor can you access the Administrative folder. Folders accessed most often by NPL staff and volunteers are the DocLib and the ImageLib. The folders in turn hold thousands of files organized into thousands of folders. To say it gets confusing is an understatement! Use guidelines are linked below. As always, if you are not sure where something goes, or if you can't find a file you need, just ask.


Additional procedures:


These procedures and others are also saved on the network.

DocLib\code_and_scripts

Generate a list of documents, images or other file types within the same folder:


UT offers people with an EID the ability to access files from their home computers without 'tying up' a computer in lab. AnyConnect is preferable when you need to access files, but don't necessarily need to use any software specific to the lab. In cases where you need to use software installed on your work computer, you'll need to contact ITS and ask about remote privileges.

To set up AnyConnect, follow these steps.

1) go to vpn.utexas.edu - you may have to install DUO, a dual authentication application, before being allowed to proceed. 
2) Java for Sun will auto launch, will take a few min. to load next page.
3) VPN page will show an option for downloading CiscoAnyConnect.
4) Download and install.


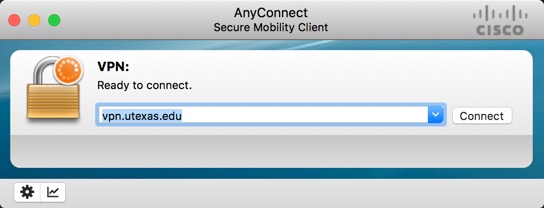
5) Launch AnyConnect.


6) You'll be prompted for your UT EID username, password and Duo Passcode. Enter these and hit OK

7) FOR A MAC: path will be https://webdav.utexas.edu/JSG-NPL
    FOR WINDOWS: path will be \\austin.utexas.edu\disk\JSG-NPL

8) Click 'Connect' and, in the next window, Sign in with your UT EID and password

9) MAC: launch a finder window, under the Shared section, select webdav.utexas....

If you don't see the JSG-NPL drive in the shared section of the finder window, close the finder and right click on the icon. You'll be shown a menu like the one below. Select 'Connect to Server' and then choose the webdav.austin server address. Now open a finder window and look to see if the JSG-NPL is listed in the left hand navigation bar under the header 'Shared'.


Once you've set everything up, accessing the server is easy- just open AnyConnect, confirm this is the server you want to use and then hit enter. Once you do that, you'll be prompted to enter your UT EID, password and Duo passcode.