We are in the process of cleaning up this page. The information and process will stay the same.
Part 1: Machine Calibration
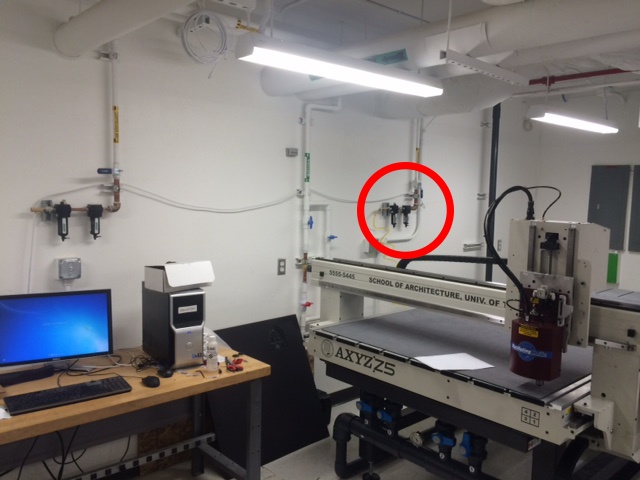
- Turn on the compressed air.
- The compressed air valve is located on the east wall of this room, between the CNC Knife and the wall.

- The compressed air valve is located on the east wall of this room, between the CNC Knife and the wall.
- Turn on the vacuum table.
- Switch is located on the west wall of this room, right behind Laser Cutter 1.

- Switch is located on the west wall of this room, right behind Laser Cutter 1.
- Power on the CNC knife.
- The power ON/OFF buttons are located beneath the CNC Knife.

- The power ON/OFF buttons are located beneath the CNC Knife.
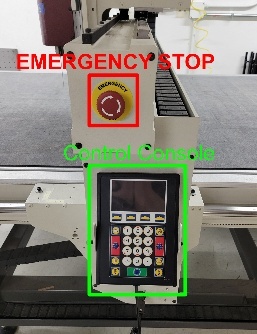
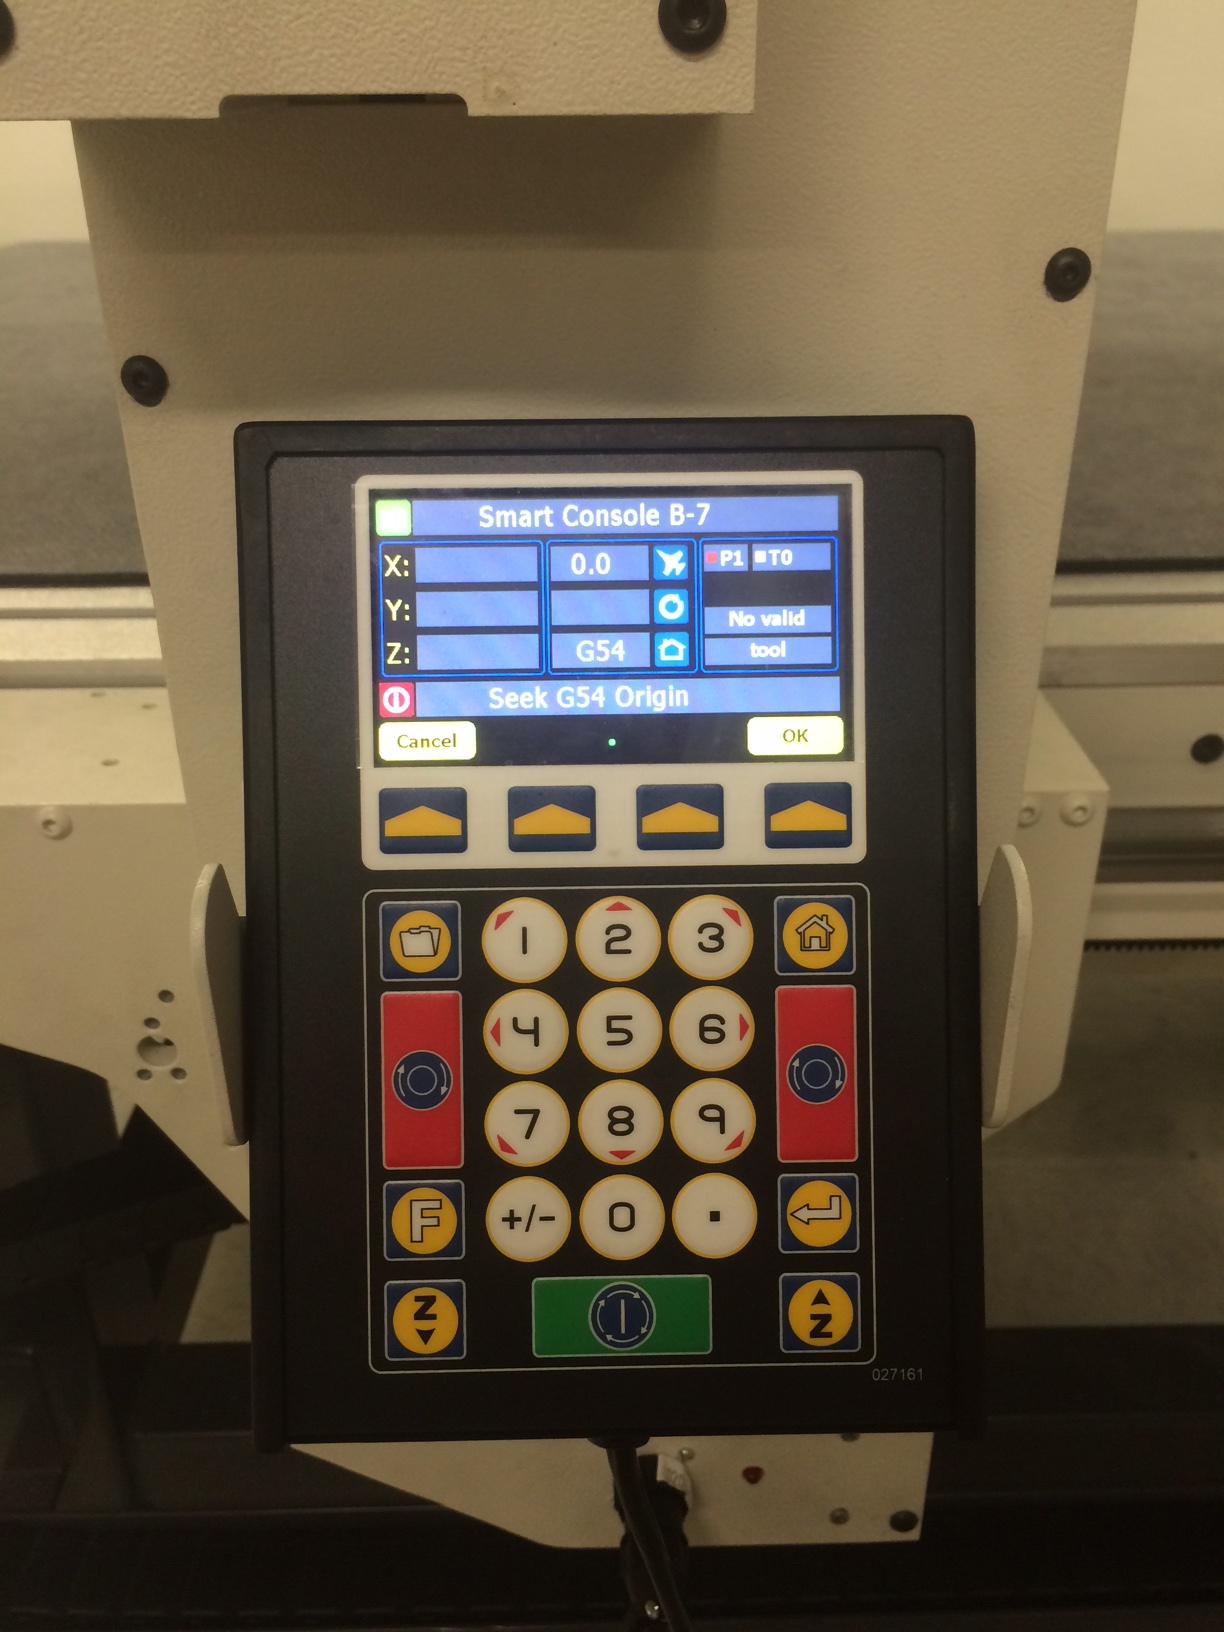
- Pickup the Control Console.
The Control Console is located on the side of the gantry below the EMERGENCY STOP.
Commands will be given to the CNC Knife in shorthand. The operator should enter the commands exactly how they are written.
At the top of this page we provide a list of commands you are likely to use for the CNC Knife. Here is a full comprehensive list of commands from AXYZ.
- Wait for the CNC Knife to come online.
- The CNC Knife will go through a few automated checks. This takes about 2 minutes.
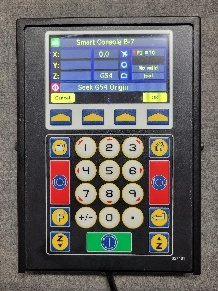
- The Control Console should now read "Seek G54 Origin?" >> Press OK.
- The CNC Knife will now calibrate its X/Y origin positions.
- The CNC Knife will now calibrate its X/Y origin positions.
Enter command F31.1 >> press OK >> press OK again.
This command tells the CNC Knife to activate the oscillating knife tool (F31) and that we're using tool #1 (.1)
- Request assistance from a Technology Lab staff member to install your blade for you.
Please note that only Technology Lab staff are permitted to change blades on the CNC Knife. Ask for assistance to install and retrieve your blade.
- Wipe the blade with a paper towel to remove any excess oils, reducing the risk of transferring oil to your material.
- This step will engage the oscillating blade. Keep clear and then Enter Command F24 >> press OK >> press OK again.
- Tool will now turn on and start oscillating the blade.
- There are multiple speeds to choose from when jogging the from point to point
- Fast - For when the blade is higher than 2 inches above the bed.
- Medium - For when 'Fast' is just too fast.
- Slow - For when the blade is within 2 inches above the bed.
- Step - For when the blade is within 0.5 inches above the bed.
- Press the +/-
 button on the Control Console to change between speeds.
 - Use the Z+
 and Z-
  buttons on the Control Console to move the blade/tool tip in the appropriate z-axis direction until it just barely cuts through a single sheet of scrap paper.
 - Press OK to set the z-zero position.
- Oscillation will now stop.
- Control Console will ask if you'd like to "Set Knife?" >> Press No
Part 2: Loading Stock Material
- Place your stock material on the bed of the CNC Knife.
- The vacuum table will be on and you should feel suction or resistance when moving your material on the bed.
- Turn on your specified zone valves and turn off the valves to unused zones to help direct airflow to zones in use.
- Check that your material is secured to the table by nudging your stock material to see if it moves.
- If stock material budges or moves then you should redo steps 1-3 until your material is correctly secured.
- Change the X/Y origin to align with the corner of your material.
- Use the arrow keys on the Control Console to position the tool at your desired start origin.
- Be careful as the gantry can move quickly!

- Enter command F10 >> press OK
- This confirms the new 0,0 or X/Y origin.
- Use the arrow keys on the Control Console to position the tool at your desired start origin.

Part 3: Running a Job
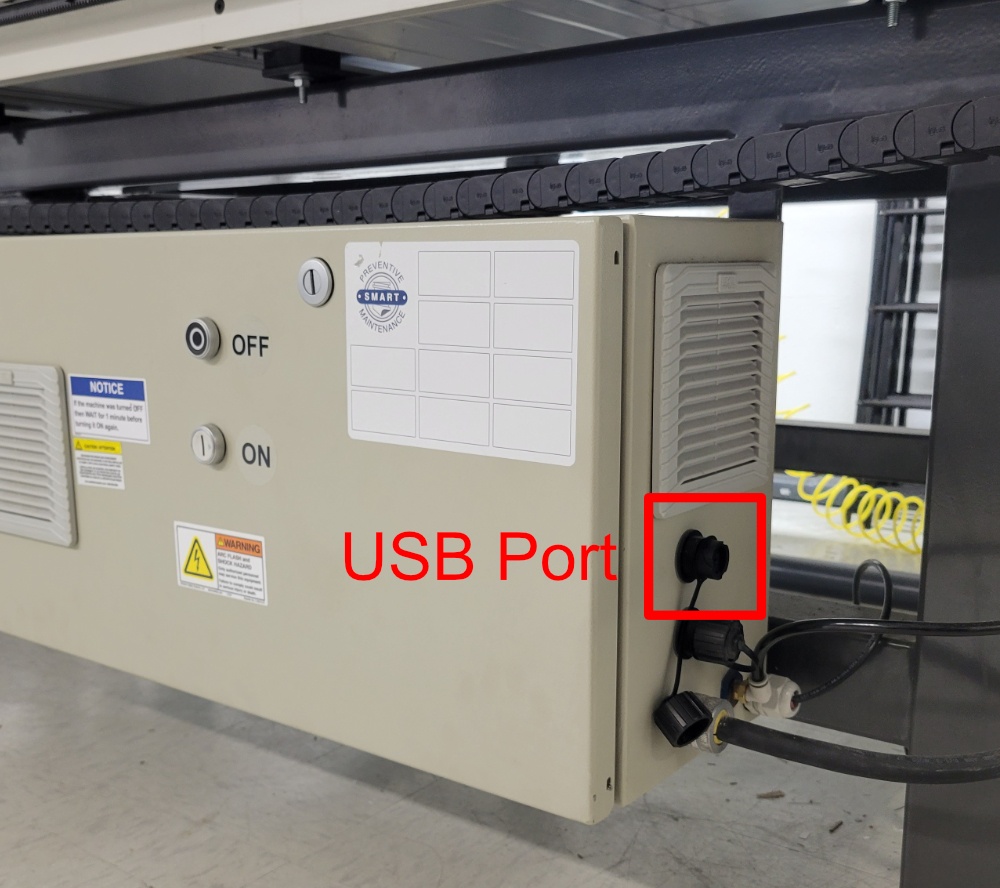
Your file must be saved in a sub-folder titles "Jobs" on a flash drive formatted to FAT32. Else the CNC Knife will be unable to read it.
A USB is available at request from Tech Desk. Please make sure to specify that you need the CNC Knife USB.
- Insert your USB drive into the USB port on the side of the control box.
- Hit the FOLDER Button
 on the Control Console to open your file saved in the "Jobs" folder of USB.
 - Push GREEN BUTTON
 at the bottom of the Control Console >> then press "OK' when you are ready to start running your operation.
- The tool will now turn on, move to it's first position, and begin cutting.
- Please keep near the EMERGENCY STOP button in the case that you do need to press it.
- We ask that you place the Control Console back onto the gantry during the cutting operation for safety purposes.
Shutdown & Cleanup Process
- Turn off CNC knife (on button west side of router)
- Remove USB
- Turn off the vacuum pump by rotating the switch on the wall adjacent to the laser cutters.
- Turn off the compressed air valve.

- Let Tech Desk Staff know that you're done with your CNC Knife reservation.
- Turn on or verify that the compressed air is on as indicated in the photograph.

- Turn on the Vacuum

- Turn on the CNC knife (The on/ off button is on the west (laser cutter) side of router. It takes 2 minutes to boot up)

- The control panel is located on the side of the router.
All commands are written in a shorthand that can be explained as follows:
F31.1, OK, OK means that you would type in F31.1, then press the OK button on the top right of the panel, and then press it again for the next prompt. - Once fully booted up, the panel will display "Seek G54 origin?" Press OK (this will find the machine origin)
- Enter command F31.1, OK, OK (to activate the oscillating knife tool (T1))
- If you need to change the blade (Only staff are permitted to change blades)
- Use command F42, OK, 180, OK (to rotate shank for blade install, 180 degrees)
- Use command F42, OK, 180, OK (to rotate shank for blade install, 180 degrees)
- Using the valves below the table, Turn the proper vacuum quadrant(s) on or off. (If your piece only occupies one or two quadrants, it is best to turn the other quadrants off for a better seal)
KEEP HANDS CLEAR OF BLADE DURING THE NEXT STEP - Take a paper towel to wipe down the metal head of the blade so oil won't splatter on your material.
- Zero the Z axis
- F24, OK, OK (Tool will now turn on)
- *There are three speeds at which the z axis will move during this or any command. You can toggle between them using the +/- button.
- Fast - for getting 1-2 inches above the bed (WARNING: If you move this down too fast and hit the bed, you will break the knife blade.)
- Medium - rarely used, nearly identical to Fast
- Slow - to come closer to bed than 1-2 inches
- Step - for final adjustments to bed top
- Using the z+ and z- buttons, move the tool in the z direction until it just cuts a piece of regular printer paper (see video). The paper test should only be done with a piece of paper - not with other materials.
 IMG_1721.MOV
 - After the paper test is successful, press OK to zero the z axis to the current position (Tool should now turn off).
- "Set knife?" No
- F24, OK, OK (Tool will now turn on)
- Changing the xy origin
- Use the arrow keys at #2,4,6,8 to position the x-y location of origin.
- Once the knife is at the desired new origin, press F10, OK
- Insert USB directly into the console (west side of router, to the right of the start button)


- Hit the folder button on the control panel to open file saved in "Jobs" folder of USB
- Push green button at the bottom to start
- "Start?" OK (The tool will now turn on, move to it's first position, and begin cutting)
- To turn off:
- Remove USB
- Turn off CNC knife (on button west side of router)
- Turn off the vacuum pump by rotating the switch on the wall adjacent to the laser cutters.
- Turn off the compressed air valve.

TIPS:
-If not cutting continuous vector: go to Edit tab and choose Fit Curves to increase speed and to cut continuous vectors. (screenshots and more details pending)
-If you receive a "Frag Error" window, just restart file. It is a glitch.
-Make sure to match your origins when prepping your file.
-Here is a link to some of the functions for the CNC knife: https://www.axyz.com/us/functions-en/
-If knife is not cutting along its sharp edge (ie. cutting 90 degrees to it) use the following series of commands to solve:
- Enter command F822
- Hit OK for Tang RPM without changing anything
- Hit OK for Lift Angle without changing anything
- Hit OK for REVS without changing anything
- Hit YES for reset OSC knife
- Use the CCW and CW buttons to rotate the knife until the blade edge faces towards the back of the bed and perpendicular to the gantry arm
- Hit OK
- Hit OK for Knife Offset without changing anything
- Hit OK for Twist Radius without changing anything
- When it asks Knife at +90? hit YES if knife edge is facing east wall of room (closest to knife cutter) and NO if it isn't
- Hit NO for test knife
-Make sure to match your origins when prepping your file.