If you have a laptop and need to print to a networked printer at the Law School, follow these instructions. For Mac instructions, please see MacOS: Wireless printing.
Printer IP Address
In order to complete these instructions you will need to know the IP address of the printer you are trying to add.
If you do not know the address, please contact Computer Services and provide the room number of the printer you are trying to add.
- Open Settings and click on Devices.


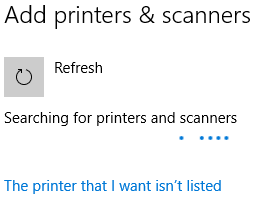
- Select Add a printer or scanner.

- It will begin searching for a printer. As soon The printer that I want isn't listed appears, click on it.
- You will then see a prompt to Find a printer by other options. Select Add a printer using a TCP/IP address or hostname and then click Next.

- You need to type in the IP address of the printer you want to Add. If you do not know the IP address, please contact Computer Services.
Once you've entered the correct IP address, click Next.
You should then see a message saying You've successfully added .......

Before clicking Next
It would be advisable to edit the printer name and add the building and room number it is in, to make it easier to remember where you have printed.

- At the next screen, make sure Do not share this printer is selected (it should be selected by default) and then click Next.

- You've successfully added your printer. Check the box "Set as the default printer" if you want to make it your default and then click Finish.

Feel free to click on Print a test page to make sure printing is working properly.
Related articles