If you want all your new documents to use a different default font, first open Word to a new blank document.
This information applies to Word 2013 and 2016
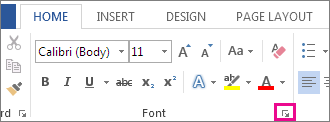
Select the font you want to use from the drop down in Home.
Click on the Font Dialog Box Launcher.
Under Font, click the font you want to use.
Under Size, click the size you want to use for body text.
Click Set As Default.

Click All documents based on the Normal.dotm template.
Click OK twice.
Now all new documents will use that font, unless you start with a custom template. To use a different font for one document, follow the same steps, but in step 5 click This document only.
Changing the font of other Styles
Alternatively to change to font for more than just the "Body" you can use similar steps to change the Styles
- Click on the Styles Dialog Box Launcher.

- If the Style you want to modify isn't listed, click on the Manage Styles button.

- Select the Style you want to modify and click on the Modify button.

- Change the Formatting to the settings you want.
Click on "New documents based on this template".
- Click OK twice.
If the default font setting doesn’t stick
The permission settings could be locked or some add-ins changed the default font back to the original font. If that’s happening, here are some things to try.
Check permissions
Click the Start button.
In the Search box, type Normal.dotm and click Search.
Right-click Normal.dotm, and click Properties.
Click the General tab, and make sure Read-only isn’t checked. If it’s checked, uncheck it.
- Click OK.
Related articles