There are not any microphones in the room.
You will need to checkout these items unless you have your own.
You will need Mic Stands and Headphones
It is recommended to use the same microphones your used on set to record your foley and ADR
But if you are not sure what to use. . . .
We recommend the following mics:
Neumann TLM 103 or U87
Audio Technica 4050 or 4033
You will also need a Mic Stand and Mic Clips and Pop Filter -
XLR Cables and Headphones
make sure you check those out too
| Click on Computer to Start the system |
|
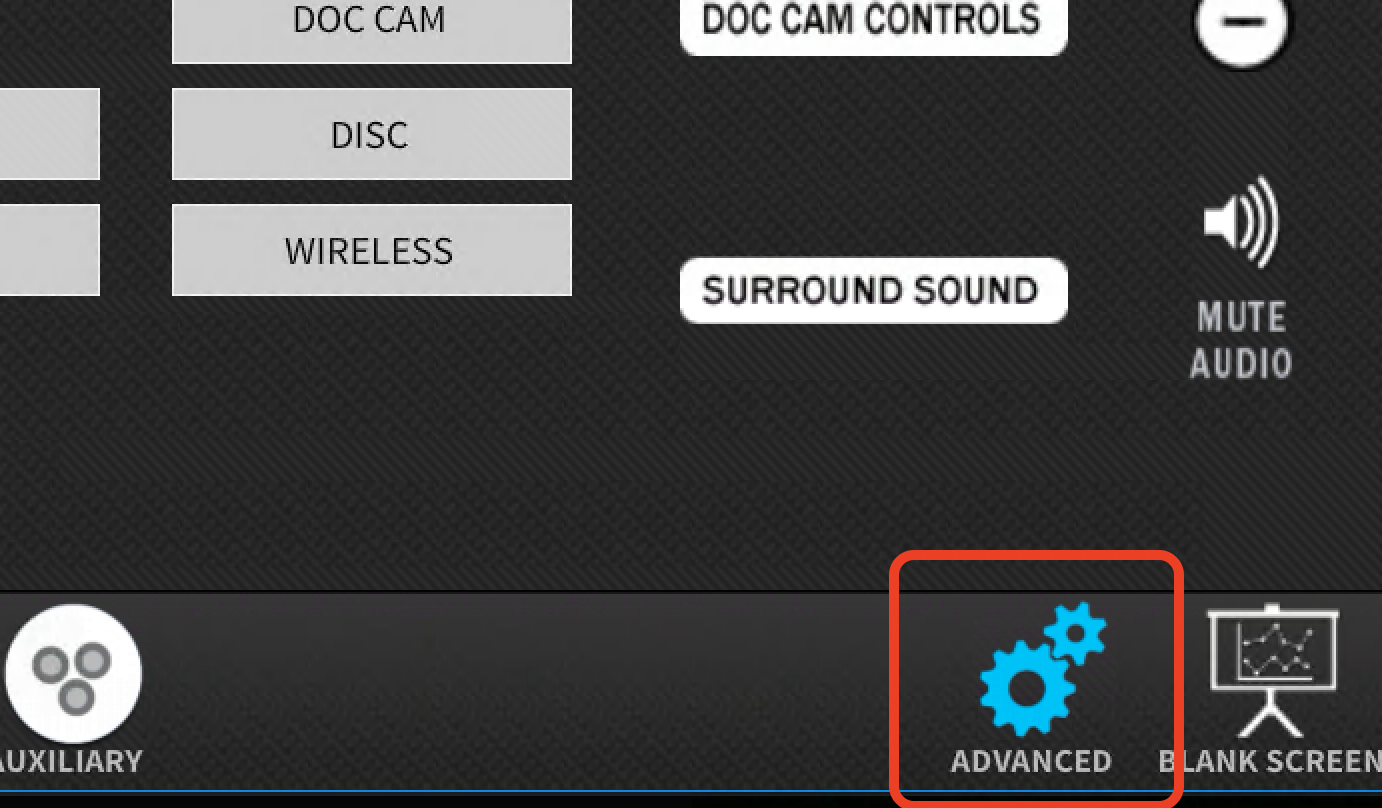
| Then click on Advanced |
|
| Then click on Surround Sound |
|
For ProTools audio output choose Mix Station Discreet Audio Output (PROTOOLS) Projector input choose HDMI Mix Station Program |
|
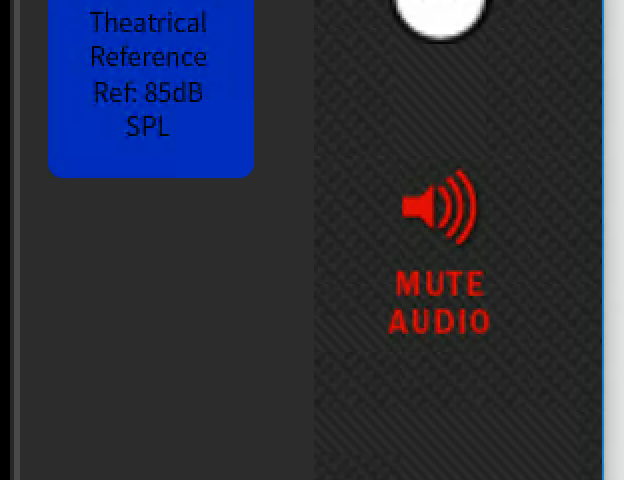
VERY IMPORTANT when you are recording you need to MUTEthe Crestron System or you will get BAD FEEDBACK
|
|
Locate the snake under the platform in front of the Mix Desk Plug your mic into one of the first 4 inputs of the mic snake. |
|
| Log into the mix station computer |
|
| Open the application called Focusrite Control |
|
Then > Click on >File Load Snapshot |
|
Navigate to the Focusrite CMB4.122 Studio C ADR.ff Go to >tempstorage>templates> Focusrite CMB4.122 Studio C ADR.ff |
|
Now go back to ProTools Application setup Open the ADR Template in the "Templates" folder on the "tempstorage" Drive Open UT_ADR_Template.ptx |
|
Open the ADR Template in the "Templates" folder on the "tempstorage" Drive Open UT_ADR_Template.ptx |
|
This Message prompt will tell you that your audio is getting routed differently it is OK to click on NO you don't want a detailed report |  |
When the session opens> Go to >File>Save As |  |
| Choose a place to save your session on your Hard Drive and click OK |  |
SET THE INPUT ON THE TRACKS On the Track Labeled "ADR_001" Make sure that the input matches the mic input that you plugged your mic into on the "Snake." Click on A1 and change it to A1, A2 or A3 or A4 depending where you plugged in on the "Snake" |  |
SET THE OUTPUT ON THE TRACKS Click on "Main" and set the output to Main (5.1>A 1-2 Stereo)
|  |
| |
| Plug Headphones into the headphone splitter. This device is located under the desk to the right in the rack |
|
The headphone jacks 1-4 control the volume for the "Talents" headphones that are plugged into the snake
|
|
Plug your headphones into the headphone amp 5-8 under the rack under the console and adjust the "Input Level" so you can hear audio in your headphones comfortably once you start testing levels coming into ProTools later in this doc. |
|
VERY IMPORTANT when you are recording you need to MUTEthe Crestron System or you will get BAD FEEDBACK
|
|


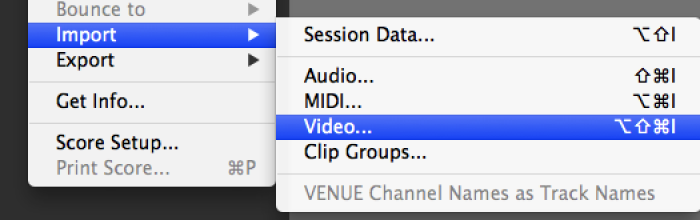
Import the QuickTime movie to chase in the ProTools project.
YOUR VIDEO NEEDS TO preferably be a 1080 DNxHD QUICKTIME SEE THIS WIKI AVID- Export a AVID DNxHD 23.98 Quicktime
Next Import the video into the project |
|
Navigate to the video file that you want to view in the ProTools session |
|
Choose New Track |
|
Choose to import at Session Start |
|
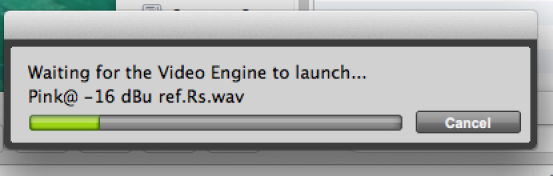
Choose to enable the Video Engine |
|
If you would like to use the audio off the video file choose to save it to the default Audio Drive folder
|
|
Video Engine will launch and you should be able to see the image on the projector |
|
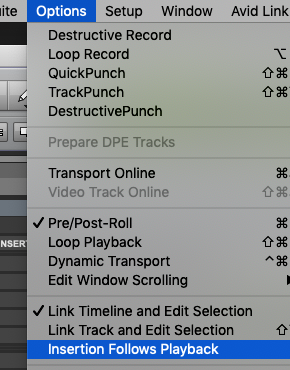
| Next Go to >Options>turn on Low Latency Monitoring |
|
| Make sure that Insertion Follows Playback is OFF unchecked |
|
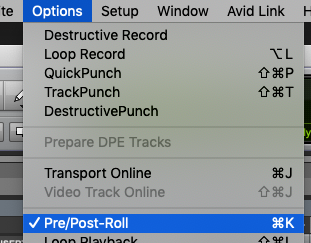
| Also>Options>Pre/Post Roll is checked = ON |
|


Next set Levels coming into protools from the mics connected to the Mic Snake. Open Focusrite Control in the Applications Folder |
|
| Next re-load the Focusrite snapshot to make sure the input and output routing is correct |
|
Navigate to the saved snapshot tempstorage>Templates>Focusrite CMB4122 Studio C ADR.ff file |
|
Click on Device Settings Choose the Analogue input you are connected to on the SNAKE in our example we are connected to INPUT 1 Select - Mic Input +48 if your mic needs phantom power then drag the orange circle around the circle to adjust input levels HINT drag up and down and the input level will increase and decrease |
|
To see input levels have the talent test the volume while you are watching on the Focusrite input levels and adjust as needed | 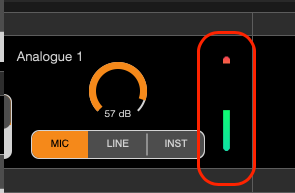 |
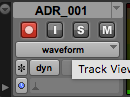
To record your ADR, Record Arm the ADR_001 track. It should Flash Red when you press the record button |
|
|
|
Place the marker where you wish to record and click Record Click and drag to select a portion you want to record |
|
|
|
| The track will turn RED and start recording |
|
To consolidate your files when you are finished recording you need to save them on to your hard drive. Go to >File>Save Copy In |
|
The next menu will come up and choose the "Session Format" allowing you to choose the current version running or a previous version of the software. |
|
Choose where you want to save the session copy and audio files |
|


- protools2
- protools3
- protools5
- additional
- studio_4b_control
- studio_4b
- cmb4_108
- cmb4_106
- cmb4_113
- cmb1_106b
- cmb4_136
- cmb4_111
- kona
- cmb4_148
- cma5_131
- cmb4_122
- cmb4_134
- cmb4_138
- cmb4_142
- cmb4_144
- cmb4_150
- audio
- adr
- looping
- dialog
- replacement
- automatic
- recording
- protools
- automated
- preamp
- amp
- pre
- -
- how
- to
- record
- foley
- sound
- or
- in
- cmb
- 4122
- 4112a
- 4112b
Overview
Content Tools