Command Quick Reference
| Command | Function | Example of use |
|---|---|---|
| C1 | Automatic Tool Changer (CNC #2 ONLY) | Chooses a new bit (1-9) from the Tool list. |
| C2 | Z-axis Calibration | Zero the Z-axis with the help of the aluminum plate. |
| C3 | Home Calibration | Carriage will 'Home' itself to 0,0 |
| C5 | Spindle Warm-Up Sequence | Spindle will cycle from low, med, high to warm-up, Takes 6-Minutes. Only required for the first cut of the day. If others are using the CNC prior to you; this has already been done. |
| J2 | Dual-Axis Jog (X,Y) | Jogs the carriage by 2-axis, using the format X,Y Example: enter 'j2 12, 24' to send the carriage to 12"-x and 24"-y on the bed. |
| JX | JY | JZ | Single-Axis Jog (X, Y, OR Z) | Jogs the carriage by 1-axis, specify which axis by 'JX' or 'JY' or 'JZ' |
| JZ | Sets temporary 'Home' position | Change the 0,0 reference point from the default corner to a new location. |
Input Quick Reference
| Input | Function | Example of use |
|---|---|---|
| 1 | Aluminum Z-plate | Only on CNC 1; for manual Z-axis calibration |
| 2 | X-axis Proxy | Proximity sensor for X-axis |
| 3 | Y-axis Proxy | Proximity sensor for Y-axis |
| 4 | Emergency Stop Button | Big red Emergency STOP button located above the workstation |
| 5 | ATC Z-plate | Only on CNC 2; for automatic tool changer |
Process
Double-check that the bit you are using is the exact type of bit mentioned in the CNC Templates page. If you don’t use the right bit, your part will absolutely not come out correctly.
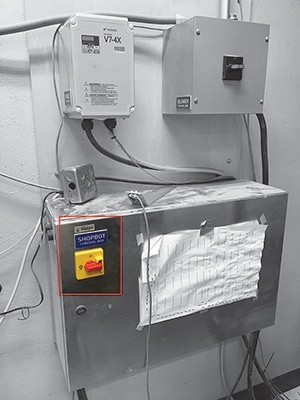
Turn on the Shopbot using the red switch on the control box.


Press the blue reset button above the computer.
This initiates the Shopbots carriage drive motors for operation.
- Verify the spindle is now turned on by checking the fan above the spindle.
Machine 2 has a green-light to verify spindle is turned on.

- Launch the Shopbot control software on the CNC workstation computer.
Type 'sb3' in the start menu or open the application shortcut on the desktop.
if you don’t see the full version with command console, click the question mark and “Switch to FULL”
Clear Shopbot bed of all stock material, sawdust and other obstructions.
Enter command C3
The Shopbot will perform it's 'Homing' function to calibrate it's X,Y location to a 0,0 reference point.CNC #2 will also automatically calibrate it's Z-axis.
CNC #1 does not have automatic Z-axis calibration so we will need to perform this function
Enter command 'J2 12,12'.
This will move the carriage 12" inwards on both X,Y axis and will give you a surface to perform the Z-axis calibration.- Locate the aluminum plate hanging on the wall.
- Place the aluminum plate on the CNC bed, directly under the spindle.
Do not place your stock materials on the bed yet! - Ensure that 'input 1' is green on the Shopbot software.
Input 1 = aluminum calibration plate for Z-axis - Enter command 'C2' to run the Z-axis calibration. A warning box will pop up, once you verified the aluminum plate is under the spindle bit press 'OK'.
The spindle will lower to the metal plate, making contact and calibrating the Z-axis. Your material should not be placed on the bed at this point. - Once the function is complete, place the aluminum plate back on the wall mount.
- Enter command 'JZ 4' to raise the spindle height to ensure you clear your materials while jogging/loading
If your material is 3" high, use command 'JZ 4' to clear your materials by an additional inch.- CNC #1 has a maximum spindle height of 10"
- CNC #2 has a maximum spindle height of 5"
- Next we want to move the carriage to a safe location to provide space for loading our stock material. Enter command 'J2 48, 48' to jog the carriage. if more room is required for full size pieces use 'J2 96, 48'
- Place your stock material on the reference 0,0 origin of the bed.

- Check that the bleeder valve is OPEN

- Turn on the appropriate zones and close ones that your stock is not overlapped on.
Ensure you close zones not being used to provide better suction to the stock material.
- Turn on the Vacuum using the switch mounted to the wall.


Close the bleeder valve as long as at least one zone is open. (the bleeder valve is closed in the image below)

If your stock material is small you may need to cover additional table surface to block airflow of opened zone to provide the best suction.
Flat-boards are kept for this purpose between the CNC#1 and Wall.
Stock material must be at least 20" by 20"
- Give your stock material a good nudge to ensure it won't move. if it does, return to step 9.
- If you are the first use on this machine for the day; Enter command 'C5' to perform the spindle warm-up function; this will take 6 minutes to finish.
If there was an operator on the CNC reserved before your session you may skip this warm-up sequence. - Plug in your USB and Save your file to the Desktop of the workstation to ensure no errors occur during operation.
- Enter command 'FP' to load your file on the Shopbot software.
you may also navigate to File > Part file load. Ignore the yellow notepad window and click the green 'START' button.

- Pay close attention to what the dialog boxes tell you on these next steps
- If a box pops up asking if the right tool is in the spindle; verify that it is and click 'Yes/OK'
If a box pops up asking if you have Zero'd the bit; click 'Yes/OK'
- A window will then appear asking you to start the spindle. Do not hit ok on that window yet.
- Press the Green button to turn on the spindle. (See image)
Verify visually that the installed bit is now spinning, then proceed.
- Once the spindle is on and spinning we're ready to cut!
Click 'Yes/OK' and keep your hand near the red EMERGENCY SHUTDOWN button.
- Your job will now start! keep an eye on the cuts to ensure they look accurate to your original file. if you notice anything it is best to check that the installed bit is the selected bit in your file.
After the CNC is finished
Jog the spindle out of the way if it is blocking you from retrieving your work (j2 36,36 will move it 3 feet in both the x and y-direction).
Open the bleeder valve and close the zone valves. Your Stock will now be released from the CNC bed.

If no one is in the queue to use the machine after you, turn off the vacuum bed system and the Shopbot control box
Log off of the CNC computer
Use the nearby shop vacs and the power cord suspended from the ceiling near the table saw to vacuum the cnc bed and the surrounding areas. Don’t leave the CNC machine messy
Before operating the ShopBot CNC machine, make sure you have passed the CNC Router Certification Quiz and had an in-person CNC training. Contact soatechdesk@utexas.edu to find out more.
Command Quick Reference
C3: moves CNC all the way to the home position
C2: zero the Z-axis with the help of the aluminum plate
- C5: Spindle Warmup
Z2: Makes current position of spindle the 0,0 XY position
J2: Jog over to a specific X and Y position (example J2 10,10)
JX, JY, JZ: Jog to a specific location on a single axis (example, JZ 2)
Process
- Double-check that the bit you are using is the exact type of bit mentioned in the CNC Templates page. If you don’t use the right bit, your part will absolutely not come out correctly. This is also where you will find the speed setting for the spindle.
Turn on the Shopbot using the red switch on the wall
Press the blue reset button above the computer
Check that you can hear the fan above the spindle turn on
Run the shopbot control software by clicking on the start menu icon in the bottom left corner of the screen and search for Shopbot (if you don’t see the full version, click the question mark and “Switch to FULL”)
Clear bed of any material
Enter c3 command, the CNC will move to the home position
Move the spindle over the work bed approximately where your stock will be using the command j2 12,12
Grab the aluminum plate and touch the plate against the CNC bit. The input 1 should turn green on the Shopbot software. Make sure you see this before proceeding
Place the metal plate on the CNC bed, not on top of your stock.
Enter c2 and then press “ok” on the dialog box once you have double-checked that the aluminum plate is under the CNC bit.
The CNC will move the spindle down to touch the metal plate and zero the Z-axis to the level of the bed.
Put the metal plate back onto the CNC computer station.
Use the JZ command to move the z-axis to a height that is above the thickness of your stock, this will prevent the bit from crashing into your stock as you jog it around. For example, if you are using 3" foam you can use the command JZ 4 to move the z-axis above where your stock will be
Move the spindle out of the way by typing in JX 48 which will move the gantry of the CNC out of the way.
Place your stock on the bed so that the origin of your stock is oriented along the x and y-axis at the 0,0 position
Double-check that the bleeder valve is open
Turn on the appropriate zone valves and close zone valves that do not overlap the workpiece. For most parts, you will likely only need one or two zone valves open
Turn on the vacuum by turning the switch located on the gray box to the right of the spindle display
Close the bleeder valve as long as at least one zone valve is open. (the bleeder valve is closed in the image below)
If your workpiece is small it might not be held down to the table well enough. There should be sheets of hardboard and plywood located next to the CNC that you can use to fill in the empty space around your model zone. Reference the image below.
Push your workpiece firmly to confirm that it won't move. If it does move, re-adjust the pieces of hardboard to cover more of the zone that your material is on.
We will load your shopbot file by going to File > Part File Load and navigating to your file. I recommend dragging your file beforehand from your USB to the desktop
A yellow window will appear. Drag it out of the way.
Click the big green START button on the screen

- A few pop-up boxes will appear. If a box pops up asking if the right tool is in the spindle, click yes/ok.
- If a box pops up asking you if you have zero'd the bit, hit ok/yes.
A window will then appear asking you to start the spindle. Do not hit ok on that window yet.
Look at the spindle control box to the right of the computer station and make sure the number indicates 150. If it is not, use the up and down arrows to set it to 150.
Press the green start button right above the CNC computer. The spindle will turn on
Let the spindle run at 150 for 2 minutes.
Increase the spindle speed to 225 and run for another 2 minutes
Increase the spindle speed to 266 and run for another 2 minutes
Now you can hit OK on the window that popped up on the computer screen. If you see any additional dialog boxes that appear, hit OK on them as well

The CNC will start moving and cut your part
After the CNC is finished
Jog the spindle out of the way if it is blocking you from retrieving your work (j2 36,36 will move it 3 feet in both the x and y-direction).
Open the bleeder valve and close the zone valves. Your workpiece will now be released from the CNC bed.
If no one is in the queue to use the machine after you, turn off the vacuum system and the shopbot control box
Log off of the CNC computer
Use the nearby shop vacs and the power cord suspended from the ceiling near the table saw to vacuum the cnc bed and the surrounding areas. Don’t leave the CNC machine messy