To ensure the integrity of your STLs, they each must be repaired individually within Netfabb.
- Launch Netfabb
- Select the Raise3D Pro3
- If your STL is greater than 300mm in any direction, select the Raise3D Pro3 Plus

- Click "Open"
- The build volume for the Raise3D printer will appear

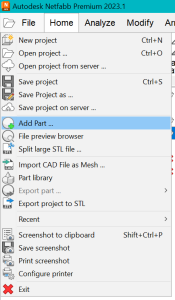
- Click "File" & "Add Part"
- Select your STL file
- Set the tessellation level to Medium accuracy

- Check the Automatic Part Repair box
- Set to Extended repair

- Click Add Parts
- Visually inspect your model to check for any unintended changes made by the automatic repair
- Click File, then Export project to STL

- Click Save
- Now you're ready to learn How to Create an Idea File
- If you haven't yet, learn How to Install ideaMaker
Related articles
| Content by Label |
|---|
| showLabels | false |
|---|
| showSpace | false |
|---|
| cql | label = "how-to" and label = "3d" and label = "student" and space = currentSpace() |
|---|
|