Once you have ideaMaker installed, you can create an .idea file to submit to the Technology Lab. In this guide, we will go over importing one or multiple models in ideaMaker, how to orient for a successful print, and how to save that as a .idea file type. It is important to note the school's 3D printing policy requires each part to be its own STL file, and each file must be repaired in Netfabb. With Rhino, you will need to export each individual component to its own STL file, then you may add multiple STL models to one .idea group file. If your scale is too large for the 3D print bed, you must section it your model into manageable pieces and submit multiple .idea group files. Our goal is to have the fewest groupings possible and to optimize the print bed by orienting and arranging our models.
Please see this graphic for an explanation of the terminology.

Step-by-step guide
- Launch ideaMaker
- Click "Import Models"
- Select your STL file(s)*
- Click on each model and ensure there are no errors listed in the bottom right for each part
- Errors will be identified by a color change in the part
- Green check means good to go
- Orange exclamation point is warning that the model may have an issue printing
- If you run into errors, we recommend returning to your source file within Rhino to correct the problem
- Non-manifold edges are a common issue
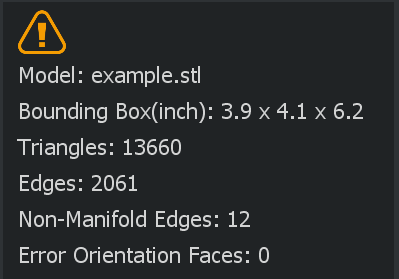
- We won't print an .idea file with warnings on the models
- E-mail trig@utexas.edu if you run into issues with this step
- If you run into errors, we recommend returning to your source file within Rhino to correct the problem
- Green check means good to go
- Errors will be identified by a color change in the part
- Verify the scale
- Scaling models will always be on the submitter
- Orient your models
- We are looking for a stable footprint to start the print
- For example, a side that is flat or without major details should be face-down
- The technology lab will use additional support pillars to ensure a successful print when doing something like a Sphere or more unconventional shapes
- When you're done adding and orienting parts
- Select "File"
- Click "Save Idea File As"
- Make sure to use the naming syntax available on our wiki**
- Now you're ready to submit your file(s)!


*If you get a warning stating your file is in millimeters when it should be in inches or vice-versa, click "Yes" to allow the software to make that change. STL 'part' files do not have the unit type embedded into the file, only the values. so, while it sees a 10x8x5, it doesn't know if that is in millimeters or inches.

**Items without the correct naming syntax will be declined, and the submitter will be placed at the end of the queue.
Naming Syntax
YYYY-MM-DD_EID_Group-#
Examples: 2023-01-09_eid123_Group-1, 2023-01-09_eid123_Group-2
Terminology
Parts
Parts are individual components of a model. Some designs will have one part, while others will have multiple. These parts must be exported to their own STL file, creating part 1STL, part 2STL, etc.
Groups
Groups are a cluster of parts containing one or multiple STL models created by the student. These are arranged within the ideaMaker program to fit the footprint of our machines.
Idea File
This idea file is an export of your previously mentioned Groups. Some jobs may be large enough to merit 2 Idea files if all parts cannot fit onto a single Group.
Related articles